
How to Migrate Your Custom GPTs to ChatGPT Work Before the Deadline: Complete Playbook for Preserving Your AI Workflows
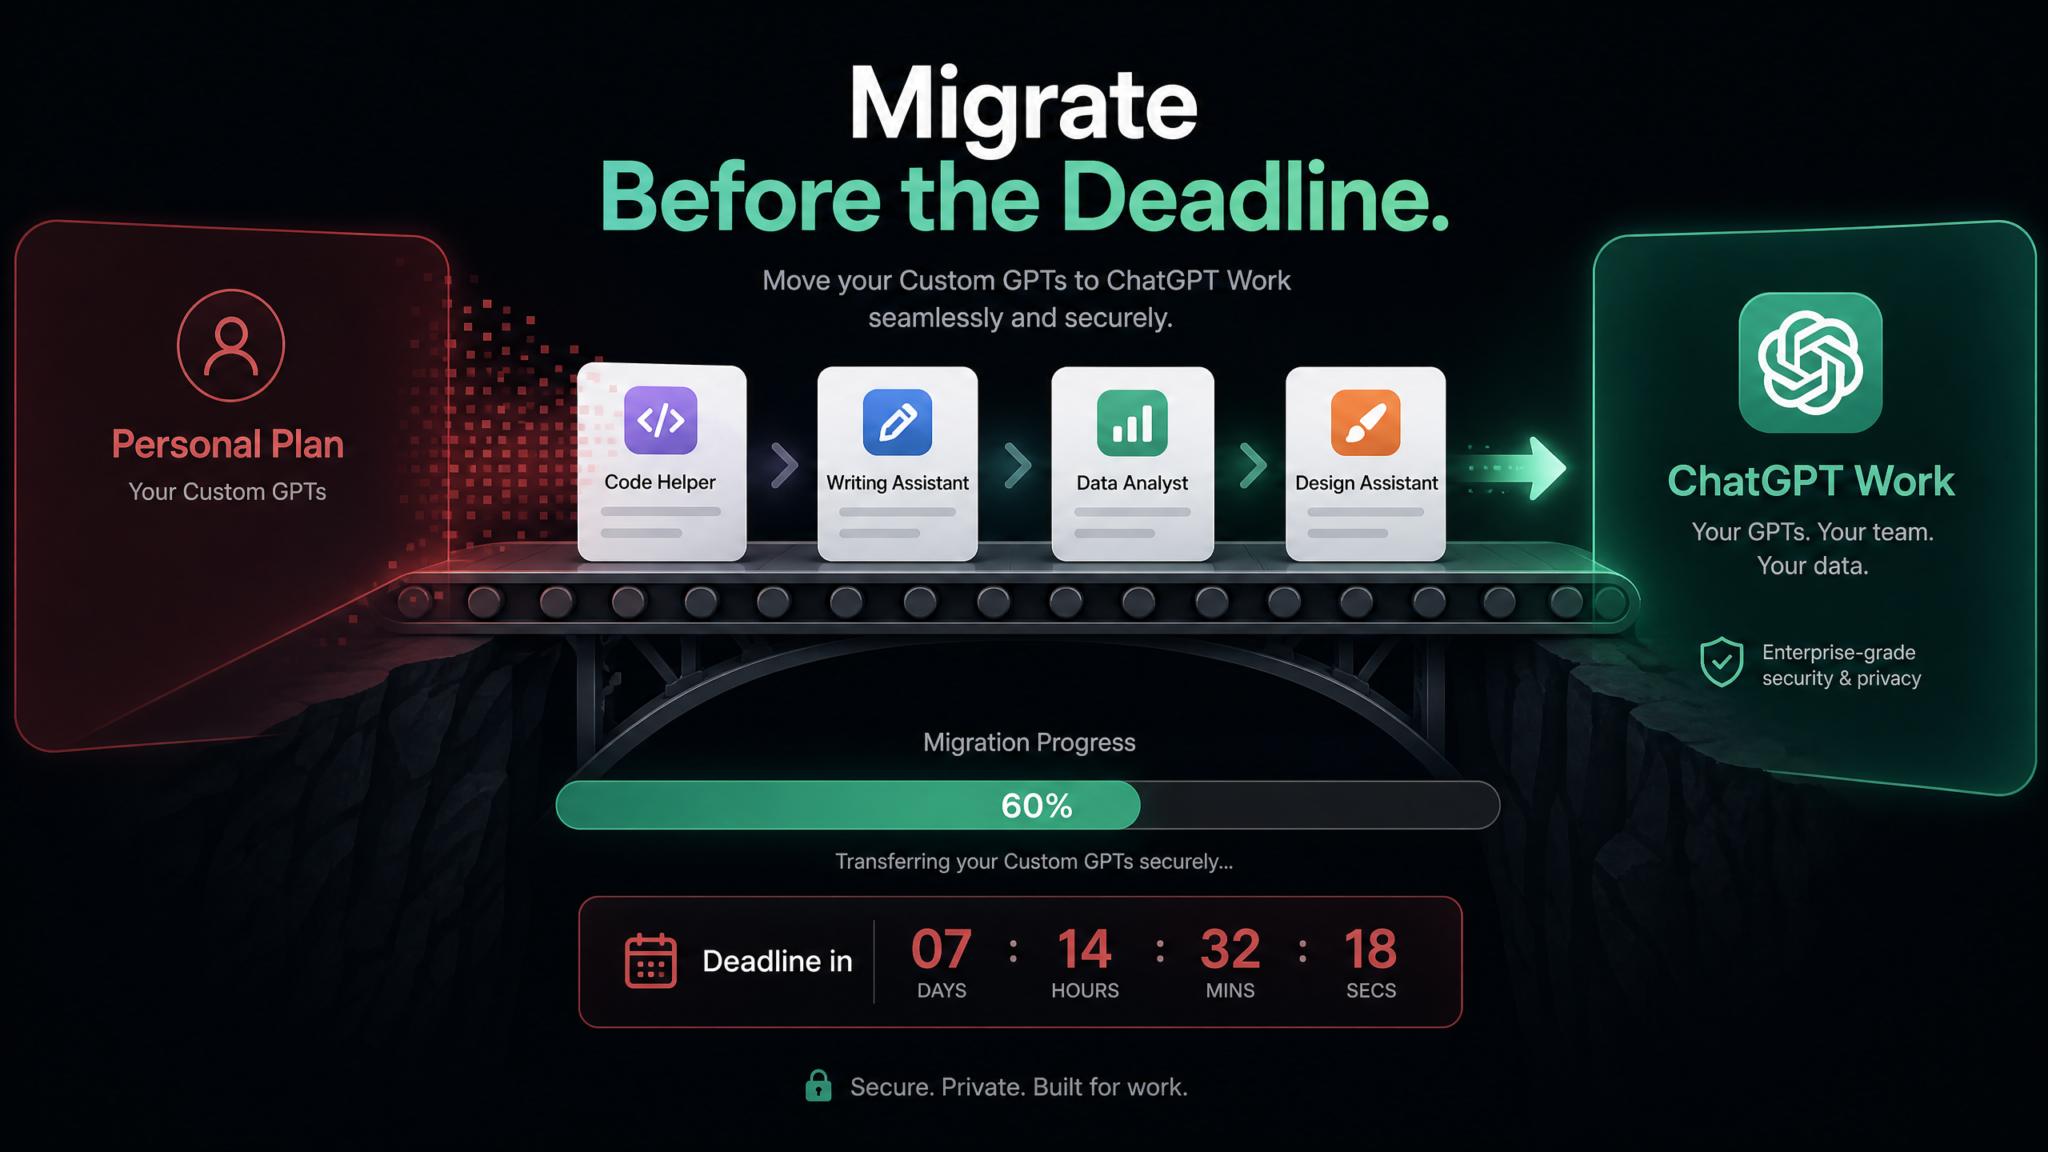
If you have spent months building custom GPT configurations that power your business processes, client workflows, or team operations, the migration to ChatGPT Work is not something you can afford to treat casually. OpenAI’s rollout of ChatGPT Work — its dedicated enterprise and professional tier — introduces new capabilities, tighter admin controls, and enterprise-grade security. But it also means that custom GPTs built under personal or Plus accounts need to be carefully inventoried, exported, and recreated in your new workspace environment before transition deadlines lock you out of your current configurations. This playbook walks you through every phase of that migration with the precision and depth the task demands.
Understanding the Deadline and What Is at Stake
OpenAI has been progressively migrating its product lines, consolidating subscription tiers, and introducing ChatGPT Work as the designated environment for professional and organizational use cases. For anyone running a custom GPT that touches revenue-generating processes — client intake forms, automated report generation, API-connected data pipelines, or internal knowledge bases — the deadline to migrate is not a suggestion. Missing it can mean losing access to configurations, having GPTs become unavailable to your team, or discovering that third-party API integrations stop functioning because authentication credentials tied to your old account no longer work.
The urgency is compounded by the fact that custom GPT configurations are not automatically transferred between account types. OpenAI does not provide a one-click migration tool that moves your GPTs, their system prompts, knowledge files, and API action schemas from a Plus account into a Work workspace. Every element must be manually inventoried, documented, and rebuilt. For a single-person operation with two or three GPTs, this might be a few hours of work. For a team with 20+ GPTs serving different client personas and internal functions, this is a structured project that requires careful planning.
This playbook treats migration as a seven-phase project with defined deliverables at each stage. Work through it sequentially. Each phase builds on the artifacts produced in the previous one.
Key Insight: Based on community reports from developers and agencies managing multiple GPT deployments, the most common migration failure point is not the system prompt — it is the API action schema and the OAuth credentials tied to it. Plan significantly more time for Phase 5 than you think you need.
Phase 1: Inventory Your Custom GPTs
Step 1.1 — Listing Every GPT Across All Accounts
Before you can migrate anything, you need a complete picture of what exists. This sounds obvious, but many organizations discover during this phase that GPTs have been created by multiple team members across multiple personal accounts, that some GPTs are publicly listed in the GPT Store while others are private, and that some GPTs exist as near-duplicates created during iterative testing that were never cleaned up.
Start by logging into every account that may have custom GPT configurations — not just your primary account, but any team member who might have created a work-related GPT on their personal subscription. Create a master inventory spreadsheet with these columns:
- GPT Name
- Account Owner (which email/account it lives on)
- Creation Date
- Last Modified Date
- Visibility (private, link-only, public/GPT Store)
- Has Knowledge Files (yes/no, count)
- Has API Actions (yes/no, count)
- Has Custom Authentication (none, API key, OAuth)
- Active Users / Usage Frequency
- Migration Priority (critical, high, medium, low)
Step 1.2 — Categorizing by Type
Not all custom GPTs carry the same migration complexity or business risk. Categorizing them by type before you begin the technical work helps you allocate effort intelligently and sequence the migration in order of business impact.
Personal Productivity GPTs
These are typically low-complexity GPTs built for individual use — a writing assistant calibrated to your tone, a summarization GPT trained on your company’s formatting preferences, a research assistant with a curated list of sources in its knowledge base. They usually have no API actions and their system prompts are relatively simple. Migration complexity: Low.
Client-Facing GPTs
These are GPTs shared via link with clients, embedded in client portals, or published under your organization’s brand in the GPT Store. They may carry brand-sensitive system prompts, proprietary knowledge files (service catalogs, pricing documents, internal policies), and potentially API connections to CRM or ticketing systems. These are high-stakes because they are externally visible — any downtime or behavioral change after migration is immediately noticed. Migration complexity: High.
Team Tools GPTs
Internal GPTs that multiple team members use daily — HR policy assistants, engineering troubleshooting guides, sales objection handlers, project intake processors. These are often the GPTs with the most elaborate system prompts because they have been refined through weeks of internal feedback. They may also have knowledge files that are updated regularly. Migration complexity: Medium to High.
API-Connected GPTs
These are the most technically complex. They use OpenAI’s Actions framework to connect to external APIs — pulling live data from a database, posting records to a CRM, triggering webhooks in automation platforms like Make.com or n8n running at endpoints like https://hooks.yourproject.io/gpt-trigger, or querying REST APIs. Every API connection requires its own migration sub-task. Migration complexity: Very High.
Step 1.3 — Identifying Dependencies and Integrations
For each GPT in your inventory, document its dependency tree. A dependency is anything outside the GPT itself that it relies on to function correctly. This includes:
- External APIs: Every endpoint URL that appears in your action schemas
- Authentication services: OAuth providers, API key issuers, credential managers
- Knowledge file sources: Where did the uploaded PDFs, CSVs, and text files come from? Are they versioned? Who maintains them?
- Downstream systems: If the GPT posts data somewhere, what receives it? Does that receiving system have any GPT-specific configuration?
- Sharing links: If you have distributed a GPT link to clients or embedded it in a product, that link will change when you recreate the GPT in the new workspace
- Conversation starter dependencies: Do your conversation starters reference specific data or assume a particular context that may behave differently under different model versions?
Document every dependency explicitly. This dependency map is what separates a clean migration from a chaotic one. ChatGPT Custom GPT Actions API Integration Guide
Phase 2: Export All Configurations
Step 2.1 — Downloading System Prompts
Your system prompt is the intellectual core of your custom GPT. It encodes your instructions, persona, constraints, output formats, and behavioral rules. To access it, open each GPT in edit mode, navigate to the Configure tab, and copy the entire contents of the Instructions field into a plain text file.
Name each file clearly: gpt-name_system-prompt_v1_YYYY-MM-DD.txt. Store all exported configurations in a dedicated project folder on your cloud storage. Do not rely on browser copy-paste as your only backup — paste the contents into a document in your version-controlled repository if you have one.
As you export, annotate anything in the system prompt that references external resources, account-specific identifiers, or hardcoded values that will need to change in the new environment. Common examples include hardcoded API endpoint URLs referenced in instructions (separate from the action schema), team member names or email addresses used as examples, and references to pricing or dates that may be outdated.
Step 2.2 — Downloading Knowledge Files
Knowledge files uploaded to a custom GPT are stored in OpenAI’s file system and associated with that specific GPT. They are not directly downloadable from the GPT configuration interface in all cases. Before your account migration window closes, you need to ensure you have accessible copies of every file you uploaded.
The reliable approach is to maintain a source directory outside of ChatGPT entirely. For each knowledge file in your inventory, locate the original source document. If the original is no longer available and the file only exists inside your GPT, use the OpenAI Files API to retrieve it programmatically:
curl https://api.openai.com/v1/files \
  -H "Authorization: Bearer $OPENAI_API_KEY"
This returns a list of all files associated with your API account. For files associated specifically with your GPT configurations (which are stored under your account), note the file IDs. You can then retrieve their content using:
curl https://api.openai.com/v1/files/{file_id}/content \
  -H "Authorization: Bearer $OPENAI_API_KEY" \
  --output recovered_file.pdf
Create a knowledge file manifest for each GPT listing: filename, file ID, file size, upload date, and purpose/description. This manifest will guide the re-upload process in Phase 4.
Step 2.3 — Exporting API Action Schemas
API actions are defined using OpenAPI 3.x schema syntax within the GPT builder. To export them, open the GPT in edit mode, go to Configure → Actions, and for each action, copy the schema JSON or YAML in full. Save each schema as gpt-name_action-name_schema_v1.yaml.
Also document for each action:
- The authentication type currently configured (API key, OAuth, none)
- Where the API key or OAuth credentials are currently stored
- The base URL of the API being called
- Any custom headers defined
- The specific endpoints being invoked and their HTTP methods
Step 2.4 — Recording Conversation Starters and Settings
Copy all conversation starters from the Configure tab into your documentation. These are easy to overlook but important for user experience consistency after migration. Also document:
- The GPT’s name and description exactly as written
- The profile image (download it)
- Which capabilities are enabled (Web Browsing, DALL·E Image Generation, Code Interpreter)
- The visibility setting
Step 2.5 — Documenting Settings That Cannot Be Exported
Some configuration state is not exportable and must be manually reconstructed. Document these explicitly so nothing is forgotten during recreation:
- Sharing links: Your current GPT URL (e.g.,
https://chatgpt.com/g/g-abc123-your-gpt-name) will not transfer. Any embedded links in external systems need to be queued for update after migration. - OAuth app registration details: Client IDs and secrets from OAuth providers like Google, Salesforce, or HubSpot are tied to your account’s registered callback URLs. New callback URLs will be generated in the Work environment.
- Usage analytics: Historical conversation data and usage metrics are not portable.
- GPT Store listing details: Categories, reviews, and publication status are not transferable.
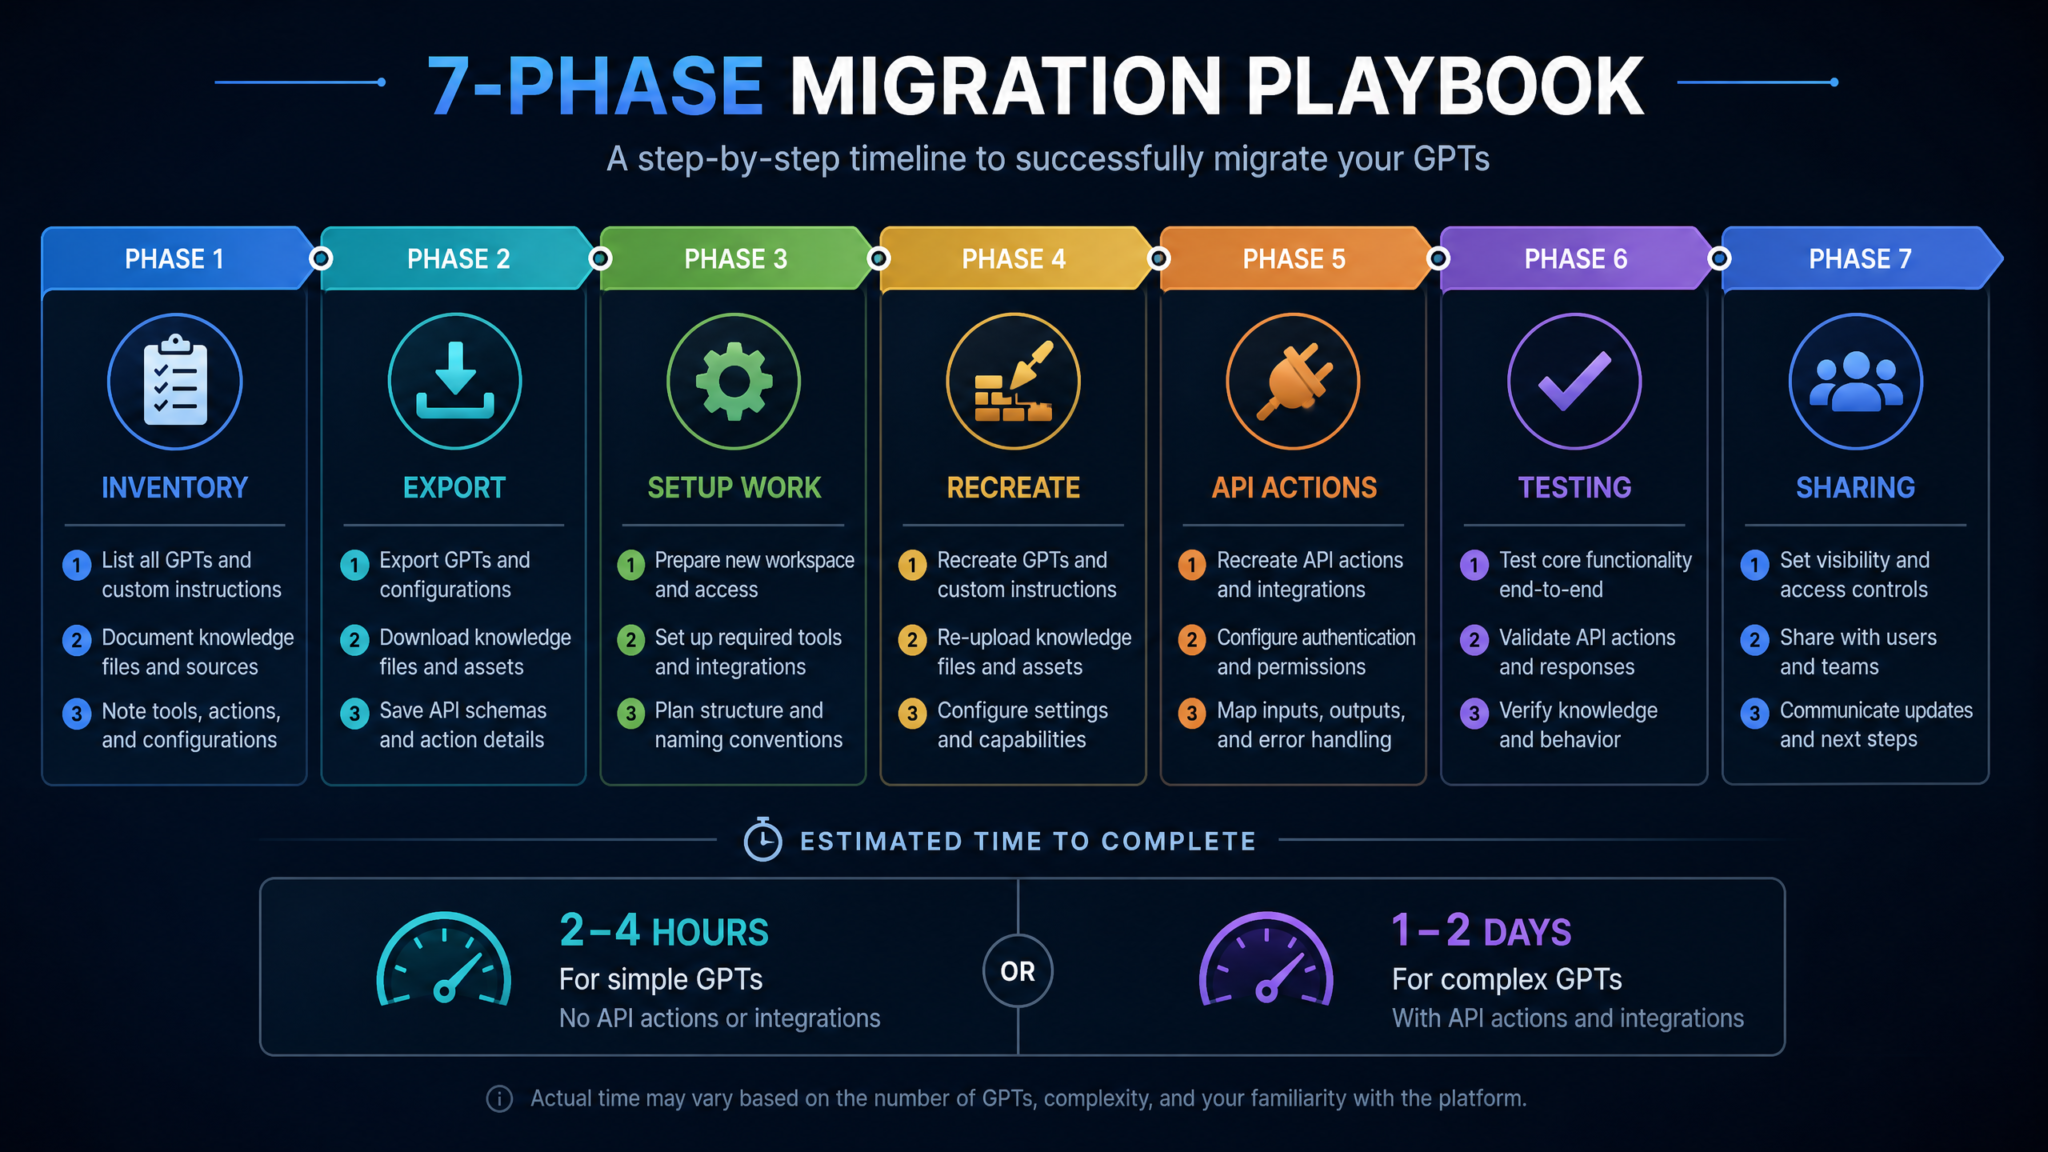
Phase 3: Setting Up ChatGPT Work
Step 3.1 — Choosing Your Plan Tier
ChatGPT Work comes in two configurations. The decision between them has downstream implications for how you manage GPTs, who has admin access, and what sharing capabilities are available.
| Feature | Work Individual ($25/mo) | Work Team ($30/user/mo) |
|---|---|---|
| Custom GPT creation | Yes | Yes |
| Internal GPT sharing | No (single user) | Yes (workspace-wide) |
| Admin console | Limited | Full |
| SSO/SAML integration | No | Yes (Enterprise add-on) |
| Usage analytics dashboard | Basic | Advanced |
| GPT permission management | N/A | Editor/Viewer roles |
| Conversation data controls | Standard | Enhanced (opt-out of training) |
| Priority access to new models | Yes | Yes |
If you are migrating GPTs that multiple people use or collaborate on, Work Team is the correct choice. The $5/user/month premium over Work Individual is justified by the workspace sharing infrastructure alone. ChatGPT Work Team vs Enterprise Plan Comparison
Step 3.2 — Workspace Configuration
Once your Work account is provisioned, complete these foundational configuration steps before importing any GPTs:
- Set your workspace name and domain: This affects how GPT sharing links appear and how team members are invited. Use your organization’s primary domain.
- Configure data controls: In Settings → Data Controls, verify that conversation data handling aligns with your organization’s data governance policy. For Work Team, confirm the opt-out-of-training setting is enabled if required by your clients or compliance obligations.
- Set up custom instructions at the workspace level: If there are baseline behaviors you want all GPTs in your workspace to inherit, configure workspace-level custom instructions before creating individual GPTs.
- Invite admin users first: Add co-administrators before adding regular users. Trying to configure admin permissions after users are already in the workspace introduces unnecessary complexity.
- Create user groups if applicable: If different teams will use different GPTs, create user groups now. Assigning GPT access to groups rather than individuals is far easier to manage at scale.
Step 3.3 — Admin Settings to Configure Before Migration
The admin console in Work Team has several settings that affect how custom GPTs can be created, shared, and used. Review and configure each of these before your GPT recreation begins:
- GPT creation permissions: Decide whether all workspace members can create GPTs or only admins. For most organizations, restricting creation to admins during the migration period prevents unauthorized duplicates.
- External GPT access: Determine whether team members can use GPTs from the public GPT Store or only internal workspace GPTs. This affects how you handle any public GPTs your team was previously using.
- API access controls: Confirm that the API keys used by your action-enabled GPTs will be manageable at the workspace level.
Phase 4: Recreating GPTs in Work
Step 4.1 — Establishing a Recreation Sequence
Recreate GPTs in reverse order of complexity: start with your simplest personal productivity GPTs (no knowledge files, no API actions), then team tools GPTs with knowledge files, then client-facing GPTs, and finally API-connected GPTs last. This sequence lets you develop familiarity with the Work environment’s GPT builder before tackling the configurations where mistakes are most costly.
For each GPT, follow this exact recreation procedure:
- Open GPT Builder in your Work workspace via Explore GPTs → Create a GPT
- Navigate immediately to the Configure tab (do not use the conversational builder — it is designed for initial creation, not precise recreation)
- Paste the GPT name, description, and system prompt from your exported documentation
- Enable the correct capabilities (Web Browsing, DALL·E, Code Interpreter) per your inventory notes
- Enter conversation starters
- Upload the profile image
- Handle knowledge files (see Step 4.2)
- Add API actions (see Phase 5)
- Save as private initially — do not share until testing is complete
- Record the new GPT URL and update your migration tracking spreadsheet
Step 4.2 — Handling Knowledge File Re-Upload
Knowledge file re-upload is straightforward but requires attention to file version control. Use the source files you identified in Phase 2 — not copies that may have circulated informally via email or messaging platforms, which may be outdated versions.
Important considerations during re-upload:
- File format matters: PDF and plain text files are indexed most reliably. If you have been using DOCX files, convert them to PDF before re-uploading to ensure consistent retrieval behavior.
- File size limits: Each file is currently capped at 512 MB with a 20-file maximum per GPT. If you are approaching these limits, consider consolidating related documents into single files or restructuring your knowledge base.
- Update stale content: The migration is an opportunity to update knowledge files that have become outdated. If your pricing guide uploaded 8 months ago is now inaccurate, fix it before re-uploading — not after.
- Test retrieval: After uploading knowledge files, run several test queries specifically designed to surface information from those files. Do not assume retrieval works correctly just because the upload succeeded.
Step 4.3 — System Prompt Audit During Recreation
Do not simply paste your old system prompt verbatim without reviewing it first. Migration is the right moment to fix issues that have accumulated over time. Check for:
- Hardcoded values that belong in knowledge files instead of the prompt
- References to the old GPT URL that appears in any sharing logic
- Instructions written for older model behavior that may be redundant or counterproductive with current models
- Overly restrictive negative instructions that were added as workarounds for previous model limitations
Phase 5: Handling API Actions and Webhooks
This phase deserves the most time and the most careful documentation. API actions are where migrations most commonly fail silently — the GPT appears to work, but the API connection is either broken, using stale credentials, or pointing at an endpoint that no longer accepts requests from the new account context.
Step 5.1 — Understanding What Changes When You Migrate
When you recreate an API-connected GPT in a Work workspace, several things change from the perspective of your external API:
- The GPT’s unique identifier changes — any external system that whitelisted your old GPT’s identity will need to be updated
- The OAuth callback URL changes — new format in Work uses different path structures
- If you were using API key authentication stored in the old GPT, you will need to re-enter those credentials in the new GPT
- Rate limits and concurrency behavior may differ under Work tier API usage patterns
Step 5.2 — Updating Callback URLs
For GPTs using OAuth authentication to connect to external services (Google Workspace, Salesforce, HubSpot, Notion, etc.), the OAuth flow requires a registered callback URL. In ChatGPT, this callback URL is provided by the platform and must be registered with your OAuth application.
The process:
- In your new Work GPT’s action configuration, add the OAuth authentication and record the new callback URL that ChatGPT provides. It will follow a format like:
https://chatgpt.com/aip/g-NEWGPTID/oauth/callback - Log in to the developer console of the OAuth provider (Google Cloud Console, Salesforce Connected Apps, etc.)
- Navigate to the registered OAuth application you created for your original GPT
- Add the new callback URL to the authorized redirect URIs list (do not remove the old one yet — keep both until the new GPT is fully validated)
- Save and allow propagation time (Google OAuth changes can take a few minutes; Salesforce changes may take longer)
Step 5.3 — Regenerating API Keys
For GPTs using API key authentication (Bearer token, custom header, or basic auth), the approach depends on your security posture:
Option A — Reuse existing keys: If your existing API keys are scoped appropriately and your security policy permits it, you can enter the same key in the new GPT’s action configuration. This minimizes the number of changes to downstream systems.
Option B — Issue new keys and rotate: The preferred approach from a security standpoint is to generate a new API key for the Work environment and deprecate the old key after confirming the new GPT is functioning correctly. This creates a clean audit trail and ensures the old GPT loses API access cleanly after cutover.
For services like internal APIs running at endpoints like https://api.myapp.dev/v2/gpt-actions, remember to update your server-side allowlists or CORS policies if they were previously scoped to allow only specific identifiers associated with your old GPT.
Step 5.4 — Rebuilding the Action Schema
Paste your exported schema directly into the Work GPT’s action editor. After pasting, use the built-in schema validator to confirm there are no parsing errors. Common schema issues that surface during migration:
openapi: "3.1.0"
info:
  title: Customer Lookup API
  description: Retrieves customer records by ID or email
  version: "v1"
servers:
  - url: https://api.myapp.dev
paths:
  /customers/{id}:
    get:
      operationId: getCustomerById
      summary: Get a customer by their unique ID
      parameters:
        - name: id
          in: path
          required: true
          schema:
            type: string
      responses:
        "200":
          description: Customer record returned successfully
Verify that the servers.url field still points to the correct base URL. If you have moved APIs to new infrastructure during this period, update the schema accordingly before saving.
Step 5.5 — Testing Third-Party Integrations
For each API action, run an explicit end-to-end test before marking it as complete. Do not trust that a successful schema import means the action will execute correctly. Test by:
- Opening the new GPT in a conversation
- Crafting a prompt explicitly designed to trigger the action
- Confirming the action is invoked (the GPT will display a disclosure that it is connecting to an external service)
- Verifying the response contains live data — not a cached or hallucinated response
- Checking your external system’s logs to confirm the incoming request was received and processed correctly
Phase 6: Testing and Validation
Testing is not a single activity at the end of migration — it is woven through every phase. But Phase 6 is where you conduct the formal, structured validation that determines whether a migrated GPT is ready to replace its predecessor.
Step 6.1 — Output Comparison Testing
For each migrated GPT, run identical prompts through both the original GPT (while it still exists) and the new Work version, then compare outputs systematically. Use a structured comparison grid:
| Test Prompt | Expected Behavior | Original GPT Output | Work GPT Output | Match? | Notes |
|---|---|---|---|---|---|
| Core use case prompt 1 | Format X, tone Y, specific data Z | [Record here] | [Record here] | Yes / No / Partial | |
| Edge case: ambiguous input | Clarifying question or graceful handling | [Record here] | [Record here] | Yes / No / Partial | |
| Knowledge file retrieval | Specific fact from uploaded document | [Record here] | [Record here] | Yes / No / Partial | |
| API action trigger | Live data retrieval from external API | [Record here] | [Record here] | Yes / No / Partial | |
| Refusal/constraint test | Declines out-of-scope request | [Record here] | [Record here] | Yes / No / Partial |
Acceptable partial matches include minor formatting differences and rephrasing that preserves semantic meaning. Unacceptable partial matches include missing data, incorrect citations from knowledge files, behavioral differences in constraint handling, or failed API actions.
Step 6.2 — User Acceptance Testing
For team tools GPTs, involve actual users before switching them over. The people who use these GPTs daily will notice behavioral changes that you might not catch in structured testing because you know what to expect. Brief testers with a simple guide:
- Use the new GPT for your normal tasks for 2-3 days before the official cutover
- Flag any instance where the new GPT behaves differently than expected, even if the output still seems acceptable
- Specifically test any workflow that you consider mission-critical
- Report both failures and unexpected improvements — both are important data points
Step 6.3 — Performance Benchmarking
If your GPTs are used in time-sensitive workflows, benchmark response latency. Work tier may have different performance characteristics than Plus depending on load and model routing. Measure:
- Time to first token for standard prompts
- Total response time for typical outputs
- API action round-trip time (GPT invokes external API, receives response, generates final reply)
If performance significantly differs, investigate whether it reflects model routing, API latency on your external services, or knowledge file retrieval overhead. Optimizing Custom GPT Response Speed and Retrieval Performance
Access 40,000+ AI Prompts for ChatGPT, Claude & Codex — Free!
Subscribe to get instant access to our complete Notion Prompt Library — the largest curated collection of prompts for ChatGPT, Claude, OpenAI Codex, and other leading AI models. Optimized for real-world workflows across coding, research, content creation, and business.
Step 6.4 — Validation Checklist
Mark each item before considering a GPT validated:
- ☐ System prompt pasted completely and accurately
- ☐ All capabilities enabled correctly
- ☐ All knowledge files uploaded and retrieval tested
- ☐ All conversation starters present and functional
- ☐ GPT name, description, and image match original
- ☐ All API actions imported and schema validated
- ☐ OAuth callback URLs updated and tested
- ☐ API keys entered and verified
- ☐ End-to-end API action test passed
- ☐ Output comparison testing completed
- ☐ User acceptance testing completed (team GPTs)
- ☐ Performance baseline documented
- ☐ New GPT URL recorded
- ☐ All external systems updated with new URL
Phase 7: Team Sharing and Permissions
Step 7.1 — Understanding Permission Levels in Work
ChatGPT Work Team introduces a proper permission model for custom GPTs that did not exist at the Plus level. There are two primary access modes:
- Can Use: The user can access and converse with the GPT but cannot view or modify its configuration, system prompt, knowledge files, or action schemas.
- Can Edit: The user has full access to the GPT’s configuration — equivalent to owner-level access on a personal account. Reserve this for GPT administrators and the team members responsible for maintaining each GPT.
The vast majority of your team should have Can Use access. Can Edit should be limited to the person responsible for each GPT and their designated backup. Giving broad Can Edit access is the fastest way to end up with undocumented system prompt changes that break your carefully validated configurations.
Step 7.2 — Sharing Migrated GPTs with Team Members
In Work Team, sharing is handled through the workspace GPT library rather than individual links. To share a GPT with your team:
- Open the GPT in edit mode
- Navigate to the Share section
- Set visibility to Workspace to make it available to all workspace members, or select specific users or groups for restricted access
- Assign appropriate permission levels per the above guidance
- Publish to the workspace library
After publishing, notify users through your normal internal communications channel that the new GPT is available. Include the GPT name as it appears in the workspace library, a one-sentence description of what it does, and any behavioral changes they should be aware of compared to the version they were using previously.
Step 7.3 — Managing Edit vs. Use Permissions at Scale
For organizations with many GPTs and many users, managing permissions individually becomes impractical. The scalable approach is to use user groups:
- Create a GPT Administrators group — members of this group get Can Edit access to all GPTs
- Create functional groups aligned with departments or use cases (e.g., Sales Team, Engineering, Customer Success)
- Assign GPT access at the group level — when someone joins or leaves a department, updating their group membership automatically updates their GPT access
Step 7.4 — Updating External Links and Embedded Access Points
If any of your migrated GPTs were previously accessed via direct link (particularly client-facing GPTs), those links have changed. Audit every location where your old GPT link appeared:
- Website pages, help centers, or client portals where the link was embedded
- Email sequences or automated onboarding flows that contain the GPT link
- Slack bots, internal wikis, or project management tools that linked to the GPT
- API documentation or developer guides that referenced the GPT URL
- Any QR codes generated from the old link
Update each of these systematically. Consider setting up a redirect from your own domain (e.g., https://tools.yourproject.io/gpt-assistant → new ChatGPT Work URL) so that you control the link surface and can update the destination without touching every published reference again in the future.
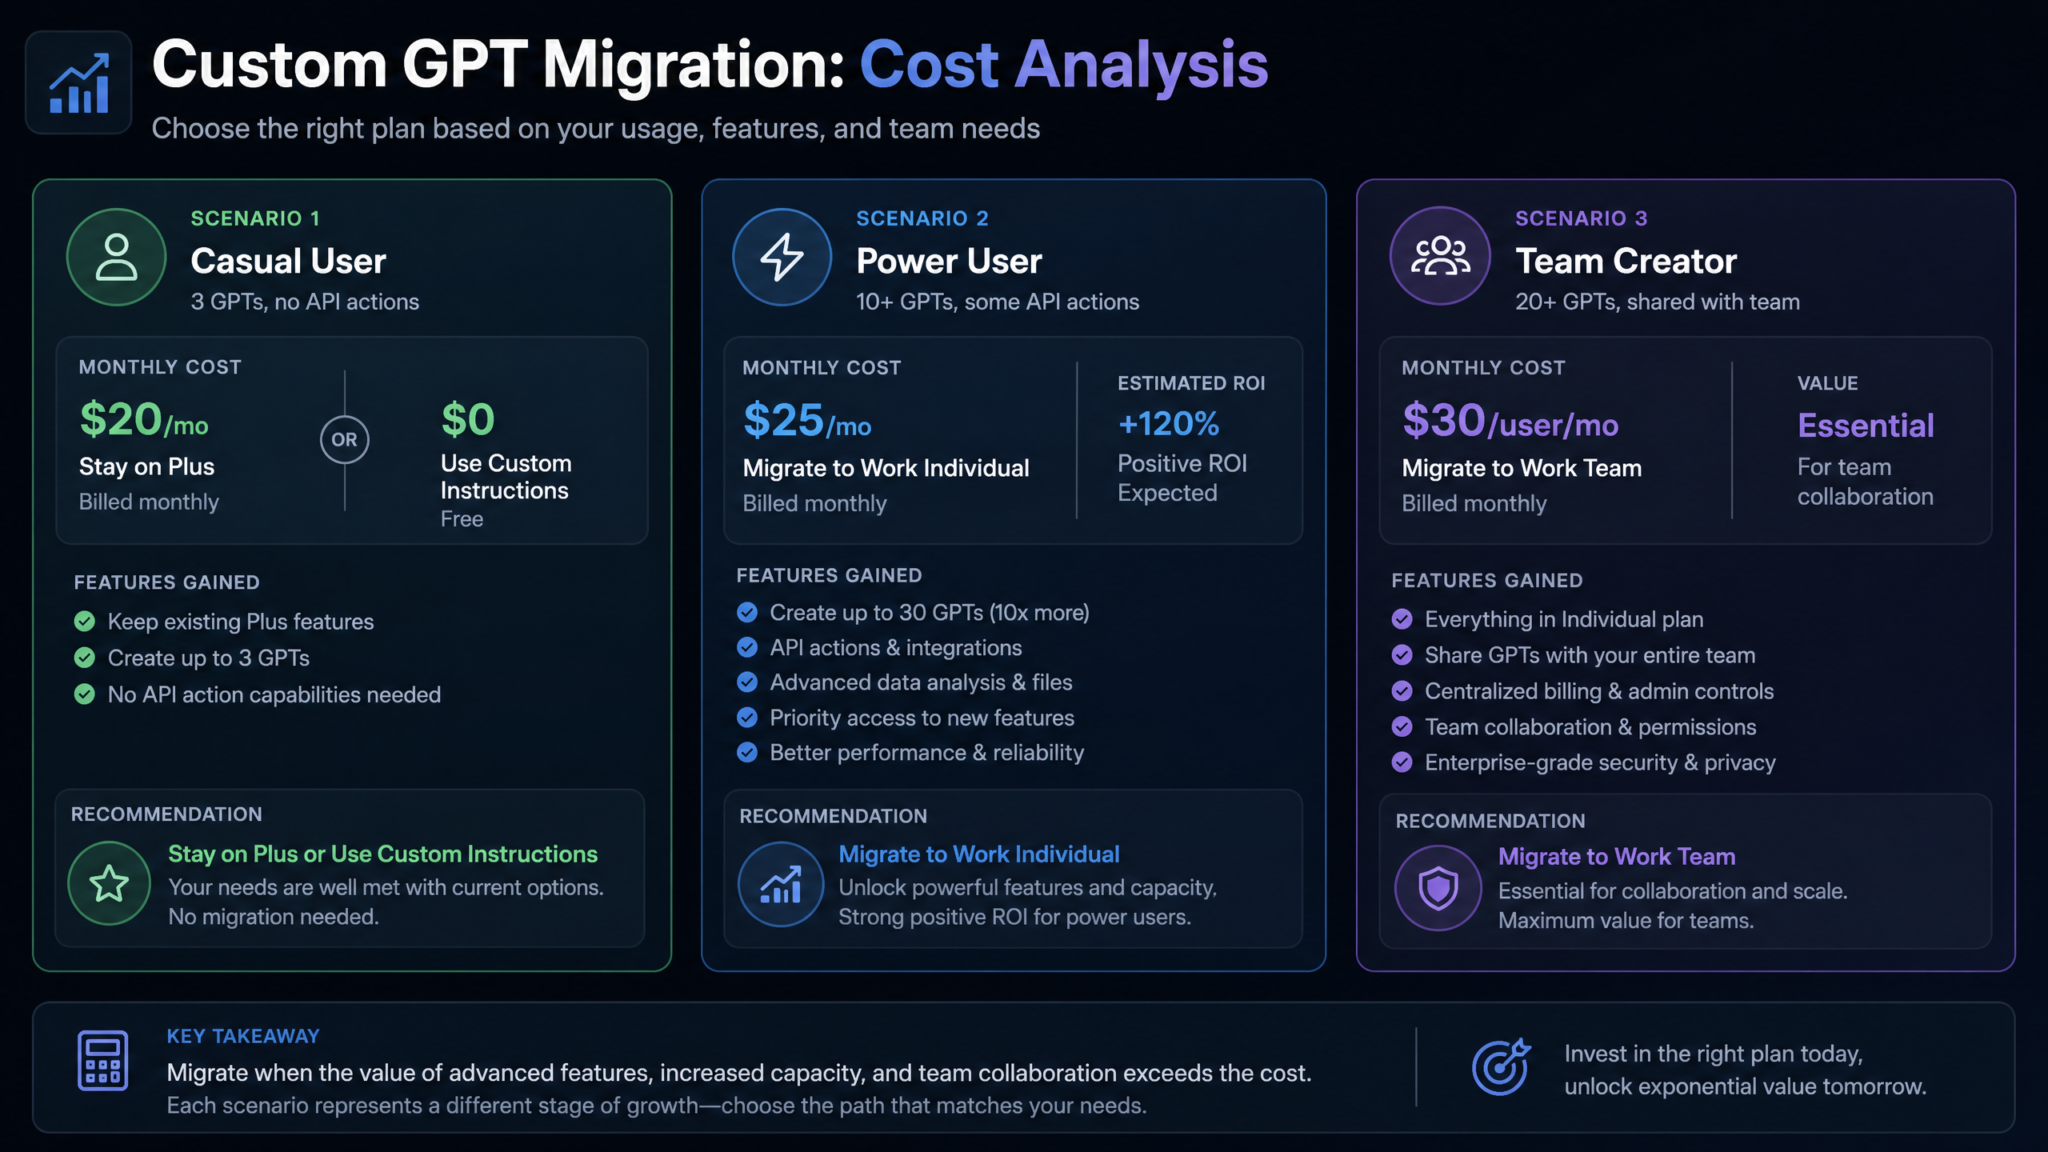
Cost Analysis: Personal vs. Work Plans for Different Usage Levels
The migration decision is not only technical — it carries a budget implication that needs to be analyzed for your specific situation. Here is a structured cost comparison across common usage scenarios:
| Scenario | Current Setup | Work Individual ($25/mo) | Work Team ($30/user/mo) | Recommendation |
|---|---|---|---|---|
| Solo operator, personal GPTs only | Plus ($20/mo) | $25/mo | N/A | Work Individual if advanced features needed; Plus otherwise |
| Solo operator with client-facing GPTs | Plus ($20/mo) | $25/mo | N/A | Work Individual for better data controls |
| Small team (2-5 people), shared GPTs | Multiple Plus ($20 × team) | N/A | $150-$450/mo | Work Team — consolidates access management |
| Medium team (6-15 people) | Multiple Plus | N/A | $180-$450/mo | Work Team with group-based permissions |
| Agency with client-specific GPTs | Plus + API costs | N/A | Varies by seat count | Work Team; evaluate Enterprise for large client counts |
The $5/month premium of Work Individual over Plus is justified by the enhanced data controls, access to GPT-4o with higher usage limits, and better performance during peak hours. For individual users whose GPTs handle sensitive client data, the data governance features alone make Work Individual worthwhile.
For teams, compare the Work Team per-seat cost against the current reality: if team members are each paying for individual Plus subscriptions, you are likely paying the same or more with less management capability. Work Team at $30/user/month with centralized admin is often cost-neutral or cost-positive for teams of four or more. ChatGPT Work Plan ROI Calculator for Business Teams
Troubleshooting Common Migration Issues
Issue: API Action Returns Authentication Error After Migration
Symptom: The GPT invokes the action, but receives a 401 or 403 error from the external API.
Cause: The authentication credentials were not entered correctly in the new GPT, or the external API still has an allowlist tied to the old GPT’s identifier.
Resolution: Verify the API key or OAuth token in the action configuration. Check the external API’s access logs to confirm whether the request is arriving at all. If it is arriving but being rejected, the issue is credential-side — re-enter or regenerate the key. If it is not arriving, the issue is schema-side — verify the endpoint URL and HTTP method in your action schema.
Issue: Knowledge File Information Is Not Surfacing in Responses
Symptom: The GPT does not reference information from uploaded knowledge files, even when asked directly.
Cause: File upload succeeded but retrieval is failing, possibly because file format is not optimally indexed or because retrieval is not being triggered by the way questions are phrased.
Resolution: Test with highly specific, direct questions that contain exact phrases from the document. If retrieval still fails, re-upload the file in plain text or PDF format. If the document is very large, consider splitting it into smaller, topically focused files to improve retrieval precision.
Issue: OAuth Flow Fails with “Redirect URI Mismatch”
Symptom: When a user attempts to authenticate the GPT with an OAuth provider, they receive a redirect URI mismatch error.
Cause: The callback URL registered with the OAuth application does not match the new callback URL generated by the Work GPT.
Resolution: In your new Work GPT’s action configuration, locate the exact callback URL displayed (it changes per GPT). Log in to the OAuth provider’s developer console and add this exact URL to the authorized redirect URIs. Ensure no trailing slashes or encoding differences exist between the registered URL and the actual callback.
Issue: GPT Behavioral Drift — New Version Behaves Differently
Symptom: The recreated GPT handles certain prompts differently than the original, even though the system prompt was pasted identically.
Cause: Model version differences between accounts, slight differences in system prompt encoding (invisible characters, character encoding issues in copy-paste), or capability settings not correctly matched.
Resolution: Compare the raw system prompt character by character if necessary. Ensure capability settings (Web Browsing, Code Interpreter) match exactly. If behavior still differs, this may reflect an underlying model improvement or change — evaluate whether the new behavior is actually preferable before attempting to force identical outputs.
Issue: Team Members Cannot Find the Migrated GPT
Symptom: You have shared the GPT to the workspace, but team members cannot locate it in their GPT library.
Cause: Visibility was set incorrectly, users are not in the correct group, or there is a propagation delay in workspace library updates.
Resolution: Verify the GPT’s sharing settings show the correct groups or workspace-wide access. Confirm team members are in the expected user groups. Wait 15-30 minutes for library updates to propagate. If the issue persists, have an affected team member log out and back in to refresh their workspace state.
Issue: Conversation Starters Not Appearing
Symptom: The recreated GPT does not display conversation starters on the opening screen.
Cause: Starters may have been entered but the GPT was saved before they propagated, or the character count exceeded limits.
Resolution: Re-enter conversation starters, ensure each is under the character limit, and save the GPT configuration again. Verify in a new conversation window after saving.
Migration Master Checklist
Use this checklist to track migration status for each individual GPT being moved. Copy it for each GPT in your inventory.
Phase 1: Inventory
- ☐ GPT added to master inventory spreadsheet
- ☐ Categorized by type (personal/client-facing/team/API-connected)
- ☐ Dependencies documented
- ☐ All account owners identified
- ☐ Migration priority assigned
Phase 2: Export
- ☐ System prompt exported to text file
- ☐ All knowledge files located and confirmed accessible
- ☐ All action schemas exported to YAML/JSON files
- ☐ OAuth app credentials and provider details documented
- ☐ Conversation starters recorded
- ☐ Profile image downloaded
- ☐ Capability settings documented
- ☐ Non-exportable settings documented (sharing links, OAuth callback URLs)
Phase 3: Work Setup
- ☐ Correct Work plan tier selected and activated
- ☐ Workspace name and domain configured
- ☐ Data controls verified
- ☐ Admin users invited
- ☐ User groups created
- ☐ GPT creation permissions set
Phase 4: Recreation
- ☐ GPT created in Work workspace
- ☐ System prompt pasted and verified
- ☐ Capabilities enabled correctly
- ☐ Knowledge files uploaded (count: ___)
- ☐ Conversation starters entered
- ☐ Profile image uploaded
- ☐ GPT saved as private
Phase 5: API Actions
- ☐ All action schemas imported
- ☐ Schema validation passed
- ☐ Authentication configured (type: ___)
- ☐ OAuth callback URLs updated with provider
- ☐ API keys entered / rotated
- ☐ End-to-end action test passed
- ☐ External system logs verified
Phase 6: Testing
- ☐ Output comparison testing completed (min. 5 prompts)
- ☐ Knowledge file retrieval verified
- ☐ API action integration verified
- ☐ Constraint/refusal behavior verified
- ☐ User acceptance testing completed
- ☐ Performance baseline documented
- ☐ All validation checklist items marked complete
Phase 7: Sharing and Cutover
- ☐ GPT shared to correct users/groups
- ☐ Permission levels set (Can Use / Can Edit)
- ☐ Team notified of new GPT availability
- ☐ All external links updated
- ☐ Old GPT access deprecated (if applicable)
- ☐ Old OAuth callback URLs removed from provider
- ☐ Old API keys rotated out (if security policy requires)
- ☐ Migration record updated with completion date
Timeline and Deadline Management Framework
Working backwards from your migration deadline, allocate time as follows based on the number of GPTs being migrated:
| GPT Count | Recommended Total Duration | Phase 1-2 (Inventory/Export) | Phase 3 (Setup) | Phase 4-5 (Recreation/APIs) | Phase 6-7 (Testing/Sharing) |
|---|---|---|---|---|---|
| 1-3 GPTs | 3-5 days | 1 day | Half day | 1-2 days | 1 day |
| 4-10 GPTs | 1-2 weeks | 2-3 days | 1 day | 5-7 days | 2-3 days |
| 11-20 GPTs | 3-4 weeks | 3-5 days | 1-2 days | 2-3 weeks | 1 week |
| 20+ GPTs | 6-8 weeks | 1 week | 2-3 days | 4-5 weeks | 1-2 weeks |
Build in a buffer of at least 20% beyond your estimate. Migrations of this type consistently take longer than planned due to OAuth credential issues, knowledge file retrieval inconsistencies, and the need to update external systems that were not included in the original dependency map. If your deadline is fixed and your timeline is tight, prioritize critical and client-facing GPTs first. A partially migrated critical GPT in the new environment is better than a fully migrated low-priority GPT while your most important tools are still at risk.
Set a hard internal deadline 72 hours before the official external deadline. This buffer is not optional — it exists specifically to handle the unexpected credential expiry, the OAuth provider that needs 48 hours to process a developer console change, or the team member who discovers a GPT you did not know existed that serves a mission-critical workflow.
The organizations that complete this migration cleanly are not the ones with the most technical expertise — they are the ones who started the inventory phase earliest and treated Phase 2 documentation with the same rigor they would apply to a legal contract. Your system prompts, your action schemas, and your knowledge file manifests are the source of truth for your AI workflows. Treat them accordingly, and your migration will be a controlled, predictable transition rather than an emergency scramble.
