How to Use OpenAI Codex Desktop Agent for Automated Workflows

OpenAI Codex has revolutionized the way developers and tech professionals automate coding tasks by bridging natural language and programming seamlessly. The Codex Desktop Agent extends this power directly to your local environment, enabling highly customizable, automated workflows that can streamline software development, testing, and integration processes.
✓ Instant access✓ No spam✓ Unsubscribe anytime
In this comprehensive tutorial, we will walk you through setting up the OpenAI Codex Desktop Agent, utilizing its advanced features such as the computer use interface for frontend testing, managing multiple parallel agents, leveraging memory for personalized workflows, scheduling automated tasks, and integrating with popular platforms like GitLab, Atlassian, and Microsoft Suite.
Getting Started: Installing and Setting Up Codex Desktop Agent
The first step to harnessing the power of Codex Desktop Agent is installation and basic configuration. The desktop agent acts as an intelligent automation assistant on your machine, capable of understanding natural language commands and executing complex workflows.
System Requirements and Prerequisites
Before installation, ensure your system meets the following requirements:
- Operating System: Windows 10/11, macOS 10.15 or later, or a modern Linux distribution.
- Hardware: Minimum 8GB RAM, recommended 16GB for parallel agents.
- Dependencies: Python 3.8+, Node.js 14+, and Git installed and configured in your PATH.
- OpenAI API Key: Access to OpenAI Codex requires an API key with appropriate permissions.
Installation Steps
Follow these steps to install the Codex Desktop Agent:
- Download the Agent: Obtain the latest release from the official OpenAI Codex repository or the desktop agent distribution page.
- Install Dependencies: Run the installation script or manually install Python and Node.js packages required by the agent.
- Configure API Key: Place your OpenAI API key in the designated config file (
config.json) or set it as an environment variableOPENAI_API_KEY. - Launch the Agent: Run
codex-agent --startfrom your terminal or use the desktop shortcut to start the agent interface.
Verifying Installation
Once launched, verify the agent is running by issuing a simple natural language command in the agent console, such as “Create a Python script that prints ‘Hello, World!’”. The agent should respond with generated code and an option to execute it locally.
Configuring Preferences
Access the settings panel to customize agent behavior, including verbosity, default programming languages, and execution environment paths. This flexibility lets you align the agent with your development environment seamlessly.
With the agent installed and verified, you are ready to explore its powerful features for automated workflows. When implementing these advanced AI workflows, understanding the underlying model architecture is crucial. Our comprehensive analysis of How to Use OpenAI Codex CLI for Automated Data Pipelines: A Step-by-Step Tutorial explores how parameter scaling affects reasoning capabilities in modern LLMs.
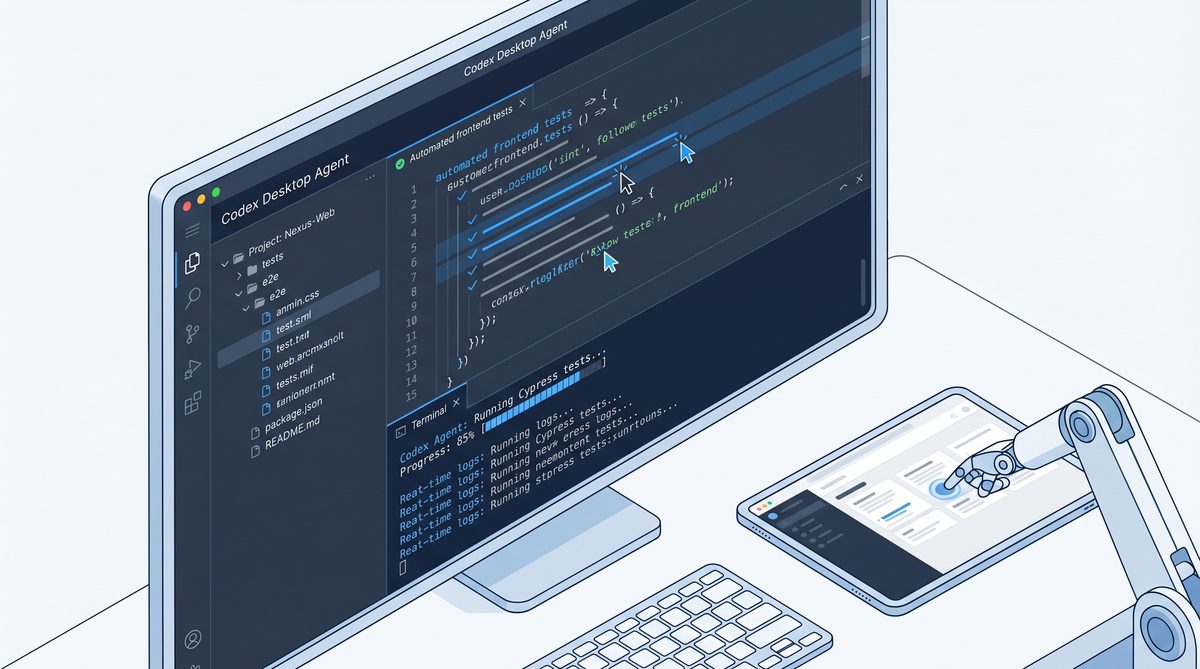
Using the Computer Use Feature for Frontend Testing
One of the standout capabilities of the Codex Desktop Agent is its computer use feature. This allows the agent to interact directly with your computer’s GUI to test frontend changes automatically, combining AI with robotic process automation (RPA) techniques.
Enabling Computer Use Mode
To activate computer use, enable the feature in the agent settings or start the agent with the --enable-computer-use flag. This gives the agent permissions to simulate mouse clicks, keyboard inputs, and screen captures.
Setting Up Frontend Testing Workflow
Follow these steps to create a frontend testing workflow:
- Define the test case: Instruct the agent using natural language commands such as “Open the latest build in Chrome and verify the login button is visible and clickable.”
- Agent generates automation script: Codex translates this into a script using tools like Selenium or Puppeteer to drive browser automation.
- Execute and monitor: Run the script via the agent; it will interact with the browser, perform the test, and report results.
- Capture screenshots and logs: The agent automatically captures visual evidence and console logs for verification.
Example: Automated UI Regression Test
Here’s an example command sequence and Codex-generated code snippet for a regression test on a React app:
Command to agent: "Test if the signup form appears correctly on the homepage and the submit button is enabled."

Generated Python (Selenium):
from selenium import webdriver
from selenium.webdriver.common.by import By

driver = webdriver.Chrome()
driver.get("http://localhost:3000")

signup_form = driver.find_element(By.ID, "signup-form")
submit_button = driver.find_element(By.ID, "submit-btn")

assert signup_form.is_displayed()
assert submit_button.is_enabled()

driver.quit()
This approach allows rapid iteration and verification of frontend changes without manual intervention, significantly accelerating the QA cycle.
Advanced GUI Interaction Techniques
Beyond browser automation, the computer use feature supports:
- Interacting with native desktop applications via keyboard shortcuts and mouse events.
- Manipulating file dialogs and system notifications.
- Performing drag-and-drop and other complex UI gestures.
These capabilities enable comprehensive end-to-end testing workflows directly from the agent interface.
Managing Multiple Parallel Agents for Scalable Automation
As your automation needs grow, managing multiple Codex Desktop Agents in parallel can dramatically increase throughput, allowing simultaneous execution of independent workflows.
Why Use Multiple Agents?
Parallel agents are essential when:
- Running concurrent tests across different environments or browsers.
- Executing batch code generation and validation tasks.
- Handling high-volume data processing or report generation workflows.
Setting Up Parallel Agents
To run multiple agents on a single machine or across a network:
- Clone the agent environment: Duplicate the installation directory or containerize the agent for isolation.
- Assign unique ports and API keys: Configure each agent instance with distinct communication ports and separate OpenAI API credentials if necessary.
- Resource allocation: Adjust CPU and memory limits to ensure stable multi-agent performance without contention.
- Start agents: Launch each instance with the
--agent-idflag to identify and manage them independently.
Coordinating Parallel Workflows
Codex Desktop Agents support inter-agent communication using message brokers or shared file systems. This enables coordination patterns such as:
- Task queues: Distributing workload to idle agents dynamically.
- Pipeline stages: Chaining agents to perform sequential steps in complex workflows.
- Synchronization: Ensuring agents share state information and avoid conflicting operations.
Example: Parallel Frontend Testing Across Browsers
You can configure three agents to simultaneously run frontend tests on Chrome, Firefox, and Edge browsers by assigning each agent a specific browser context and test suite. This setup reduces total testing time and increases coverage.
Monitoring and Logging
Robust logging frameworks built into the agent ecosystem allow centralized monitoring of multiple agents. Logs include:
- Execution timelines
- Errors and exceptions
- Resource usage statistics
Dashboards can be built on top of these logs for real-time insights and performance tuning.
For best practices in managing distributed AI agents and orchestrating automated workflows, our in-depth guide on From Prompts to AI Skills: How to Build Reusable Prompt Workflows for ChatGPT, Claude, and Codex provides valuable strategies and architectural patterns.
Leveraging Memory for Personalized and Context-Aware Workflows
The Codex Desktop Agent’s memory feature allows it to remember context from previous interactions, enabling personalized and stateful workflows. This is a significant advancement over stateless AI calls, as it allows the agent to build knowledge over time and tailor responses accordingly.
How Memory Works
The memory system stores relevant data points, such as:
- User preferences and environment configurations.
- Previous commands and their outputs.
- Project-specific information like code style, frameworks used, and naming conventions.
This data can be indexed and recalled during future interactions to inform decision-making and code generation.
Enabling and Configuring Memory
Memory is enabled by default but can be configured via the settings panel:
- Memory retention period: Define how long the agent keeps session data.
- Scope: Set memory to be global (across all projects) or project-specific.
- Privacy controls: Encrypt sensitive data and control what information is persisted.
Example: Personalized Code Generation
If you frequently use a particular logging library or follow a specific code style, the memory feature allows the agent to incorporate these preferences automatically. For example, when generating Python functions, it might always include your preferred docstring format or use your favorite error handling pattern without explicit instructions.
Context-Aware Error Resolution
When debugging, the agent can recall past errors and fixes you applied to similar issues, suggesting solutions based on historical data. This accelerates troubleshooting and reduces repetitive work.
Memory in Collaborative Workflows
In multi-agent setups, memory can be shared or synchronized to maintain a consistent context across agents working on the same project. This supports collaboration features similar to human teams.
Scheduling Automated Tasks with Codex Desktop Agent
Automation is most powerful when it operates on a schedule. The Codex Desktop Agent includes a built-in scheduler to trigger workflows at specified times or intervals, turning your desktop into a programmable automation hub.
Creating Scheduled Workflows
Define tasks using natural language, for example:
- “Every weekday at 9 AM, pull the latest changes from GitLab and run frontend tests.”
- “At midnight, generate a daily build report and email it to the dev team.”
Codex translates these instructions into scheduled jobs using the local OS scheduler (e.g., Windows Task Scheduler, cron on Linux/macOS) or internal timers.
Managing Scheduled Jobs
Use the agent’s dashboard to:
- Create, edit, or delete scheduled tasks.
- View upcoming job execution times.
- Monitor task history and status.
Example: Automated Code Review Reminders
Schedule the agent to send reminders for code reviews by integrating with your communication platform (e.g., Microsoft Teams or Slack) and project management tools, triggering notifications at optimal times for your team.
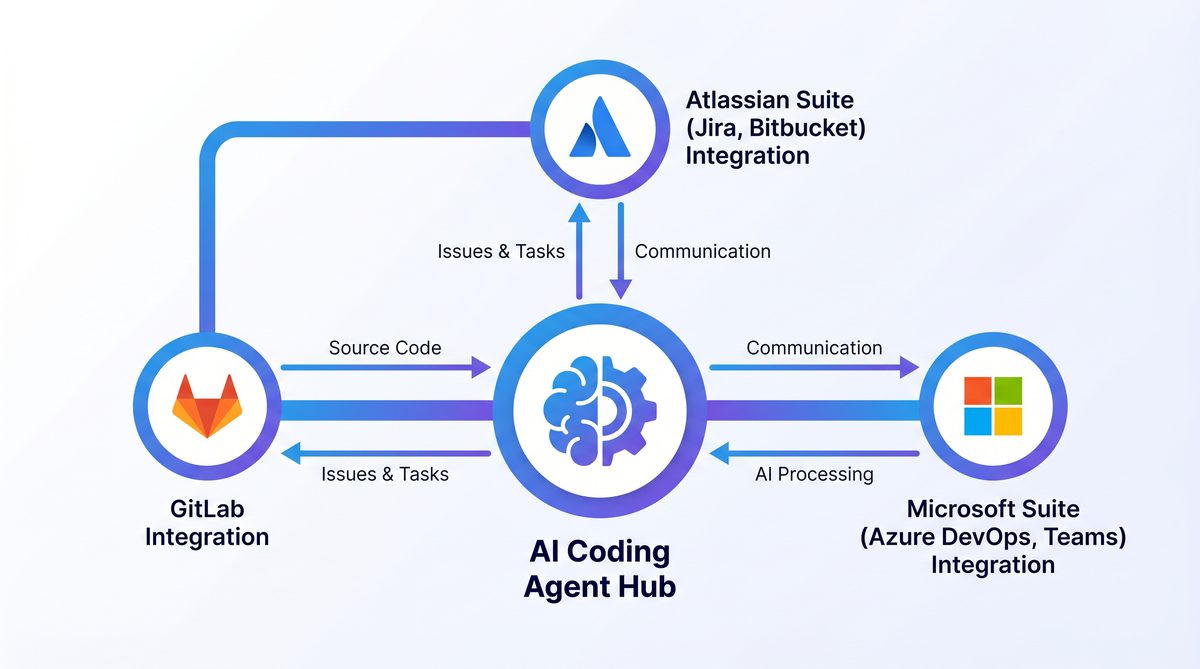
Integrating Codex Desktop Agent with GitLab, Atlassian, and Microsoft Suite
Seamless integration with popular developer platforms and productivity suites extends the capabilities of the Codex Desktop Agent beyond local automation, enabling hybrid workflows that span cloud services and local machines.
GitLab Integration
The agent can interact with GitLab repositories to automate tasks such as code commits, branch management, and CI/CD pipeline triggering.
- Authentication: Use personal access tokens securely stored in the agent’s credential vault.
- Automated commits: Generate code snippets or bug fixes locally and push changes back to GitLab branches automatically.
- Pipeline monitoring: Query GitLab’s API to retrieve build statuses and notify users of failures or successes.
Atlassian Integration (Jira, Confluence)
Codex Desktop Agent can interact with Jira for issue tracking and Confluence for documentation management:
- Issue automation: Create, update, or comment on Jira tickets based on code changes or test results.
- Documentation updates: Automatically generate or update Confluence pages with release notes or technical documentation.
- Workflow triggers: Use Jira webhook events to initiate workflows in the agent.
Microsoft Suite Integration
Integration with Microsoft Office and Teams enhances communication and documentation automation:
- Outlook: Schedule and send emails with automated reports or code review summaries.
- Excel: Generate or update spreadsheets for project tracking or test result aggregation.
- Teams: Post messages or alerts related to workflow events directly into team channels.
Configuring Integration Connectors
All integrations require configuring API credentials and endpoints within the agent’s integration manager. This centralized interface ensures secure management and auditing of connected services.
Example Use Case: Continuous Delivery Pipeline
Imagine a workflow where the Codex Desktop Agent:
- Detects a new merge request in GitLab.
- Runs automated frontend and backend tests locally.
- Updates Jira tickets with test results.
- Posts a summary message in Microsoft Teams.
- Triggers a Confluence page update with deployment notes.
This fully automated pipeline dramatically reduces manual overhead and improves team visibility.
For developers interested in deepening integration strategies and best practices for AI-assisted development environments, our detailed exploration of How to Use OpenAI Codex as Your AI Coding Agent: Complete Setup and Workflow Guide offers valuable insights.
Best Practices and Tips for Maximizing Codex Desktop Agent Efficiency
To get the most out of your Codex Desktop Agent, consider the following best practices:
- Incremental adoption: Start with simple automation scripts and gradually increase complexity.
- Maintain clear prompts: Provide detailed and unambiguous instructions to the agent for improved output quality.
- Regular updates: Keep the agent and dependencies up to date to leverage the latest capabilities and security patches.
- Use parallel agents smartly: Avoid overloading your system; monitor resource usage closely.
- Security hygiene: Secure API keys and sensitive data using encrypted storage.
- Leverage memory: Use personalized memories to tailor workflows and reduce repetitive instructions.
- Integrate thoroughly: Link with your development ecosystem to automate end-to-end pipelines.
Troubleshooting Common Issues
Some typical issues you might encounter include:
- API rate limits: Adjust request frequency or upgrade your OpenAI plan.
- Permission errors in computer use mode: Ensure the agent has proper OS-level permissions.
- Conflicts between parallel agents: Isolate environments or stagger task schedules.
- Integration failures: Verify API keys and network connectivity.
Consult the agent’s detailed log files and error reports for diagnostics, and refer to official documentation for advanced troubleshooting steps.
Useful Links
- OpenAI Codex Official Documentation
- GitLab API Documentation
- Atlassian Jira REST API Guide
- Microsoft Graph API Documentation
- Selenium WebDriver Documentation
- Node.js Official Documentation
- Python Official Documentation
- Ansible Automation Guide
- Cron Scheduling Syntax Reference
Useful Links and Resources
Here are some valuable resources to help you explore the topics covered in this article:
- OpenAI Codex Getting Started
- OpenAI API Quickstart
- VS Code Extensions Marketplace
- OpenAI Cookbook on GitHub
- ChatGPT Plugins Documentation
- Stack Overflow AI Tags
🕐 Instant∞ Unlimited🎁 Free
Get Free Access to 40,000+ AI Prompts
Join 40,000+ AI professionals. Get instant access to our curated Notion Prompt Library with prompts for ChatGPT, Claude, Codex, Gemini, and more — completely free.
Get Free Access Now →No spam. Instant access. Unsubscribe anytime.