ChatGPT Coding Masterclass Part 4: Codex CLI Deep Dive — Terminal-First AI Coding with GPT-5.3-Codex
⚡ The Brief
- What it is: Codex CLI is a terminal-first AI coding tool leveraging GPT-5.3-Codex, designed for professional developers to enhance coding efficiency through command-line interactions.
- Who it’s for: This tool is ideal for professional developers and advanced practitioners looking to integrate AI into their coding workflows, especially those familiar with terminal environments.
- Key takeaways: Codex CLI offers rapid, scriptable interactions, seamless cloud-native integration, and supports advanced prompt engineering for efficient AI coding.
- Pricing/Cost: Pricing details for Codex CLI are typically subscription-based, depending on the level of access and usage within the OpenAI ecosystem.
- Bottom line: Codex CLI is a powerful tool for developers seeking to streamline coding processes with AI, offering robust terminal-first capabilities and integration options.
✓ Instant access✓ No spam✓ Unsubscribe anytime
ChatGPT Coding Masterclass Series
Codex CLI Deep Dive: Terminal-First AI Coding
Welcome to the Codex CLI Deep Dive, Part 4 of the ChatGPT Coding Masterclass series. This masterclass is crafted for professional developers and advanced practitioners eager to harness the full power of GPT-5.3-Codex via the Rust-based Codex CLI. In this module, we’ll explore terminal-first AI coding with exhaustive technical depth, from theoretical underpinnings to hands-on implementation, SDK usage, IDE integration, and advanced prompt engineering — culminating in a mastery of Codex CLI in the modern cloud-native AI ecosystem.
Table of Contents
- Theoretical Foundations: Why Terminal-First AI Coding?
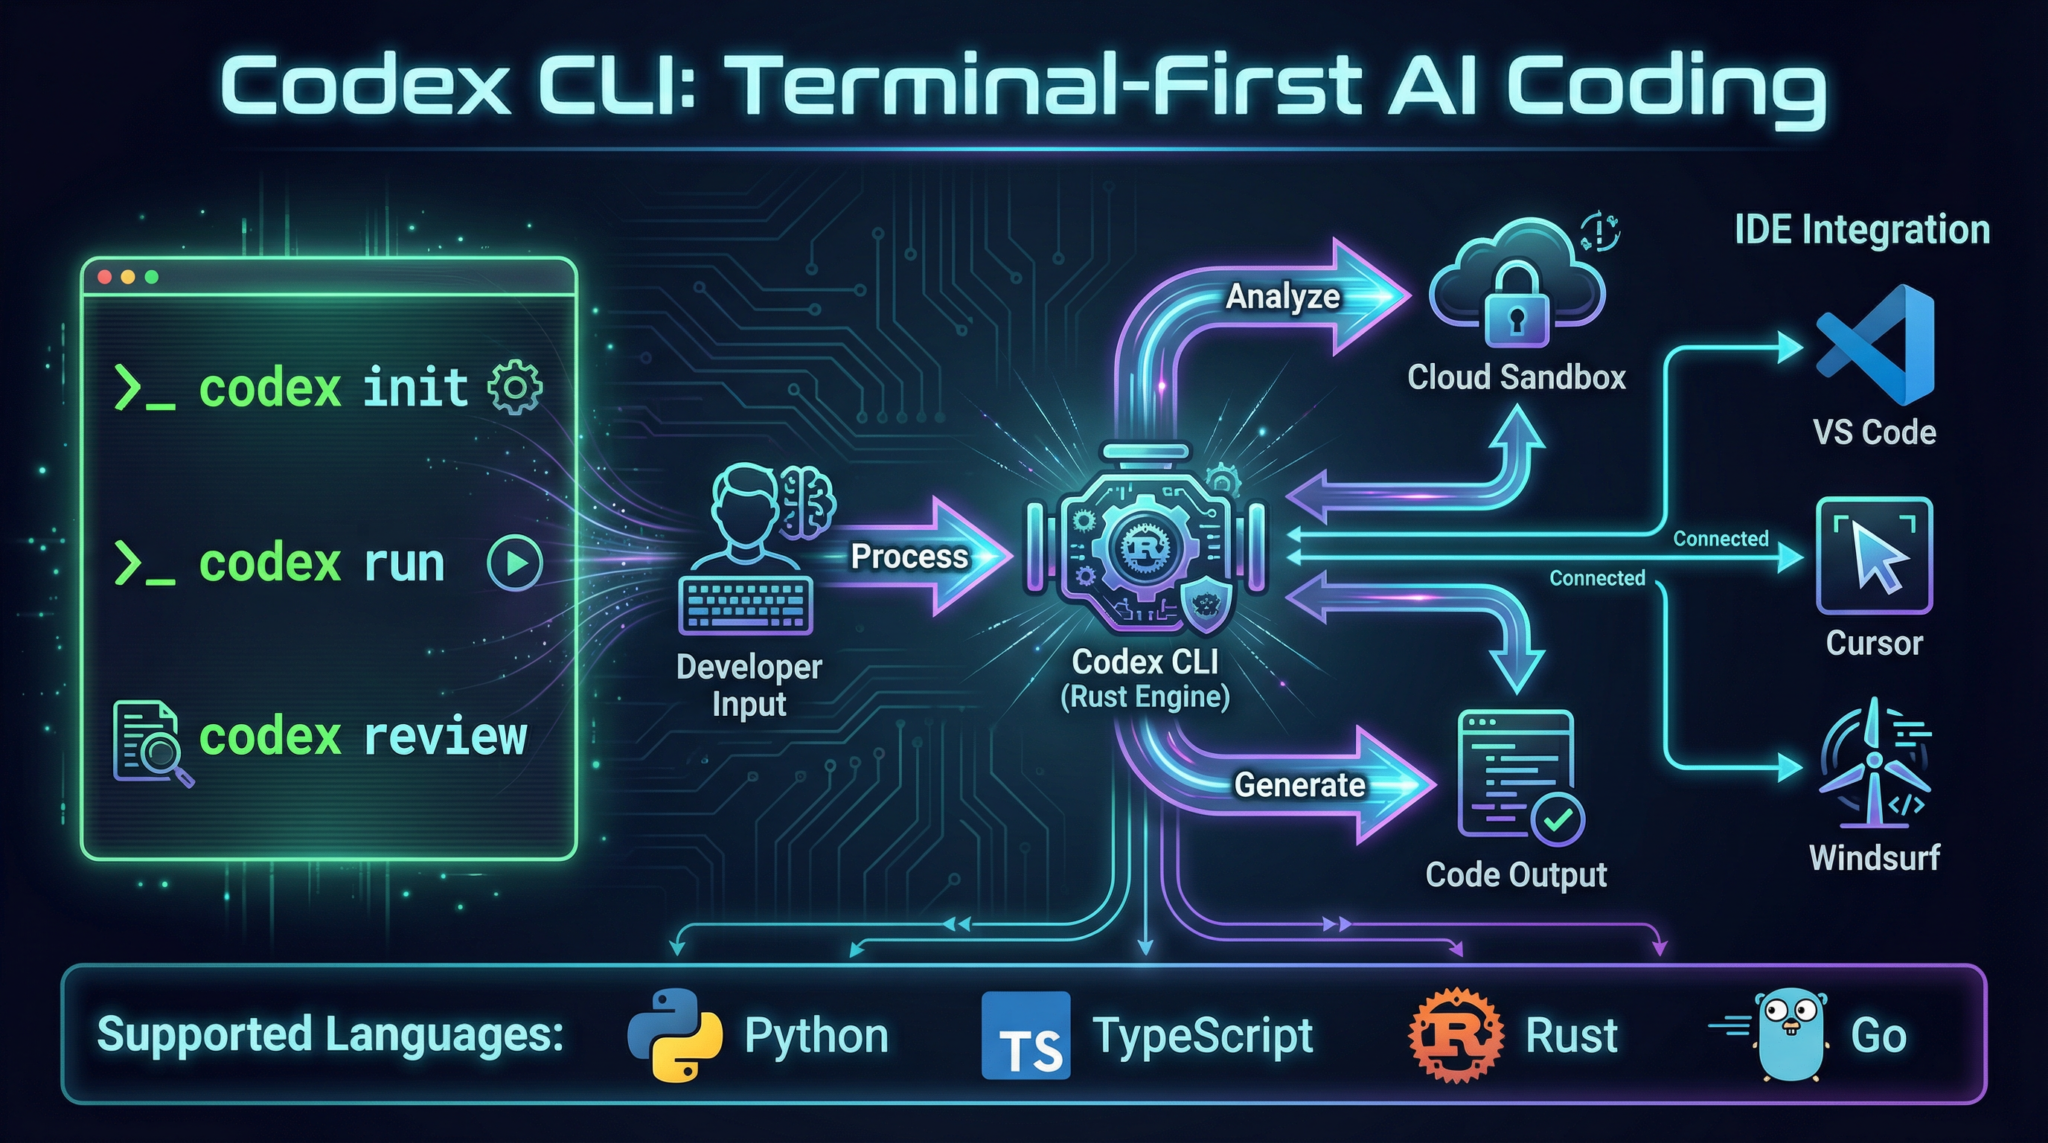
- Codex CLI Architecture & Ecosystem Overview
- Step-by-Step: Setting Up and Using Codex CLI
- Deep Integration: OpenAI Agents SDK & Agent Harness Patterns
- IDE Integrations: VS Code, Cursor, Windsurf, JetBrains
- Advanced Prompt Templates for Codex CLI
- Concrete Code Examples: Rust & Python Implementations
- Pro Tips & Edge Cases: Troubleshooting and Optimization
Theoretical Foundations: Why Terminal-First AI Coding?
Get Free Access to 40,000+ AI Prompts
Join 40,000+ AI professionals. Get instant access to our curated Notion Prompt Library with prompts for ChatGPT, Claude, Codex, Gemini, and more — completely free.
Get Free Access Now →No spam. Instant access. Unsubscribe anytime.
The Paradigm Shift: CLI as the New IDE
While most AI coding workflows have historically been IDE-centric, the shift to terminal-first AI coding with Codex CLI is no accident — it is a deliberate architectural and ergonomic choice driven by:
- Maximized developer velocity: CLI workflows enable rapid, scriptable, and reproducible interactions with Codex, eliminating GUI overhead.
- Cloud-native sandboxing: Terminal-first tools fit seamlessly into containerized environments and remote workflows.
- Agent Harness Engineering synergy: Harnesses rely on programmatic CLI interactions to orchestrate long-running AI agent tasks.
- Multi-agent orchestration: CLI enables parallel and chained agents with reliable input/output piping.
- Extensibility & Automation: Terminal tools integrate naturally into CI/CD, DevOps pipelines, and event-driven architectures.
Under the Hood: How Codex CLI Orchestrates AI Coding
At a high level:
- Rust-based CLI binary: Provides performant, deterministic behavior, safety guarantees, and native OS integration.
- OpenAI API abstraction: The CLI wraps GPT-5.3-Codex calls, managing token streaming, error handling, and context windows.
- Context Engineering: CLI commands inject AGENTS.md files or other context snippets that guide AI reasoning progressively.
- Planner-Generator-Evaluator agent pattern: The CLI can invoke these specialized sub-agents in sequence or parallel, each with distinct responsibilities.
- Sandboxed execution environment: The CLI manages ephemeral cloud sandboxes to run and test generated code securely.
- Entropy management: Via adjustable temperature and repetition penalties, the CLI constrains AI spontaneity for deterministic outputs.
- Logging and telemetry: CLI logs all interactions for audit, debugging, and continuous improvement.
Why Rust?
Rust is chosen for:
- Native performance and concurrency
- Memory safety without GC pauses
- Easy cross-compilation for Linux, macOS, Windows
- Tight integration with system resources (files, pipes, terminals)
- Strong typing for reliable CLI UX
Codex CLI Architecture & Ecosystem Overview
Key Components
| Component | Description |
| Codex CLI Binary | Rust-based executable providing commands, flags, and streaming outputs to interact with GPT-5.3-Codex. |
| OpenAI Agents SDK | Type-safe SDK enabling programmatic control over AI agents, with support for harness patterns and parallelism. |
| Agent Harness | Infrastructure layer managing AI context, constraints, and long-running task orchestration. |
| Cloud Sandbox | Ephemeral containerized environment for executing generated code securely and reproducibly. |
| IDE Plugins | VS Code, Cursor, Windsurf, JetBrains native GPT-5.3 plugins integrating Codex CLI features inline. |
Command Groups & Flags Overview
| Command Group | Purpose | Key Flags |
|---|---|---|
init |
Initialize project with Codex context and harness files | --template <name>, --overwrite |
generate |
Generate code snippets or files from prompt | --prompt <file/string>, --temperature <float>, --max-tokens <int> |
plan |
Execute planning agent to expand specs | --spec <file>, --output <file> |
evaluate |
Run evaluation agent with Playwright MCP for QA | --test-suite <file>, --verbose |
sandbox |
Launch cloud sandbox for testing or debugging | --env <vars>, --timeout <s> |
agent |
Manage multi-agent workflows (planner/generator/evaluator) | --mode <planner|generator|evaluator>, --parallel |
logs |
Access CLI interaction logs and telemetry | --filter <criteria>, --tail |
Step-by-Step: Setting Up and Using Codex CLI
Prerequisites
- Rust 1.70+ installed (
rustuprecommended) - OpenAI API key with GPT-5.3-Codex access
- Network connectivity for API and sandbox operations
- Docker installed and running (for local sandbox)
1. Install Codex CLI
cargo install codex-cli
Or download pre-built binaries from the official OpenAI GitHub releases page.
2. Initialize Your Project with Codex Context
codex-cli init --template rust-agent-harness --overwrite
This creates a base directory structure:
/project-root
  /src
  AGENTS.md
  codex.toml
  harness/
AGENTS.md acts as the map to your AI context, critical for progressive disclosure.
3. Authenticate with OpenAI API
Set your API key as an environment variable:
export OPENAI_API_KEY="sk-xxxxxx"
Verify authentication:
codex-cli status
Expected output:
API Key: Valid
Model: GPT-5.3-Codex
Context Window: 128k tokens
Sandbox: Ready
4. Generate Code from a Prompt File
Create prompts/create_api_endpoint.txt:
Create a Rust HTTP API endpoint using actix-web that responds with JSON { "status": "ok" }.
Run generation:
codex-cli generate --prompt prompts/create_api_endpoint.txt --temperature 0.2 --max-tokens 512 --output src/api.rs
Output snippet will stream to terminal and save in src/api.rs.
5. Plan a Feature Using Planner Agent
Define spec in specs/feature_login.md:
Implement user login with JWT authentication. Include password hashing and token refresh.
Run planner:
codex-cli plan --spec specs/feature_login.md --output plans/feature_login_plan.md
Planner agent expands specs into sub-tasks and sprint contracts.
6. Evaluate Generated Code with Playwright MCP
Assuming you have a test suite tests/login_tests.js:
codex-cli evaluate --test-suite tests/login_tests.js --verbose
Evaluator agent runs tests in sandbox, records video, and reports errors.
7. Use Agent Harness for Long-Running Tasks
Run full autonomous loop:
codex-cli agent --mode planner
codex-cli agent --mode generator --parallel
codex-cli agent --mode evaluator
Harness manages state validation and orchestration.
8. Launch Cloud Sandbox for Debugging
codex-cli sandbox --env "RUST_LOG=debug" --timeout 600
Opens an ephemeral container for manual debugging.
codex-cli generate --watch to stream incremental code outputs live as you refine prompts interactively.
Deep Integration: OpenAI Agents SDK & Agent Harness Patterns
OpenAI Agents SDK Overview
The SDK exposes:
- Agent constructs: Planner, Generator, Evaluator
- Harness interfaces: Context injection, entropy control, constraint enforcement
- Parallel agent management: Spawn, monitor, synchronize
- Progressive disclosure helpers: Context layering, short AGENTS.md injection
- Logging and telemetry hooks
Example: Creating a Planner Agent in Rust
use openai_agents_sdk::{Agent, AgentContext, AgentHarness};

struct PlannerAgent;

impl Agent for PlannerAgent {
    fn run(&self, ctx: &mut AgentContext) -> anyhow::Result<()> {
        let spec = ctx.get_spec()?;
        let expanded_plan = ctx.model.expand_spec(spec)?;
        ctx.save_output("plan.md", &expanded_plan)?;
        Ok(())
    }
}

fn main() -> anyhow::Result<()> {
    let harness = AgentHarness::new("planner")?;
    let agent = PlannerAgent;
    harness.execute(&agent)?;
    Ok(())
}
Agent Harness Engineering
- Context Engineering: Harness injects
AGENTS.mdas a bootstrap map to the AI. - Architectural Constraints: Harness enforces token limits, prompt schema, and temperature settings.
- Entropy Management: Adjustable randomness to tune deterministic vs creative output.
- Progressive Disclosure: Agents get minimal context initially, then fetch linked deeper docs as needed.
- QA & Validation Loop: Evaluators verify code correctness with Playwright MCP, feeding back to harness.
Test Harness Patterns
- Use
cargo test+codex-cli evaluateintegration - Automated bug reproduction via recorded video playback
- Sprint contract enforcement: tests correspond to planned sub-tasks
- Test harnesses auto-reset sandbox state between runs
IDE Integrations: VS Code, Cursor, Windsurf, JetBrains
VS Code GPT-5.3 Plugin Setup
- Install OpenAI GPT-5.3 plugin
- Configure API key in VS Code settings (
openai.apiKey) - Add
codex.tomlto project root for CLI sync -
Use command palette:
-
Codex: Generate Code Codex: Plan Feature-
Codex: Evaluate Tests -
Terminal embedded for
codex-clicommands, auto-sync with editor buffers
Cursor & Windsurf with Codex CLI
- Both IDEs provide seamless terminal integration with Codex CLI
- Cursor’s inline prompt completion supports advanced prompt templates (see below)
- Windsurf offers cloud sandbox terminals with one-click
codex-cli sandboxlaunch - Both support multi-agent workflows with task parallelism
JetBrains GPT-5.3 Plugin
- Native Codex CLI command runner inside Run Configurations
- Harness context injection via project-level AGENTS.md mapping
- Code inspections enhanced by evaluator agent feedback
- Debugger integration with sandbox replay videos
codex-cli generate --watch for instant code generation previews without leaving the editor.
Advanced Prompt Templates for Codex CLI
Below are five advanced prompt templates designed for deep control over GPT-5.3-Codex via Codex CLI. Replace variables in {{ }} brackets before use.
1. Multi-Agent Sprint Planning Template
# Sprint Planning for Feature: {{feature_name}}

You are the Planner agent. Break down the feature "{{feature_name}}" into detailed sprint tasks with acceptance criteria.

Requirements:
- Tasks must be atomic and testable.
- Include dependencies between tasks.
- Output in markdown checklist format.

Context:
- Previous sprint retrospectives: {{retrospective_summary}}
- Known constraints: {{constraints}}

Begin planning.
2. Bug Reproduction & Fix Template
# Bug Report: {{bug_title}}

You are the Generator agent tasked with reproducing and fixing this bug.

Steps:
1. Reproduce the bug with exact environment setup.
2. Record a video of the bug.
3. Generate fix with inline comments.
4. Provide tests that catch the bug and verify the fix.

Environment:
{{environment_details}}

Bug Description:
{{bug_description}}
3. Security Audit and Hardening Template
# Security Audit for Module: {{module_name}}

You are the Evaluator agent. Perform a security audit focusing on:

- Input validation
- Authentication and authorization
- Data encryption
- Dependency vulnerabilities

Provide a detailed report with:
- Vulnerabilities found
- Suggested fixes with code snippets
- Recommended security best practices
4. Cross-Language API Client Generator
# API Client Generation for {{api_name}}

Generate a fully typed {{target_language}} client for the following API spec:

{{api_spec}}

Ensure:
- Proper error handling
- Async support if applicable
- Inline documentation for each method
- Unit tests for all endpoints
5. Progressive Disclosure Context Injection
# Agent Context Injection

Inject the following short AGENTS.md map for progressive disclosure:

{{agents_md_summary}}

Instructions for the AI agent:
- Start with this map.
- When more details are needed, fetch linked documents.
- Maintain context window under {{token_limit}} tokens.
- Use entropy setting {{temperature}} for deterministic output.
Concrete Code Examples: Rust & Python Implementations
Rust: Agent Harness Example
use openai_agents_sdk::{Agent, AgentContext, AgentHarness};
use anyhow::Result;

struct GeneratorAgent;

impl Agent for GeneratorAgent {
    fn run(&self, ctx: &mut AgentContext) -> Result<()> {
        // Retrieve prompt with progressive disclosure
        let prompt = ctx.get_prompt()?;

        // Generate code with controlled entropy
        let code = ctx.model.generate_code(&prompt, 0.1)?;

        // Save code to output file
        ctx.save_output("generated_code.rs", &code)?;

        Ok(())
    }
}

fn main() -> Result<()> {
    let harness = AgentHarness::new("generator")?;
    let agent = GeneratorAgent;
    harness.execute(&agent)?;
    Ok(())
}
Python: Automated Evaluation Harness
from openai_agents_sdk import AgentHarness, EvaluatorAgent

class TestEvaluator(EvaluatorAgent):
    def run(self, ctx):
        # Fetch generated code path
        code_path = ctx.get_output_path()

        # Run pytest on generated code in sandbox
        result = ctx.sandbox.run_tests(code_path)

        # Record video on failure
        if not result.passed:
            ctx.sandbox.record_video("fail_video.mp4")

        # Output test summary
        ctx.save_output("test_summary.txt", result.summary)
        return result.passed

if __name__ == "__main__":
    harness = AgentHarness(mode="evaluator")
    agent = TestEvaluator()
    harness.execute(agent)
Pro Tips & Edge Cases: Troubleshooting and Optimization
Common Pitfalls and Fixes
| Issue | Cause | Solution |
| Context tokens exceeded | Too large AGENTS.md or prompt injected | Use progressive disclosure; trim context; split AGENTS.md into smaller maps |
| Sandbox timeout failures | Long-running tests or infinite loops in generated code | Increase sandbox timeout; add watchdog timers; optimize generated code |
| Unstable generation outputs | High temperature or missing repetition penalties | Lower temperature (0.1-0.3); set presence_penalty and frequency_penalty flags |
| Agent deadlocks in multi-agent workflows | Improper synchronization or missing state updates | Use harness state validation APIs; add retries and timeouts; log extensively |
| IDE plugin desync with CLI outputs | Buffer caching or misconfigured workspace root | Reload workspace; sync `codex.toml`; use `–watch` flag on generation |
Optimization Strategies
- Cache model outputs when running repeated generations on similar prompts.
- Use streaming output to start reviewing code before generation completes.
- Divide large specs into modular plans using the planner agent.
- Leverage parallel generation agents for sprint contract subtasks.
- Incorporate evaluation feedback loops to auto-fix flaky or failing tests.
- Automate sandbox lifecycle with ephemeral containers for clean environments.
Summary
This module delivered an ultra-detailed exploration of Codex CLI usage for terminal-first AI coding in 2026’s GPT-5.3 era, including:
- Underlying theory and design rationale
- Comprehensive CLI command usage and flags
- Deep SDK and Agent Harness integration patterns
- IDE plugin setup and workflows
- Advanced prompt templates for complex agent tasks
- Concrete Rust and Python agent harness examples
- Pro tips and troubleshooting guides
In the upcoming modules (Parts 5-7), we will build upon this foundation to engineer Agent Harness infrastructure, implement multi-agent orchestration, and master the Full Agent Autonomy Loop, fully leveraging GPT-5.3’s groundbreaking capabilities.
End of Part 4: Codex CLI Deep Dive: Terminal-First AI Coding
🔒 Unlock the Full Coding Masterclass Library
This is a premium deep-dive module. Register for free to access all 7 parts, downloadable templates, and the complete prompt library.
Register Free & Access Now →ChatGPT Coding Masterclass Series
🕐 Instant∞ Unlimited🎁 Free
Frequently Asked Questions
What is Codex CLI and its primary function?
Codex CLI is a terminal-first AI coding tool that utilizes GPT-5.3-Codex to enhance developer workflows. Its primary function is to provide a command-line interface for coding, allowing developers to interact with AI models directly from the terminal. This approach maximizes efficiency by enabling scriptable, reproducible coding interactions without the overhead of a graphical user interface.
How does Codex CLI improve developer velocity?
Codex CLI improves developer velocity by offering rapid, scriptable interactions that eliminate the need for GUI overhead. This allows developers to execute tasks quickly and efficiently, leveraging the power of AI to automate repetitive coding tasks. The CLI environment also supports seamless integration with existing development tools and workflows, further enhancing productivity.
What are the benefits of terminal-first AI coding?
Terminal-first AI coding offers several benefits, including increased developer velocity, seamless integration with cloud-native environments, and enhanced automation capabilities. It allows developers to interact with AI models programmatically, enabling efficient orchestration of long-running tasks and multi-agent workflows. This approach also supports extensibility and integration into CI/CD pipelines, making it ideal for modern development practices.
Can Codex CLI be integrated with popular IDEs?
Yes, Codex CLI can be integrated with popular IDEs such as VS Code, JetBrains, and others. This integration allows developers to leverage the power of Codex CLI within their preferred development environment, combining the benefits of terminal-first AI coding with the features and tools available in modern IDEs. This hybrid approach enhances productivity and flexibility in coding workflows.
What programming languages does Codex CLI support?
Codex CLI primarily supports Rust and Python implementations, providing developers with concrete code examples and templates for these languages. This focus allows developers to harness the full capabilities of Codex CLI in environments where these languages are prevalent, ensuring compatibility and performance in a wide range of coding scenarios.
How does Codex CLI handle multi-agent orchestration?
Codex CLI handles multi-agent orchestration by enabling reliable input/output piping between agents. This allows developers to chain multiple AI agents together, facilitating complex workflows and parallel processing. The CLI environment supports programmatic interactions, making it easier to manage and coordinate tasks across different agents, enhancing the overall efficiency and effectiveness of AI-driven coding processes.