
How to Build Custom Codex Plugins: A Step-by-Step Developer Tutorial
OpenAI’s Codex platform represents a paradigm shift in the way developers harness artificial intelligence to generate, analyze, and manipulate code across multiple programming languages and frameworks. As of the release of Codex app version 26.527, the platform has introduced an enhanced, streamlined mechanism for creating custom plugins, significantly expanding the scope and flexibility of AI-assisted development workflows. These custom plugins serve as modular extensions that empower developers to tailor Codex’s capabilities precisely to their project requirements, enabling sophisticated automation, context-aware code generation, and integration with external tools or APIs.
The Significance of Custom Codex Plugins
Custom plugins unlock a new dimension of developer control over AI interactions. Instead of relying solely on Codex’s out-of-the-box features, developers can now programmatically define how the AI interprets commands, processes data, and generates output. This level of customization is essential for complex development environments where standardized AI responses may fall short, such as domain-specific applications, enterprise codebases, or integrated development environments (IDEs) with unique workflows.
- Enhanced Contextual Awareness: Plugins can maintain state, access project-specific metadata, and incorporate contextual cues that improve AI predictions and code suggestions.
- Workflow Automation: Automate repetitive coding tasks and enforce coding standards programmatically through plugin-defined logic.
- Third-Party Integrations: Seamlessly connect Codex with external APIs, databases, CI/CD pipelines, or proprietary services to extend functionality beyond code generation.
- Multi-Language Support: Custom handlers enable plugins to operate across different programming environments, supporting polyglot projects with consistent AI assistance.
Overview of What This Tutorial Covers
This tutorial is designed as a comprehensive, hands-on guide that demystifies the entire process of building custom Codex plugins from the ground up. The following key areas will be explored in detail:
- Plugin Architecture: An in-depth analysis of the structural components of Codex plugins, including manifests, event handlers, and communication protocols.
- Manifest Configuration: Step-by-step instructions on setting up plugin manifests, detailing required fields, optional parameters, and best practices for defining capabilities and permissions.
- Development Environment Integration: Techniques to incorporate plugins into your local coding workflow, including debugging, live reloading, and version control considerations.
- Custom Handler Implementation: Practical examples of writing plugin logic in Python and Node.js, showcasing common patterns such as request handling, response formatting, and error management.
- Testing and Deployment: Strategies for validating plugin functionality, performance optimization, and deploying plugins in production-grade environments.
Who Should Follow This Tutorial?
This guide caters to a broad spectrum of developers and AI practitioners, including but not limited to:
- Experienced Developers: Those familiar with AI and API integrations who seek to leverage Codex’s extensibility for advanced coding assistance.
- AI Enthusiasts: Individuals new to AI-augmented development aiming to build foundational skills in plugin creation and system design.
- Software Architects: Professionals interested in incorporating AI-driven code generation into large-scale software ecosystems with customized business logic.
- DevOps Engineers: Engineers looking to automate and optimize CI/CD pipelines using Codex plugins.
Key Concepts and Terminology
Before diving into plugin development, it is critical to understand several foundational concepts that form the backbone of the Codex plugin system:
| Term | Description |
|---|---|
| Plugin Manifest | A JSON or YAML file that defines the plugin’s metadata, permissions, event subscriptions, and external dependencies. It acts as the blueprint for Codex to load and interact with the plugin. |
| Event Handlers | Functions or methods within the plugin that respond to specific AI or user-triggered events such as code generation requests, error reports, or context updates. |
| API Hooks | Endpoints or interfaces exposed by the plugin that Codex can invoke to perform custom logic or fetch external data during code assistance sessions. |
| Contextual State | Data maintained by the plugin to preserve session history, user preferences, or project-specific details that influence AI output. |
| Runtime Environment | The local or cloud-based environment where the plugin executes, which may involve Python interpreters, Node.js servers, or containerized platforms. |
Why Choose Python or Node.js for Plugin Development?
Codex plugins can be implemented in multiple programming languages, but Python and Node.js stand out for their versatility, extensive ecosystems, and ease of integration. Understanding their distinct advantages helps developers select the best fit for their use case.
- Python: Known for its simplicity and readability, Python offers robust libraries for AI, data processing, and asynchronous programming. It’s ideal for plugins requiring complex logic, machine learning integration, or rapid prototyping.
- Node.js: Leveraging JavaScript’s ubiquity, Node.js excels in event-driven, non-blocking I/O operations, making it suitable for plugins that interact heavily with web APIs, real-time data streams, or frontend frameworks.
Step-by-Step Workflow Preview
To set expectations, here is a high-level overview of the typical steps involved in building a custom Codex plugin, which will be elaborated on throughout this tutorial:
- Define the Plugin Manifest: Specify plugin name, version, permissions, and event subscriptions.
- Set Up the Development Environment: Install dependencies, configure runtimes, and prepare debugging tools.
- Implement Event Handlers: Write code to handle AI triggers, user inputs, and external API calls.
- Test Plugin Functionality: Execute unit and integration tests to verify behavior and performance.
- Deploy and Integrate: Register the plugin with Codex and integrate it within your development workflow.
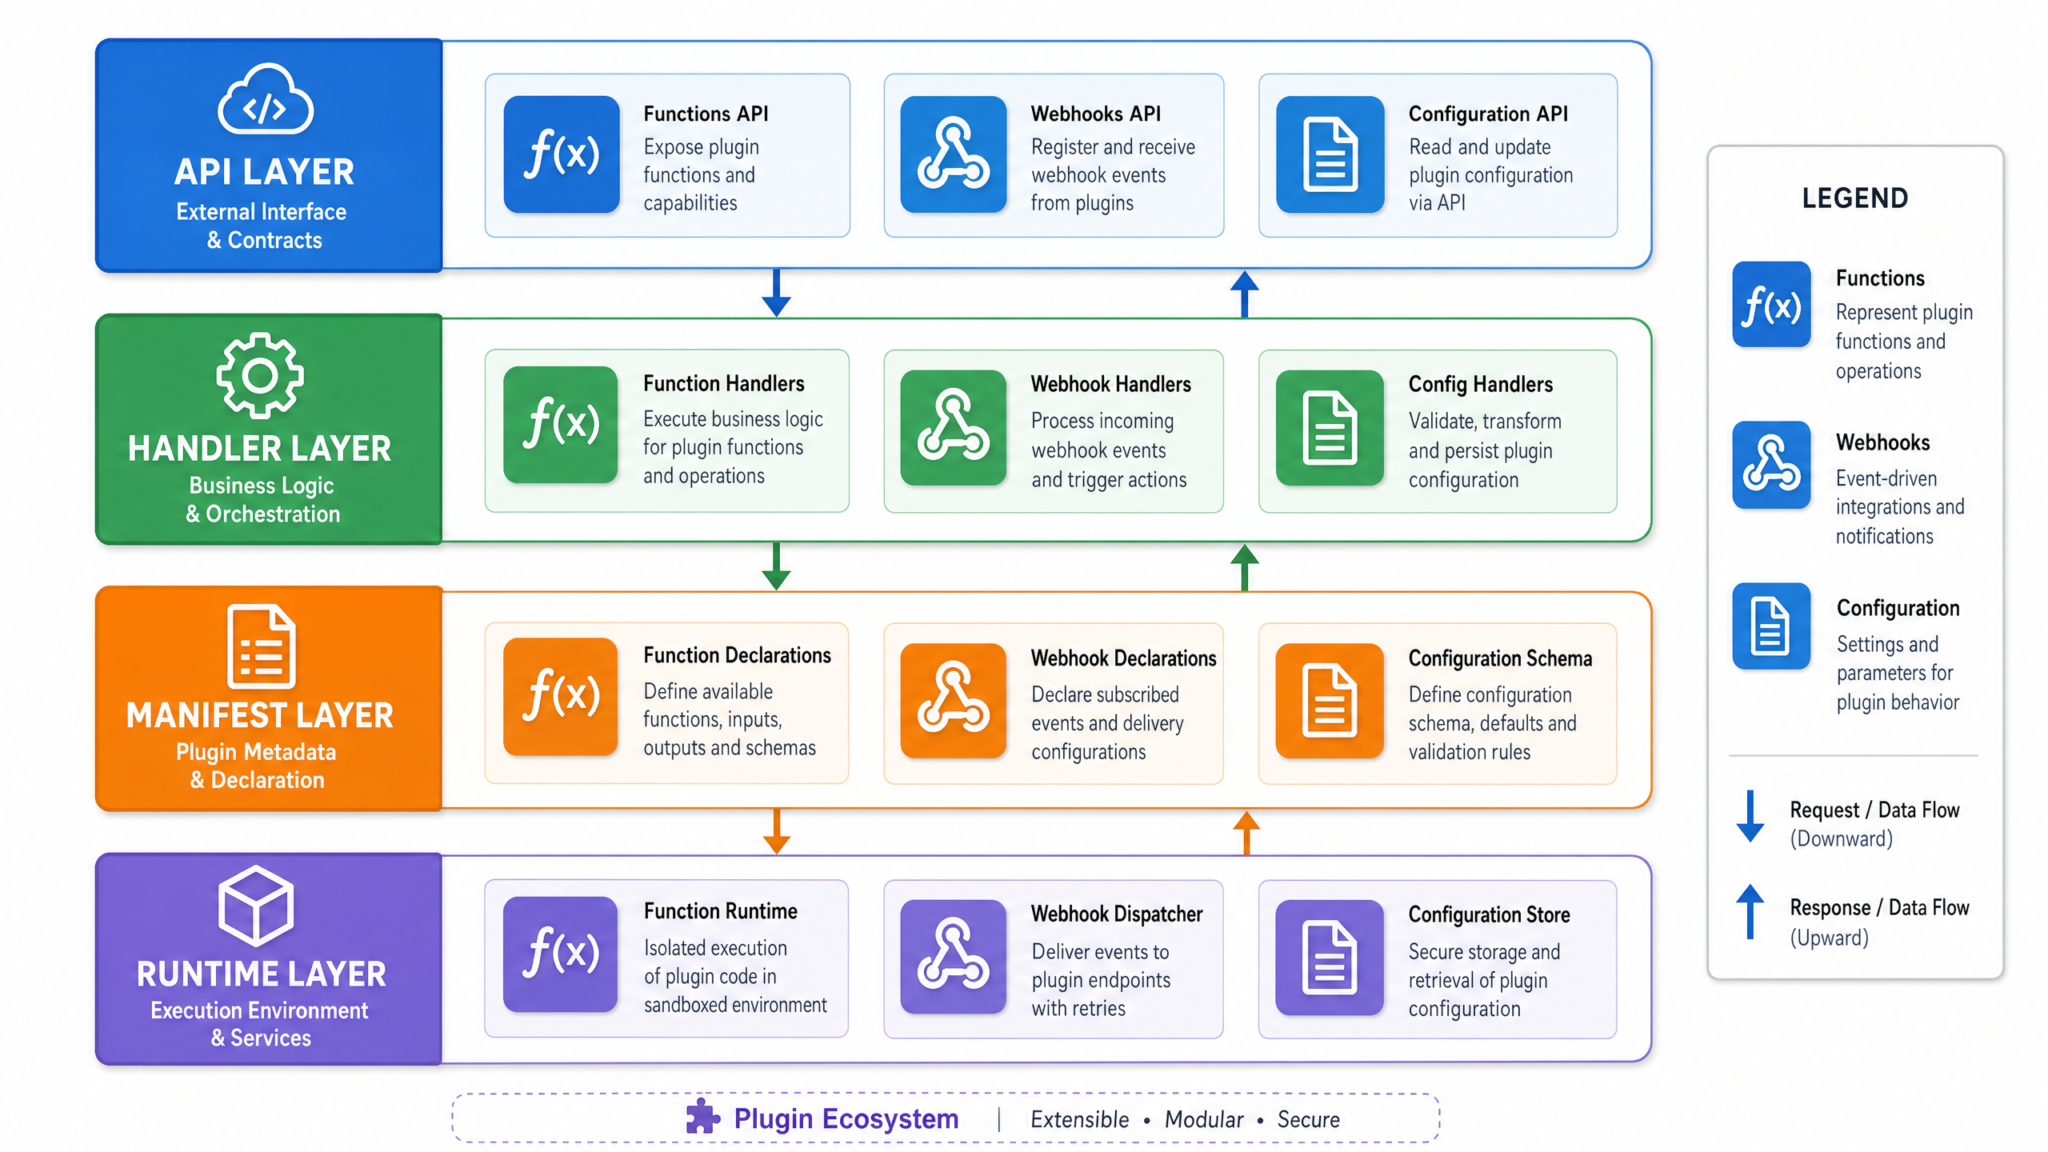
Understanding the Codex Plugin Architecture
Before embarking on the development of custom Codex plugins, it is imperative to develop a comprehensive understanding of the plugin architecture. This architecture forms the backbone of the entire plugin ecosystem, ensuring seamless integration, high performance, and extensibility. By dissecting each core component and the intricate lifecycle stages, developers can optimize their plugins for robustness, maintainability, and scalability.
In-Depth Analysis of Core Components
The Codex plugin architecture is composed of four fundamental components, each playing a pivotal role in facilitating smooth interaction between the Codex AI engine and the plugin’s custom logic. Understanding these components at a granular level is essential for effective plugin development.
1. Plugin Manifest
The Plugin Manifest is the declarative heart of any Codex plugin. It is a structured configuration file, typically authored in JSON or YAML format, that provides the Codex runtime with essential metadata and operational instructions. This manifest dictates how Codex discovers, loads, and interacts with the plugin.
Key elements within the Plugin Manifest include:
| Manifest Field | Description | Example |
|---|---|---|
name |
Unique identifier for the plugin, often in reverse domain notation. | "com.chatgptaihub.myplugin" |
version |
Semantic versioning string indicating the plugin version. | "1.0.0" |
description |
Brief summary of the plugin’s purpose and capabilities. | "Provides weather data integration for AI-assisted coding." |
api_endpoints |
Defines the REST or RPC endpoints exposed by the plugin for Codex to invoke. |
[
  {
    "path": "/weather",
    "method": "POST",
    "handler": "weatherHandler"
  }
]
|
permissions |
Specifies the scope of access the plugin requires, such as file system, network, or environment variables. | ["network", "filesystem"] |
hooks |
Lists Codex lifecycle events or triggers that the plugin listens for, mapping them to handler functions. | {"onRequest": "handleRequest", "onResponse": "handleResponse"} |
The manifest acts as a contract between the plugin and Codex, allowing the platform to validate compatibility and enforce security boundaries before plugin execution.
2. Handlers
Handlers are the executable units within the plugin responsible for processing incoming requests or events from Codex. These are essentially functions or classes written in supported programming languages such as Python or JavaScript (Node.js), encapsulating the business logic of the plugin.
Handlers must adhere to a defined interface to ensure consistent communication with Codex:
- Input: Typically, handlers receive a structured request object containing context information, parameters, and payloads.
- Processing: The handler executes logic which may include data transformation, external API calls, file operations, or complex computations.
- Output: A structured response object is returned, containing results or status indicators to Codex.
Example: A simple Node.js handler to fetch user data might look like this:
async function userDataHandler(request) {
  const userId = request.params.userId;
  const userData = await fetchUserFromDatabase(userId);
  return { status: 200, data: userData };
}
By modularizing logic into handlers, developers can achieve reusable, testable, and maintainable code segments.
3. Communication Layer
The Communication Layer serves as the middleware facilitating message exchange between the Codex core engine and plugin handlers. This layer abstracts the complexities of inter-process communication, data serialization, and concurrency management.
Key characteristics of the communication layer include:
- Protocol Agnostic: Supports multiple transport protocols such as HTTP, WebSockets, or gRPC depending on deployment.
- Message Queuing: Ensures reliable delivery and ordering of messages, crucial for synchronous and asynchronous operations.
- Security: Implements authentication, authorization, and encryption mechanisms to safeguard data exchange.
- Error Handling: Captures and propagates exceptions or timeouts back to Codex for graceful degradation.
Understanding the communication layer helps developers design efficient handlers that respect latency constraints and optimize throughput.
4. Development Server
The Development Server is a local runtime environment that hosts the plugin during development and testing phases. It simulates the Codex runtime, providing essential capabilities such as:
- Hot Reload: Automatically reloads plugin code upon source changes, accelerating iterative development.
- Debugging Tools: Integrates with IDE debuggers and logging frameworks for real-time inspection of handler execution.
- Mocked Inputs: Allows injection of synthetic events or requests to validate plugin behavior in isolation.
- Performance Profiling: Facilitates monitoring of execution time, memory usage, and resource consumption.
Leveraging the development server effectively reduces time-to-market and improves code quality through immediate feedback loops.
Comprehensive Breakdown of the Plugin Lifecycle
The plugin lifecycle orchestrates the sequence of states and transitions that a Codex plugin undergoes from initialization through termination. Mastery of this lifecycle enables developers to implement plugins that are efficient, resilient, and responsive.
- Initialization
During this phase, Codex ingests the plugin manifest to register metadata, API endpoints, permissions, and event hooks. The platform performs validation checks to ensure manifest correctness and security compliance.Technical details:
- Manifest schema validation against predefined JSON Schema.
- Dependency resolution for handler modules.
- Allocation of runtime resources such as threads or containers.
- Invocation
When Codex identifies a trigger condition—such as a specific user command, code context, or external event—it invokes the appropriate handler mapped in the manifest. This invocation is mediated by the communication layer.Example: Upon detecting a request for database schema generation, Codex calls the
schemaGeneratorHandlerwith relevant parameters.Considerations:
- Ensuring handlers are idempotent to prevent side effects on repeated invocations.
- Managing invocation concurrency to avoid race conditions.
- Execution
The handler processes the input data, executes business logic, interacts with external APIs or databases, and prepares a response.Advanced topics include:
- Asynchronous processing and promise handling in JavaScript.
- Error recovery strategies and fallback mechanisms.
- Data validation and sanitization to maintain integrity.
- Response
Once execution completes, the handler returns a structured response to Codex. This response is then integrated into the ongoing AI-assisted session, influencing code suggestions, completions, or other contextual outputs.Response payload format:
{ "status": 200, "result": { "suggestions": ["function foo() {...}", "const bar = 42;"] } } - Termination
After the response is delivered, Codex releases allocated resources and resets the plugin state as necessary. The plugin remains in a standby mode, ready for subsequent invocations.Resource management best practices:
- Closing database connections or file handles.
- Clearing in-memory caches to prevent memory leaks.
- Logging execution metrics for monitoring and analytics.
By adhering to this lifecycle, developers can ensure their plugins perform reliably under diverse operational scenarios and scale gracefully as demand increases.
Architectural Principles Favoring Modularity and Extensibility
The Codex plugin architecture is deliberately engineered to promote a modular approach, allowing developers to focus on implementing domain-specific logic without grappling with underlying infrastructure complexities. Some key architectural philosophies include:
- Language-Agnostic Interfaces: Handlers can be written in multiple supported languages, with the communication layer abstracting cross-language interoperability.
- Separation of Concerns: Distinct responsibilities are assigned to manifests, handlers, and communication layers, enabling independent development and testing.
- Extensible Hook System: Developers can register new event hooks or extend existing ones, facilitating future-proof plugin designs.
- Security by Design: Permissions and sandboxing mechanisms are enforced at the manifest and runtime levels to mitigate risks.
Understanding these principles empowers developers to architect plugins that are not only functional but also maintainable and secure.
Configuring the Plugin Manifest
The plugin manifest serves as the foundational blueprint for your Codex plugin. It dictates how Codex identifies, loads, and interacts with your plugin’s components during runtime. A meticulously crafted manifest not only ensures seamless integration but also enforces security boundaries and operational constraints necessary for stable plugin execution within the Codex ecosystem.
Manifest Format and Location
The manifest must be authored as a JSON file named plugin.manifest.json and resides at the root directory of your plugin project. This centralized placement allows Codex to efficiently locate and parse the manifest during the plugin loading phase. The manifest’s JSON structure must be well-formed and adhere strictly to the schema outlined in the Codex Plugin Manifest Reference.
Below is an exemplary manifest that illustrates the fundamental properties and their typical values:
{
  "pluginId": "com.example.mycodexplugin",
  "version": "1.0.0",
  "name": "My Custom Codex Plugin",
  "description": "Enhances Codex with custom code transformations.",
  "entryPoints": {
    "handlers": [
      {
        "event": "onCodeCompletion",
        "language": ["python", "javascript"],
        "script": "handlers/completionHandler.js"
      },
      {
        "event": "onFileSave",
        "language": ["python"],
        "script": "handlers/saveHandler.py"
      }
    ]
  },
  "permissions": [
    "filesystem:read",
    "filesystem:write",
    "network:request"
  ],
  "settings": {
    "enableDebug": true,
    "maxExecutionTimeMs": 5000
  }
}
Detailed Breakdown of Manifest Properties
| Property | Description | Value Type | Example |
|---|---|---|---|
pluginId |
A globally unique identifier for your plugin. Best practice is to use a reverse-DNS format to avoid naming collisions. | String | com.example.mycodexplugin |
version |
Adheres to Semantic Versioning (SemVer). This tracks incremental plugin updates and compatibility. | String | 1.0.0 |
name |
Human-readable plugin name displayed in the Codex UI and logs. | String | My Custom Codex Plugin |
description |
Concise summary of your plugin’s purpose and key features. | String | Enhances Codex with custom code transformations. |
entryPoints.handlers |
An array defining event-driven handlers. Each handler specifies:
|
Array of objects | See example above |
permissions |
Explicit permissions your plugin requires to operate. Codex enforces these permissions at runtime for security and sandboxing. | Array of strings | filesystem:read, network:request |
settings |
Optional configuration flags controlling plugin runtime behavior such as debugging or execution limits. | Object | {"enableDebug": true, "maxExecutionTimeMs": 5000} |
In-Depth Explanation of Key Manifest Sections
1. pluginId: The Unique Identifier
Your pluginId acts as the canonical reference for your plugin within the Codex ecosystem. It must be globally unique to prevent conflicts with other plugins. Using a reverse-DNS notation, such as com.yourdomain.pluginname, is the de facto standard. Avoid generic or overly broad identifiers.
Tip: If your plugin is intended for public distribution, secure a domain name or namespace to ensure uniqueness.
2. version: Semantic Versioning Best Practices
Adopt Semantic Versioning to communicate the nature of your updates:
MAJOR: Incremented for incompatible API changes.MINOR: Incremented for backward-compatible functionality additions.PATCH: Incremented for backward-compatible bug fixes.
Example: Moving from 1.0.0 to 1.1.0 signals new features without breaking compatibility.
3. entryPoints.handlers: Event-Driven Plugin Architecture
The entryPoints.handlers array is the heart of your plugin’s reactive design. Each handler is triggered by specific Codex events, allowing your plugin to inject functionality precisely when needed.
Key considerations for handlers:
- Events: Codex supports a variety of event types such as
onCodeCompletion,onFileSave,onProjectOpen. Selecting the right event(s) is crucial for efficient plugin behavior. - Language filters: Restrict handlers to specific programming languages to optimize performance and relevance.
- Script location: Define relative paths to your handler scripts. Codex supports multiple languages for handlers, including JavaScript and Python. Ensure your scripts comply with Codex’s runtime requirements.
Example handler configuration:
{
  "event": "onCodeCompletion",
  "language": ["python"],
  "script": "handlers/pythonCompletionHandler.js"
}
4. permissions: Security and Access Control
Codex enforces a strict permission model to sandbox plugins and mitigate security risks. Your manifest must explicitly declare the permissions your plugin requires.
filesystem:read– Read access to the local filesystem.filesystem:write– Write access to the local filesystem.network:request– Ability to send network requests.process:spawn– Permission to spawn subprocesses.- …and additional granular permissions as documented in the manifest reference.
Important: Request only the necessary permissions to adhere to the principle of least privilege, enhancing user trust and plugin security.
5. settings: Fine-Tuning Plugin Behavior
The settings object enables you to customize runtime options for your plugin. Common configuration parameters include:
enableDebug(boolean): Whentrue, activates verbose logging to assist during development and troubleshooting.maxExecutionTimeMs(integer): Sets an upper limit on handler execution time in milliseconds to prevent blocking Codex’s main thread.cacheEnabled(boolean): Enables or disables internal caching mechanisms within your plugin if applicable.
These settings provide granular control over plugin performance and diagnostics without modifying your plugin’s core logic.
Common Manifest Pitfalls and Best Practices
- JSON syntax errors: Always validate your manifest JSON with a linter or schema validator before deployment to avoid runtime loading failures.
- Invalid paths: Double-check that script paths correctly point to existing files relative to the manifest root.
- Over-permissioning: Avoid requesting excessive permissions, as this can lead to user distrust and potential rejection during plugin review.
- Version mismatches: Ensure the
versionfield is updated appropriately with each release to avoid caching or update conflicts. - Descriptive metadata: Provide meaningful
descriptionandnamefields to facilitate discoverability and clarity in plugin listings.
Validating and Testing Your Manifest
Prior to packaging and publishing your plugin, perform the following validation steps to ensure manifest integrity:
- Schema Validation: Use JSON schema validation tools aligned with the official Codex manifest schema to verify property types, required fields, and value constraints.
- Manual Review: Conduct a line-by-line review of the manifest for semantic correctness, such as verifying event names and language codes against Codex documentation.
- Local Loading Test: Load your plugin in a controlled Codex development environment to confirm that handlers trigger as expected and permissions are honored.
- Logging and Debugging: Utilize the
enableDebugsetting to capture detailed logs during testing phases, facilitating rapid identification of manifest-related issues.
Example: Comprehensive Manifest for a Multi-Language Plugin
Consider a plugin designed to enhance coding assistance for both Python and JavaScript, with handlers responding to multiple events and strict permission controls:
{
  "pluginId": "com.acme.codexpro",
  "version": "2.3.1",
  "name": "CodexPro Enhancer",
  "description": "Delivers advanced code analysis and refactoring across Python and JavaScript.",
  "entryPoints": {
    "handlers": [
      {
        "event": "onCodeCompletion",
        "language": ["python", "javascript"],
        "script": "handlers/completionHandler.js"
      },
      {
        "event": "onFileSave",
        "language": ["python"],
        "script": "handlers/saveHandler.py"
      },
      {
        "event": "onProjectOpen",
        "language": ["javascript"],
        "script": "handlers/projectOpenHandler.js"
      }
    ]
  },
  "permissions": [
    "filesystem:read",
    "filesystem:write",
    "network:request"
  ],
  "settings": {
    "enableDebug": false,
    "maxExecutionTimeMs": 4000
  }
}
This manifest reflects a real-world scenario where multiple event handlers coexist, languages are selectively targeted, and permissions are carefully scoped.
For exhaustive documentation on every manifest property, validation rules, and advanced configuration options, consult the Codex Plugin Manifest Reference.
Setting Up Local Development Environment
Developing custom Codex plugins locally necessitates a meticulously configured environment that closely replicates the Codex runtime. This enables developers to iterate swiftly with real-time testing, debugging, and seamless integration of new features. The local development environment acts as the foundational workspace where plugin logic, manifests, and handlers can be refined before deployment.
Prerequisites: Ensuring Your System Is Ready
Before delving into the setup, verify that your development machine meets the essential requirements. This guarantees compatibility and smooth operation of Codex tooling and runtime components.
| Component | Recommended Version | Purpose | Notes |
|---|---|---|---|
| Node.js | 16.x or above | JavaScript runtime for plugin handlers and Codex CLI tooling | Node.js 18.x LTS is recommended for optimal performance and security |
| Python | 3.8+ | Execution environment for Python-based plugin handlers | Ensure pip and virtualenv are installed for dependency management |
| Codex CLI | Latest stable release | Command-line interface to scaffold, run, and debug plugins locally | Install globally via npm for accessibility across projects |
| Code Editor | N/A | Primary tool for writing, debugging, and managing plugin code | Visual Studio Code is highly recommended due to extensive extension support |
Step 1: Installing Node.js and Python
Begin by installing Node.js and Python if they are not already present on your system.
- Node.js Installation: Download the installer from the official Node.js website. For package managers:
brew install node(macOS with Homebrew)sudo apt-get install nodejs npm(Ubuntu/Debian)- Python Installation: Download from the official Python website. Use package managers for automation:
brew install python(macOS)sudo apt-get install python3 python3-pip(Ubuntu/Debian)
Once installed, verify versions:
node -v
python3 --version
Step 2: Installing and Initializing the Codex CLI
The Codex CLI is pivotal for local plugin management, providing commands to scaffold, validate, and serve your plugin projects.
- Global Installation: Use npm to install the CLI globally, ensuring you can access it from any terminal window:
npm install -g @openai/codex-cliNote: If you encounter permission errors, prepend sudo (Linux/macOS) or run your terminal as Administrator (Windows).
- Initialize Your Plugin Project: Navigate to the root directory of your intended plugin project and run:
codex plugin initThis command performs several critical functions:
- Generates a
codex.plugin.jsonmanifest file outlining your plugin metadata and endpoints. - Creates a sample handler directory structure based on your chosen language.
- Validates existing manifest files to check for schema compliance and common errors.
Example Output:
✔ Plugin manifest created at codex.plugin.json
✔ Sample handlers scaffolded in /handlers
✔ Manifest validated successfully
Step 3: Starting the Local Development Server with Hot Reload
To run your plugin locally with immediate feedback on code changes, start the development server:
codex plugin dev --watchThis command accomplishes the following:
- Launches a local HTTP server typically bound to
localhost:4000. This simulates the Codex hosting environment. - Watches for file changes within your plugin directory to trigger automatic reloads.
- Exposes REST endpoints as defined in your plugin manifest, allowing you to test integration and handler responses in real time.
- Streams live logs and debugging information directly to your console for immediate troubleshooting.
Customizing the Server Port: To run the server on a different port, add the --port flag:
codex plugin dev --watch --port 5000Example Log Output:
Server running at http://localhost:4000
Watching for changes in /handlers
Received request: POST /generate
Handler executed successfully in 120ms
Step 4: Advanced Configuration of the Codex CLI
The codex.config.json file allows you to customize the CLI behavior for your local environment:
| Config Option | Description | Example |
|---|---|---|
port |
Sets the HTTP server port. | 4000 |
watchDirectories |
Array of directories to monitor for hot reload. | ["handlers", "utils"] |
logLevel |
Controls verbosity of logs: debug, info, warn, error. |
"debug" |
envFile |
Path to environment variables file for local secrets/configuration. | ".env.local" |
Step 5: Integrating the Codex Dev Server with Your IDE
Maximize productivity by linking your integrated development environment (IDE) directly to the Codex local server. This integration enables breakpoint management, step-through debugging, and real-time log inspection.
Visual Studio Code Configuration
VSCode supports attaching its debugger to Node.js processes using the Language Server Protocol (LSP), which Codex leverages internally.
- Create or open the
.vscode/launch.jsonfile in your plugin root. - Add the following configuration to attach the debugger to the Codex plugin process:
{
  "version": "0.2.0",
  "configurations": [
    {
      "type": "node",
      "request": "attach",
      "name": "Attach to Codex Plugin",
      "port": 9229,
      "restart": true,
      "protocol": "inspector",
      "timeout": 10000,
      "skipFiles": [
        "<node_internals>/**"
      ]
    }
  ]
}
Starting Your Plugin with Debug Mode Enabled:
- Launch the Codex dev server with the Node.js debugger flag:
node --inspect=9229 $(which codex) plugin dev --watch- This command runs Codex CLI with the debugger listening on port 9229, allowing VSCode to attach.
- Once attached, you can set breakpoints within your handler source files, inspect variables, and control execution flow.
Python Debugging Support
If your plugin handlers are implemented in Python, configure your IDE (e.g., VSCode) with the Python extension to support debugging:
- Set up a
launch.jsonconfiguration specifying the entry script for your handler. - Use environment variables to point to your local Codex server endpoints.
- Enable
autoReloadfeatures of your IDE to synchronize code changes.
Example Python debug configuration snippet:
{
  "name": "Python: Attach to Handler",
  "type": "python",
  "request": "attach",
  "connect": {
    "host": "localhost",
    "port": 5678
  },
  "pathMappings": [
    {
      "localRoot": "${workspaceFolder}/handlers",
      "remoteRoot": "/app/handlers"
    }
  ]
}
Step 6: Managing Environment Variables and Secrets Locally
Secure handling of API keys, tokens, and environment-specific configuration is critical. Codex local development supports loading environment variables from standard .env files.
- Create a
.env.localfile at your plugin root. - Define variables in the format
KEY=VALUE, for example:
OPENAI_API_KEY=sk-xxxxxxxxxxxxxxxxxxxxxxxxxxxxxxxx
PLUGIN_SECRET=mysecretvalue
DEBUG=true
The Codex CLI automatically loads this file during startup, injecting variables into the runtime environment.
Security Tip: Never commit .env.local or any secrets file to source control. Use .gitignore to exclude these files.
Step 7: Verifying Your Plugin Manifest and Endpoints
The Codex manifest (codex.plugin.json) defines the endpoints, authentication, and metadata of your plugin. You can validate your manifest anytime with:
codex plugin validateThis command performs schema checks and reports errors or warnings.
To test endpoints manually, use tools like Postman or curl. Example:
curl -X POST http://localhost:4000/generate \
  -H "Content-Type: application/json" \
  -d '{"prompt":"Hello, Codex!"}'
Additional Resources
For advanced local development setups including containerization, environment isolation, and deployment pipelines, see Codex Plugin Advanced Development Setup.
Writing Custom Handlers in Python and Node.js
Handlers serve as the fundamental building blocks of custom Codex plugins. They define how your plugin reacts to specific Codex events by executing tailored logic, manipulating data, and integrating seamlessly with the AI-assisted environment. Mastering handler implementation in both Python and Node.js empowers you to unlock the full potential of Codex plugins, enabling highly customized workflows and interactive experiences.
Understanding the Role of Handlers in Codex Plugins
At their core, handlers are event-driven functions triggered by Codex platform events—such as file saves, code completions, or API calls. These functions receive event payloads, perform computations or side effects, and return structured responses that influence subsequent AI behavior. Writing robust, efficient handlers is essential for creating performant and reliable plugins.
Key Responsibilities of Handlers
- Event Consumption: Receive and parse incoming event data, usually in JSON format.
- Business Logic Execution: Execute custom operations such as formatting code, modifying completions, or interacting with external services.
- Response Generation: Construct appropriate JSON responses that Codex can interpret and use to proceed with AI workflows.
- Error Handling: Gracefully manage exceptions and provide informative error messages.
- Integration: Interface with system tools, libraries, or APIs to enrich plugin capabilities.
Writing Custom Handlers in Python
Example 1: Python Handler for File Save Event with Automated Code Formatting
This example demonstrates a Python handler that intercepts the onFileSave event. It automatically applies the black code formatter to the saved Python file, ensuring consistent style and reducing manual intervention.
File Structure:
handlers/saveHandler.py
import subprocess
import json
import sys

def on_file_save(event_data_json):
    """
    Handler invoked on file save event.

    Args:
        event_data_json (str): A JSON string containing event metadata, including filePath.

    Returns:
        dict: A response dictionary indicating success or failure, with messages.
    """
    try:
        # Parse incoming event data JSON
        event_data = json.loads(event_data_json)
        file_path = event_data.get("filePath")

        if not file_path:
            return {"success": False, "error": "Missing 'filePath' in event data."}

        # Execute 'black' formatter on the saved file to enforce style consistency
        result = subprocess.run(["black", file_path], capture_output=True, text=True)

        if result.returncode != 0:
            # Capture and return formatter errors to assist in debugging
            return {"success": False, "error": result.stderr.strip()}

        # Return success response with an informative message
        return {"success": True, "message": f"Formatted '{file_path}' successfully."}

    except json.JSONDecodeError:
        return {"success": False, "error": "Invalid JSON input to handler."}
    except Exception as e:
        # Catch-all for unexpected exceptions with detailed error info
        return {"success": False, "error": f"Exception occurred: {str(e)}"}

if __name__ == "__main__":
    # Read JSON event input from standard input for CLI or Codex invocation
    input_json = sys.stdin.read()
    response = on_file_save(input_json)
    # Output JSON response for Codex to consume
    print(json.dumps(response))
In-Depth Explanation
- Input Handling: The handler accepts event data as a JSON string via standard input (
stdin). This design allows it to be invoked both within the Codex environment and through command-line testing. - JSON Parsing: The event data is parsed to extract the
filePath, which is critical for locating the file to be formatted. - External Process Invocation: The Python
subprocessmodule is used to execute theblackformatter as a child process. Usingcapture_output=Trueandtext=Trueensures that stdout and stderr streams are captured as strings. - Error Management: The handler checks the return code of the subprocess to detect failures and reports any errors back in the response JSON.
- CLI Support: The
if __name__ == "__main__"block enables standalone execution for debugging and testing.
Best Practices for Python Handlers
- Always validate incoming JSON and required fields to avoid runtime errors.
- Use subprocess judiciously, ensuring any external commands are available in the runtime environment.
- Return structured JSON responses that clearly differentiate between success and error states.
- Include detailed exception handling to capture unexpected failures.
- Consider asynchronous processing (e.g.,
asyncio) for handlers involving network or I/O-bound operations.
Writing Custom Handlers in Node.js
Example 2: Node.js Handler for Code Completion Event with Custom Comment Injection
This Node.js example illustrates a handler that modifies code completion suggestions by appending a custom signature comment to each suggestion. This pattern exemplifies how handlers can programmatically enhance AI-generated content before it reaches the user.
File Structure:
handlers/completionHandler.js
const fs = require('fs');

async function onCodeCompletion(eventDataJson) {
    try {
        // Parse incoming JSON event data
        const eventData = JSON.parse(eventDataJson);
        const completions = eventData.completions || [];

        // Append a custom comment to each completion suggestion's text
        const enhancedCompletions = completions.map(item => {
            return {
                ...item,
                text: item.text + " // Generated by My Custom Codex Plugin"
            };
        });

        // Return the enhanced completions wrapped in a success response
        return {
            success: true,
            completions: enhancedCompletions
        };
    } catch (error) {
        // Return error details in case of JSON parse failure or other exceptions
        return {
            success: false,
            error: error.message
        };
    }
}

// Support CLI invocation for development and testing
if (require.main === module) {
    let input = '';
    process.stdin.on('data', chunk => input += chunk);
    process.stdin.on('end', async () => {
        const response = await onCodeCompletion(input);
        console.log(JSON.stringify(response));
    });
}

module.exports = { onCodeCompletion };
Detailed Explanation
- Event Data Parsing: The handler expects a JSON string representing the event, which is parsed to extract the
completionsarray. - Data Transformation: Each completion object is enhanced by appending a fixed comment to its
textfield. This demonstrates how handlers can dynamically transform AI outputs. - Asynchronous Design: Although this example uses synchronous operations, the handler function is declared
asyncto allow future asynchronous extensions such as API calls. - Robust Error Handling: Parsing errors or unexpected exceptions result in a response with
success: falseand a descriptive error message. - CLI Compatibility: Reading from
stdinsupports direct command-line testing, facilitating rapid iteration.
Best Practices for Node.js Handlers
- Use
async/awaitsyntax to handle asynchronous operations cleanly. - Validate and sanitize all incoming data to prevent runtime errors.
- Structure responses consistently to enable predictable Codex integration.
- Design handlers to gracefully handle partial or missing data.
- Modularize code for reusability and maintainability, exporting handler functions as modules.
Comparative Summary: Python vs. Node.js Handlers
| Aspect | Python Handlers | Node.js Handlers |
|---|---|---|
| Primary Use Cases | Ideal for CPU-bound tasks, file system operations, and leveraging Python-specific tools like black. |
Suited for asynchronous I/O, network requests, and event-driven architectures. |
| Execution Model | Synchronous by default; can use asyncio for async behavior. |
Non-blocking, event-driven, inherently asynchronous. |
| Error Handling | Try-except blocks with detailed exception capture. | Try-catch with promise rejection handling. |
| Integration with External Tools | Direct subprocess calls to CLI tools. | Native support for HTTP clients and extensive npm packages. |
| Testing and Debugging | Support for CLI invocation and standard testing frameworks like pytest. |
CLI support with tools like mocha or jest. |
Advanced Handler Development Considerations
- Asynchronous API Calls: Handlers often need to interact with external REST APIs or internal microservices. Implement asynchronous patterns using
async/awaitin Node.js orasyncioin Python to avoid blocking the Codex event loop. - Stateful Handlers: While most handlers are stateless, some scenarios require maintaining session state or caching. Consider using external storage (e.g., Redis, databases) or in-memory caches with appropriate concurrency controls.
- Security: Sanitize inputs rigorously to prevent injection attacks. Limit execution privileges of subprocesses and validate all file paths to avoid directory traversal vulnerabilities.
- Performance Optimization: Profile handler execution times and optimize bottlenecks. Use asynchronous file I/O and avoid long-running synchronous operations.
- Logging and Monitoring: Integrate detailed logging for debugging and production monitoring. Structured logs with timestamps and severity levels facilitate efficient troubleshooting.
For further examples including asynchronous API calls and stateful handlers, consult .
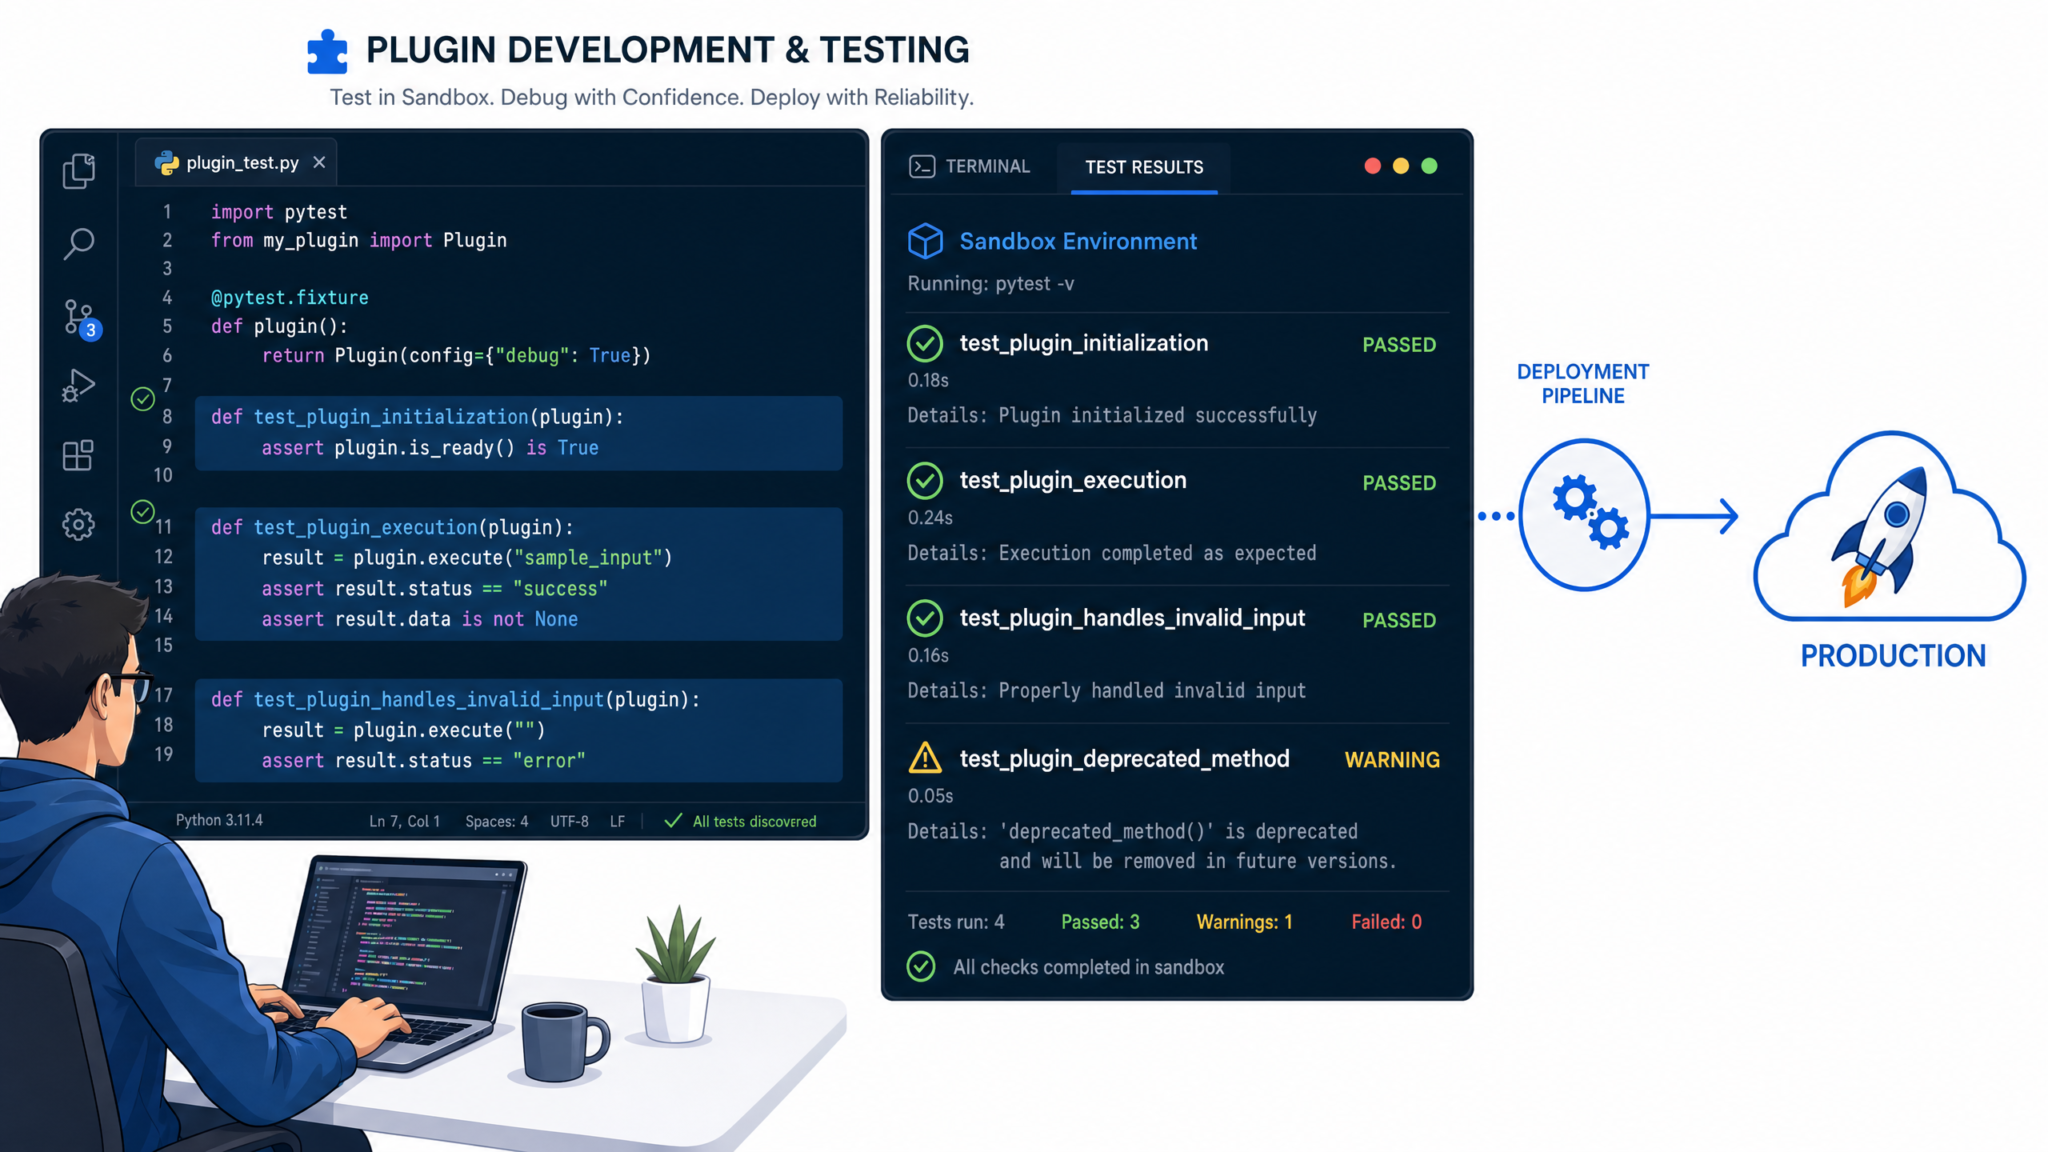
Testing, Debugging, and Deployment Best Practices
Unit and Integration Testing
Robust testing is the cornerstone of developing reliable, maintainable, and high-quality Codex plugins. It is critical to validate each handler’s logic in isolation (unit testing) before verifying their collaboration in an integrated environment (integration testing). This two-tiered approach ensures that individual components behave as expected and work harmoniously when combined, minimizing runtime failures and unexpected behaviors.
Unit Testing Best Practices
Unit tests focus on the smallest testable parts of the plugin—typically individual handler functions or utility modules. The goal is to test each function’s inputs and outputs independently from external dependencies such as file systems, networks, or databases. This isolation is commonly achieved using mock objects or stubbing techniques.
- Define clear, deterministic inputs: Construct mock events that closely mimic the actual Codex plugin event payloads.
- Assert expected outputs: Check for correct return values, state changes, or side effects.
- Use fixtures for setup/teardown: Prepare consistent test environments and clean up post-test to avoid cross-test pollution.
- Automate tests: Integrate with continuous integration (CI) pipelines to catch regressions early.
Integration Testing Strategies
Integration tests verify that multiple components of the plugin interact correctly. This includes validating that event handlers can process chained events, shared resources are accessed correctly, and the plugin respects contract boundaries defined in the manifest.
- Simulate full event flows: Pass realistic event sequences to the plugin to test end-to-end functionality.
- Test external dependencies: Where applicable, mock external APIs or services but keep mocks close to real behavior to avoid false positives.
- Validate error handling: Ensure that the plugin gracefully handles invalid inputs, network failures, and unexpected states.
Example: Python Unit Test with pytest
Below is an expanded Python example demonstrating unit testing of a handler function that formats a file when saved. Notice the use of mock event data and assertion of the success flag:
import json
import pytest
from handlers.saveHandler import on_file_save

@pytest.fixture
def mock_event():
    return {
        "filePath": "example.py",
        "fileContent": "print('Hello, world!')",
        "options": {"formatOnSave": True}
    }

def test_format_on_save_success(mock_event):
    # Serialize event as JSON string to simulate actual event input
    event_json = json.dumps(mock_event)
    response = on_file_save(event_json)

    # Assert response structure and success status
    assert isinstance(response, dict), "Response should be a dictionary"
    assert response.get("success") is True, "Formatting on save should succeed"
    assert "formattedContent" in response, "Response must include formatted content"

def test_format_on_save_failure():
    # Provide malformed event data to test error handling
    malformed_event = '{"filePath": null}'
    response = on_file_save(malformed_event)

    assert response.get("success") is False, "Handler should fail gracefully on invalid input"
    assert "error" in response, "Error message must be returned on failure"
Testing Frameworks and Tools
| Language | Recommended Testing Frameworks | Mocking Libraries | Key Features |
|---|---|---|---|
| Python | pytest, unittest |
unittest.mock, pytest-mock |
Simple syntax, fixtures, rich assertion introspection, extensive plugins |
| Node.js | jest, mocha, ava |
sinon, jest.mock |
Built-in mocking, snapshot testing, async support, parallel test execution |
Debugging Tips
Efficient debugging accelerates development cycles and reduces costly production issues. Below are advanced techniques and best practices tailored for Codex plugin development:
Enable Verbose Logging
Modify your plugin’s manifest file to include "enableDebug": true. This instructs the Codex runtime environment to emit detailed debug logs, including event payloads, handler entry and exit points, and internal state changes. Verbose logs can be invaluable when tracing complex workflows or intermittent issues.
IDE Debugger Integration
Most modern IDEs support debugging Node.js and Python processes. Attach your debugger to the plugin’s runtime process to set breakpoints, step through code, inspect variables, and evaluate expressions in real-time:
- Python: Use
pdbor IDE-native debuggers (e.g., VSCode Python extension) to launch the plugin handler script. - Node.js: Start your plugin with
node --inspectornode --inspect-brkflags, then connect via IDE debugging tools.
Strategic Logging
While console.log (Node.js) or print (Python) statements are straightforward for tracing execution, their indiscriminate use can clutter logs and obscure meaningful information. Adopt the following practices:
- Log levels: Implement configurable log levels (DEBUG, INFO, WARN, ERROR) to filter output based on context.
- Contextual messages: Include handler names, event IDs, and timestamps to correlate logs across distributed systems.
- Sanitize sensitive data: Avoid logging secrets, personally identifiable information (PII), or large payloads.
Common Debugging Scenarios
| Issue | Debugging Approach | Example Tools/Commands |
|---|---|---|
| Handler not triggering | Verify event subscription in manifest; confirm event payload matches expected schema | console.log(event), manifest validation tools |
| Unexpected response format | Check serialization/deserialization logic; assert response structure in tests | print(response), unit tests with assertions |
| Performance bottlenecks | Profile handler execution; identify slow I/O or CPU-intensive operations | Node.js Profiler, Python cProfile, flamegraphs |
Deployment and Versioning
Deployment of Codex plugins should be approached with the same rigor as any production software artifact. Proper packaging, version control, and release management ensure smooth rollouts and backward compatibility.
Packaging Your Plugin
Before deployment, verify that your plugin directory includes:
- Manifest file:
manifest.jsonwith correct metadata, event subscriptions, andenableDebugflags. - Handler scripts: Fully tested and linted source files.
- Dependency declarations: For Node.js,
package.jsonwith pinned versions; for Python,requirements.txtorpyproject.toml. - Documentation and changelog: Include
README.mdand detailed release notes.
Publishing via Codex CLI
The official Codex CLI provides a streamlined publishing workflow. Use the following command syntax to deploy your plugin:
codex plugin publish --plugin-dir ./myplugin --version 1.0.0Key points to note:
- –plugin-dir: Path to the root directory of your plugin.
- –version: Explicitly specify the semantic version you are releasing.
Semantic Versioning and Change Management
Adopt Semantic Versioning (SemVer) principles to communicate the impact of changes effectively:
| Version Segment | Increment When | Effect on Users |
|---|---|---|
| MAJOR (e.g., 2.x.x) | Introducing incompatible API changes or breaking backward compatibility | Users must review migration guides before upgrading |
| MINOR (e.g., 1.3.x) | Adding functionality in a backward-compatible manner | Users gain new features without breaking existing workflows |
| PATCH (e.g., 1.2.1) | Backward-compatible bug fixes and minor improvements | Safe to update; no new features |
Maintain a detailed CHANGELOG.md documenting the rationale for each version increment, especially for breaking changes. This transparency facilitates user trust and smooth upgrade paths.
Advanced Deployment Considerations
For production-scale deployments, consider the following:
- Continuous Integration / Continuous Deployment (CI/CD): Automate testing, packaging, and publishing using pipelines on platforms like GitHub Actions, Jenkins, or GitLab CI.
- Rollbacks: Keep prior plugin versions accessible to enable quick rollbacks in case of critical failures.
- Monitoring and Telemetry: Integrate logging and performance monitoring to track plugin health post-deployment.
- Security Audits: Regularly scan dependencies and code for vulnerabilities before publishing.
For detailed guidance on scaling plugin deployment and integrating with enterprise-grade CI/CD workflows, refer to the comprehensive resource: .
Conclusion
Building custom plugins for OpenAI’s Codex represents a transformative approach to customizing and elevating AI-assisted software development workflows. The ability to design, implement, and deploy your own extensions unlocks a spectrum of powerful capabilities—from automating mundane, repetitive coding tasks to integrating complex domain-specific logic that can dramatically enhance developer productivity and code quality.
Deep Dive into the Plugin Architecture
At the core of crafting effective Codex plugins lies a thorough understanding of the underlying architecture. Codex plugins are modular components that interface seamlessly with the AI engine, allowing developers to extend the model’s functionality by introducing bespoke commands, APIs, or data sources. This architecture is intentionally designed to be:
- Modular and Extensible: Plugins operate as self-contained units that can be independently developed, tested, and maintained.
- Declarative Manifests: Each plugin includes a manifest file that defines its metadata, permissions, API endpoints, and interaction patterns, ensuring clear contract-based integration.
- Multi-Language Support: Handlers can be implemented in popular languages such as Python and Node.js, providing flexibility for developers to leverage familiar stacks.
- Secure and Isolated: The plugin system enforces strict security boundaries, limiting access to sensitive resources and preventing unintended side effects.
Understanding these principles enables developers to architect plugins that are both robust and maintainable, ensuring long-term compatibility with the Codex platform.
Configuring Robust and Scalable Plugin Manifests
The manifest file is the declarative backbone of your plugin, detailing how the Codex runtime interacts with your extension. A well-configured manifest not only facilitates seamless integration but also ensures scalability and security. Key components include:
| Manifest Element | Description | Best Practices |
|---|---|---|
name |
Unique identifier for your plugin | Use concise, descriptive names to prevent conflicts |
version |
Semantic versioning of plugin releases | Follow semantic versioning (MAJOR.MINOR.PATCH) for clarity |
permissions |
Defines API scopes and resource access | Adopt least privilege principle; request only necessary permissions |
api |
Endpoint definitions and schemas | Use OpenAPI specifications to define clear and consistent APIs |
authentication |
Specifies authentication methods | Implement secure OAuth or token-based authentication where applicable |
By meticulously crafting your manifest, you lay a strong foundation that governs how your plugin behaves, communicates, and scales within the Codex ecosystem.
Setting Up a Professional Local Development Environment
Reliable local development environments are critical for iterative plugin development and debugging. To optimize your workflow:
- Use Containerization: Employ Docker to create isolated environments matching production dependencies, reducing “works on my machine” issues.
- Leverage Debugging Tools: Utilize integrated debuggers in IDEs like VSCode or PyCharm to step through your plugin handlers and inspect runtime states.
- Automate Testing: Implement unit and integration tests using frameworks like pytest for Python or Jest for Node.js to ensure your plugin functions as intended.
- Continuous Integration: Set up CI pipelines to automatically validate plugin builds and run tests on code commits, enhancing code quality and reducing regressions.
Establishing a professional-grade local environment accelerates development cycles and improves the reliability of your plugins.
Authoring Handlers in Python and Node.js: Practical Insights
Codex plugins typically require server-side handlers to process requests, perform logic, and generate responses. Both Python and Node.js are supported, each with distinct advantages:
- Python: Ideal for data-centric tasks, AI integration, and rapid prototyping. Popular frameworks such as FastAPI or Flask provide lightweight HTTP routing and validation. Example snippet:
from fastapi import FastAPI, Request

app = FastAPI()

@app.post("/handle")
async def handle(request: Request):
    data = await request.json()
    # Perform processing logic
return {"result": "Processed data successfully"}- Node.js: Offers high concurrency and event-driven architecture, suitable for real-time applications and API orchestration. Frameworks like Express.js simplify endpoint creation. Example snippet:
const express = require('express');
const app = express();

app.use(express.json());

app.post('/handle', (req, res) => {
  const data = req.body;
  // Perform processing logic
  res.json({ result: 'Processed data successfully' });
});

app.listen(3000, () => {
  console.log('Plugin handler running on port 3000');
});
Choosing the appropriate language and framework depends on your plugin’s complexity, performance needs, and developer expertise. In both cases, ensure robust error handling, input validation, and logging for maintainability and troubleshooting.
Maintaining and Evolving Plugins in a Dynamic Ecosystem
As the Codex platform continually evolves, maintaining your plugins to remain compatible and performant is paramount. Best practices include:
- Monitor API Deprecations and Updates: Subscribe to official OpenAI release notes and changelogs to anticipate breaking changes.
- Engage with the Developer Community: Participate in forums, GitHub repositories, and community chats to share insights and learn from peers.
- Implement Telemetry: Integrate usage analytics to monitor plugin performance and user engagement, enabling data-driven improvements.
- Iterative Enhancement: Regularly update your plugin with new features, optimizations, and security patches based on feedback and evolving requirements.
This proactive maintenance approach ensures that your plugins remain reliable, secure, and aligned with emerging developer needs.
Experimentation and Contribution: Growing the Codex Ecosystem
The examples and patterns demonstrated throughout this tutorial serve as a springboard for your own creative explorations. We strongly encourage you to:
- Expand Plugin Functionality: Incorporate advanced AI-driven features such as natural language understanding, automated refactoring, or contextual code suggestions.
- Integrate Third-Party APIs: Connect your plugins with external services like version control systems, CI/CD pipelines, or issue trackers to build comprehensive development tools.
- Share Your Work: Publish your plugins on community platforms or contribute to open-source repositories to foster collaboration and innovation.
- Seek Feedback: Engage users early and iterate based on real-world usage to refine your plugin’s usability and effectiveness.
By actively experimenting and contributing, you not only enhance your own skills but also help cultivate a vibrant, diverse ecosystem of Codex extensions that benefit the broader developer community.
📚 Related Articles
- **Topic:**
“Mastering Custom GPTs: How Developers Can Build and Deploy Tailored AI Assistants Using OpenAI’s Latest API Features”**Why it’s trending/high-value:**
With OpenAI’s recent rollout of customizable GPT models, developers now have unprecedented control to create AI assistants fine-tuned for specific industries, workflows, or user needs. This tutorial/news article would dive deep into the step-by-step process of leveraging these new API capabilities, showcasing practical use cases, optimization techniques, and deployment best practices. It addresses the growing developer demand to move beyond generic AI and build specialized, high-performance conversational agents—making it a must-read for the chatgptaihub.com audience eager to stay ahead in the AI app development space. - How to Build a Research Assistant with OpenAI Codex in 2026: Step-by-Step
- How to Build AI Agents That Actually Work: A Step-by-Step Developer Guide for 2026
🚀 Stay Ahead with AI
Get the latest ChatGPT tips, prompts, and tutorials delivered to your inbox weekly.