
How to Set Up Codex on Linux for Terminal-First Development: Complete Playbook from Installation to Advanced Workflow Integration
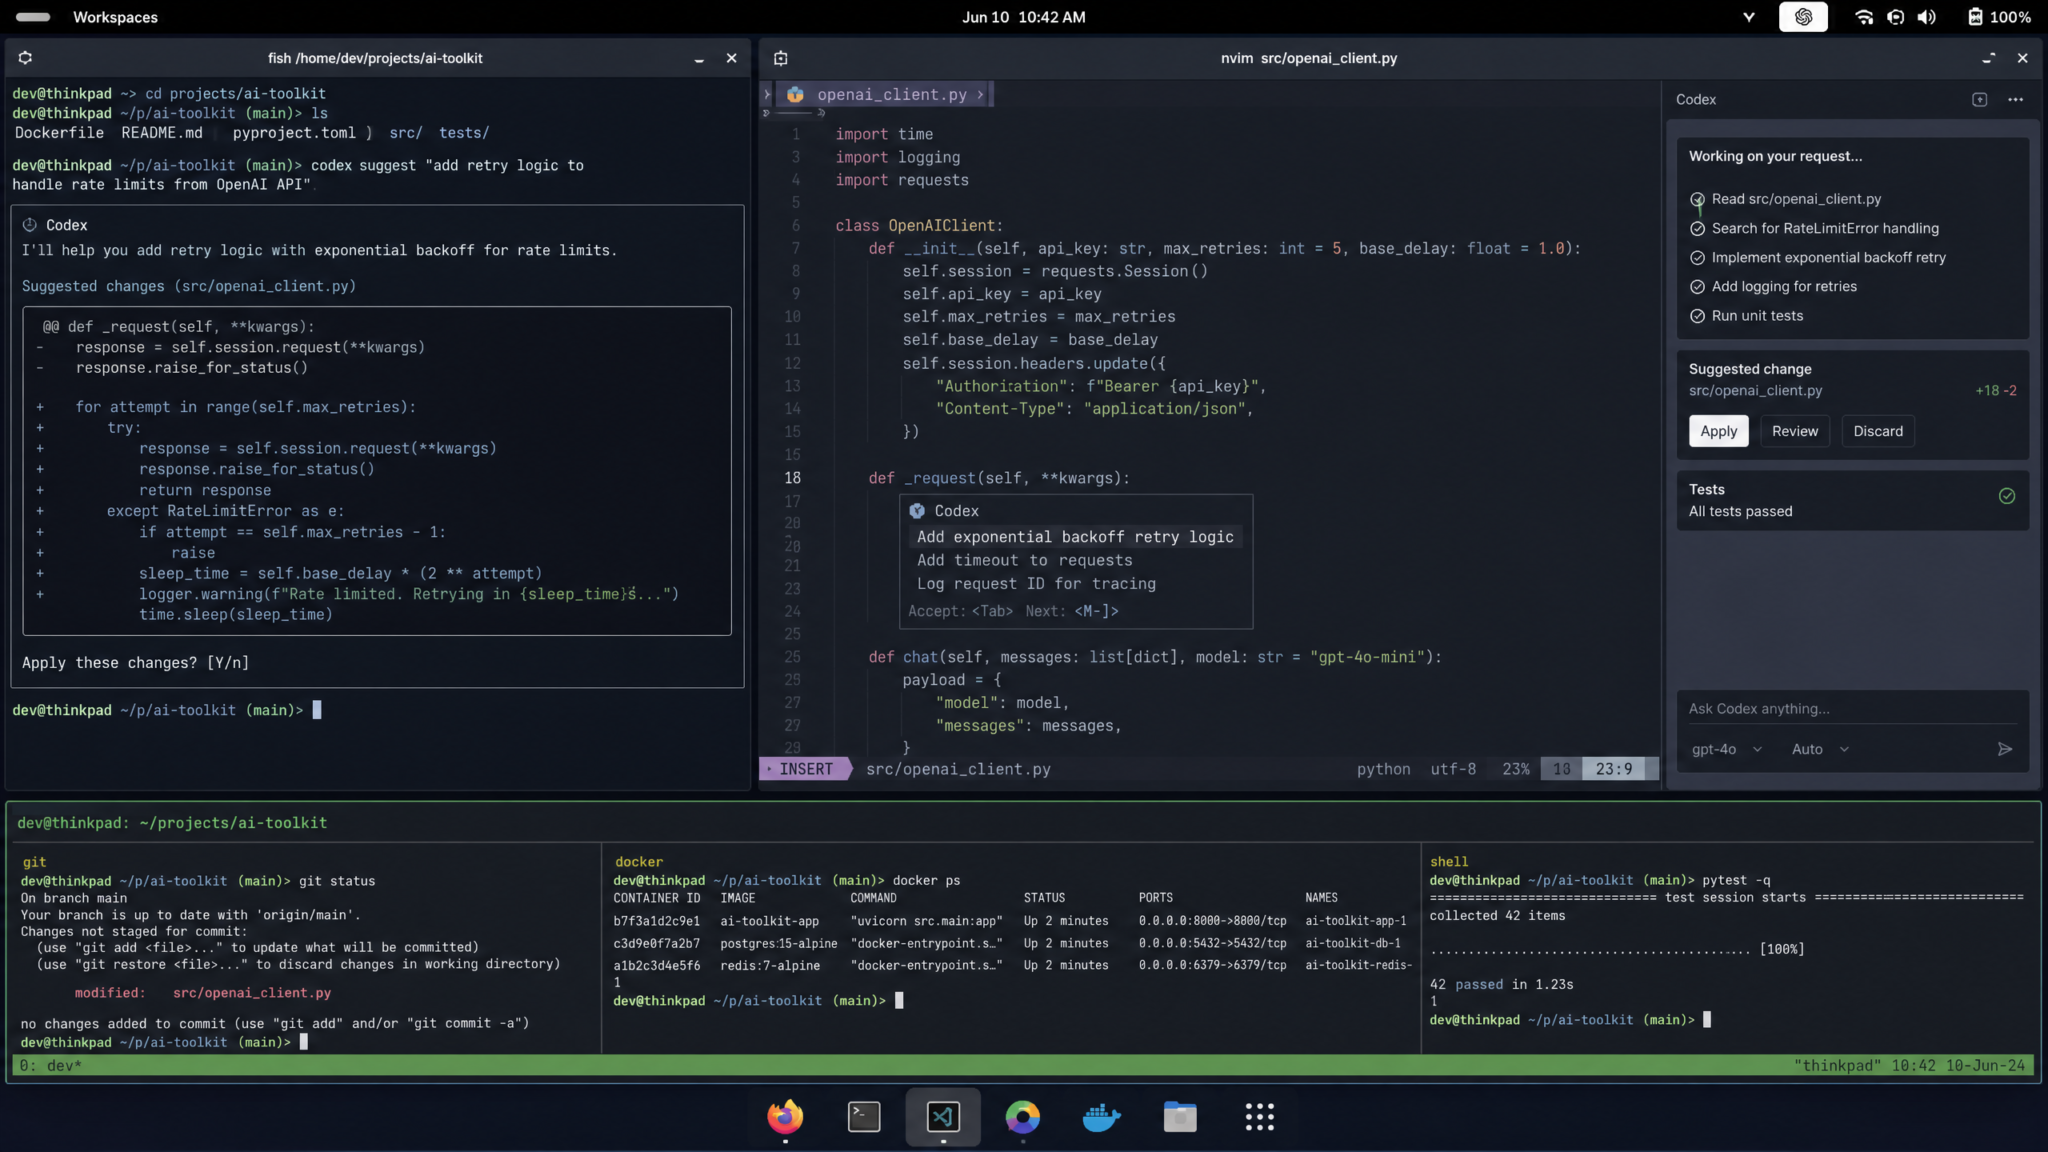
Linux developers live in the terminal. Every workflow — from spinning up Docker containers to managing remote SSH sessions — flows through a shell prompt, a multiplexer pane, or a keybinding in a text editor that hasn’t needed a mouse since 2009. Codex, the AI-powered coding engine integrated into ChatGPT, was built with that reality in mind. This playbook walks you through every phase of integrating Codex into a genuine terminal-first Linux development environment, from choosing your installation format to automating complex multi-repo CI/CD workflows entirely through conversational AI assistance.
Phase 1: Installation — Packages, Formats, and First Authentication
Understanding What You Are Installing
Before downloading anything, clarify the distinction between the ChatGPT desktop application (which bundles the Codex preview for Linux) and the standalone OpenAI Codex CLI tool available via npm. Both have their place in a terminal-first workflow, but they serve different interaction models. The ChatGPT desktop app gives you a windowed interface that also exposes its context to CLI bridges. The Codex CLI tool, installed separately, lets you invoke AI-assisted code generation directly from any shell prompt without a graphical window. This playbook covers both, because elite Linux workflows use them together.
As of mid-2025, the ChatGPT desktop application ships for Linux in three primary distribution formats. Understanding the tradeoffs between them is not a minor footnote — on Linux, your package format determines update cadence, sandbox permissions, filesystem access, and how well the app integrates with your display server and shell environment.
Choosing Your Distribution Format
| Format | Pros | Cons | Best For |
|---|---|---|---|
| AppImage | Portable, no install required, runs on any distro, easy rollback | No auto-updates, manual permission management, larger binary size | Arch, NixOS, Gentoo, immutable distros like Fedora Silverblue |
| .deb package | System-level integration, apt-managed updates, smaller footprint | Debian/Ubuntu-only, requires root for install | Ubuntu, Debian, Pop!_OS, Linux Mint, elementary OS |
| Flatpak | Sandboxed, distro-agnostic, Flathub distribution, easy updates | Sandbox can block filesystem and socket access needed for terminal context | Fedora Workstation, openSUSE, any distro with Flatpak support |
Installing via AppImage (Recommended for Terminal-First Workflows)
The AppImage format wins for terminal-first developers because it imposes no sandbox by default. Your Codex instance can read shell socket files, access /proc entries for running processes, and write to your home directory’s config paths without hitting Flatpak permission walls. Download the AppImage from the official ChatGPT download page, then set it up properly:
# Download the AppImage (verify the URL matches the official OpenAI download page)
wget -O ~/Applications/ChatGPT.AppImage https://download.chatgpt.com/linux/ChatGPT-latest.AppImage

# Make it executable
chmod +x ~/Applications/ChatGPT.AppImage

# Optional: integrate with your desktop environment
cd ~/Applications
./ChatGPT.AppImage --appimage-extract
# This extracts squashfs-root/ which you can symlink from /usr/local/bin

# Create a launcher wrapper in your PATH
cat > ~/.local/bin/chatgpt << 'EOF'
#!/usr/bin/env bash
exec ~/Applications/ChatGPT.AppImage "$@"
EOF
chmod +x ~/.local/bin/chatgpt
Installing via .deb on Ubuntu/Debian Systems
# Add the official OpenAI apt repository (check openai.com for the current signing key)
curl -fsSL https://packages.openai.com/linux/ubuntu/gpg | sudo gpg --dearmor \
  -o /etc/apt/keyrings/openai.gpg

echo "deb [arch=$(dpkg --print-architecture) signed-by=/etc/apt/keyrings/openai.gpg] \
  https://packages.openai.com/linux/ubuntu $(lsb_release -cs) stable" | \
  sudo tee /etc/apt/sources.list.d/openai.list > /dev/null

sudo apt update && sudo apt install chatgpt-desktop -y
Installing the Codex CLI Tool
The Codex CLI operates independently of the desktop app and is the tool you will reach for most during day-to-day terminal work. Install it via npm or the standalone binary:
# Via npm (Node 18+ required)
npm install -g @openai/codex

# Verify installation
codex --version

# Configure your API key
export OPENAI_API_KEY="sk-your-key-here"
# Add to your shell profile for persistence:
echo 'export OPENAI_API_KEY="sk-your-key-here"' >> ~/.bashrc
# or for zsh:
echo 'export OPENAI_API_KEY="sk-your-key-here"' >> ~/.zshrc
Verifying Codex Preview Access
Codex within ChatGPT is currently a preview feature tied to ChatGPT Plus, Pro, and Enterprise subscriptions. After installation, launch the desktop app and navigate to Settings → Features → Codex. If you see an "Enable Codex" toggle, you have access. If the section is absent, your account tier may not yet include the preview. Verify your subscription status at chat.openai.com/settings.
For the CLI tool, Codex access runs through the standard API with the codex-1 model. You can verify access with:
codex "list the files in my current directory and identify any configuration files"If authentication succeeds, you will see a streamed response analyzing your working directory. If you receive a 401 or 403 error, double-check that your API key has the Codex model enabled under your OpenAI platform account at platform.openai.com/account/limits.
Initial Configuration File
The Codex CLI stores its configuration in ~/.config/codex/config.json. Edit this file to set your preferred model, default context behavior, and output formatting:
{
  "model": "codex-1",
  "approvalMode": "suggest",
  "contextPaths": [
    "~/.bashrc",
    "~/.zshrc",
    "~/.gitconfig",
    "~/dotfiles/"
  ],
  "notify": false,
  "maxTokens": 8192,
  "temperature": 0.2
}
The approvalMode field is critical for terminal safety. Set it to "suggest" to have Codex propose commands without executing them, "auto" for sandboxed auto-execution, or "full-auto" only in isolated development environments where you trust the full execution chain.
Phase 2: Terminal Integration — Context, History, and Shell Awareness
Why Context Is Everything
A Codex session that knows nothing about your environment will give you generic answers. A Codex session that understands your shell history, your active virtual environments, your running services, and your project structure will function like a senior engineer sitting next to you. Phase 2 is about building that context pipeline.
Configuring Shell History Awareness
Both bash and zsh can expose recent command history to Codex through a context-injection wrapper. The pattern involves a shell function that prepends relevant history to each Codex invocation:
# Add to ~/.bashrc or ~/.zshrc

# History-aware Codex wrapper
cx() {
  local context_file=$(mktemp /tmp/codex-context-XXXXXX)

  # Capture last 50 commands
  echo "=== Recent Shell History ===" >> "$context_file"
  history 50 >> "$context_file"

  # Capture current directory structure
  echo -e "\n=== Current Directory ===" >> "$context_file"
  ls -la >> "$context_file"

  # Capture active environment
  echo -e "\n=== Environment Context ===" >> "$context_file"
  echo "PWD: $PWD" >> "$context_file"
  echo "VIRTUAL_ENV: ${VIRTUAL_ENV:-none}" >> "$context_file"
  echo "NODE_ENV: ${NODE_ENV:-none}" >> "$context_file"
  echo "Git branch: $(git branch --show-current 2>/dev/null || echo 'not a git repo')" >> "$context_file"

  # Run Codex with context
  codex --context-file "$context_file" "$@"
  rm -f "$context_file"
}

# Quick alias for common operations
alias cxf='cx --format shell'   # output as executable shell commands
alias cxe='cx --format explain' # explain mode for understanding output
tmux Integration
If tmux is your multiplexer (and for terminal-first developers, it should be), you can expose pane content directly to Codex. This lets you ask questions like "what error is showing in my server pane?" without copy-pasting anything:
# Capture current tmux pane output and send to Codex
tmux-cx() {
  local pane_content=$(tmux capture-pane -p -S -200)
  local query="$*"
  echo "$pane_content" | codex "Given this terminal output:\n$(cat -)\n\n$query"
}

# Add to ~/.tmux.conf for a keybinding
# prefix + C-x: send current pane to Codex for analysis
bind-key C-x run-shell \
  'tmux capture-pane -p -S -100 | codex "Analyze this terminal output and suggest next steps"'

# prefix + C-e: explain last error in current pane
bind-key C-e run-shell \
  'tmux capture-pane -p -S -50 | codex "Explain the error shown and provide the fix"'
screen Session Integration
GNU screen users can achieve similar context capture through screen's logging facility:
# In .screenrc, enable hardcopy logging
deflog on
logfile ~/.screen-logs/%Y%m%d-%H%M%S.log

# Shell function to read screen log and send to Codex
screen-cx() {
  local latest_log=$(ls -t ~/.screen-logs/*.log 2>/dev/null | head -1)
  if [[ -n "$latest_log" ]]; then
    tail -100 "$latest_log" | codex "$*"
  else
    codex "$*"
  fi
}
Connecting Codex to Your Development Environment
For project-specific context, create a .codex directory at the root of each repository. Codex CLI detects this directory and loads its contents as persistent context:
mkdir -p myproject.dev/.codex

# Create a project context file
cat > myproject.dev/.codex/context.md << 'EOF'
# Project: MyApp API

## Stack
- Runtime: Node.js 20 with TypeScript
- Database: PostgreSQL 15 via Prisma ORM
- Cache: Redis 7
- Container orchestration: Docker Compose (dev), Kubernetes (prod)

## Key Commands
- `npm run dev` — start development server on port 3000
- `npm run test:watch` — run Jest in watch mode
- `docker compose up -d` — start all services
- `npx prisma migrate dev` — run pending database migrations

## Code Style
- ESLint with Airbnb config
- Prettier for formatting
- Conventional commits enforced via commitlint
EOF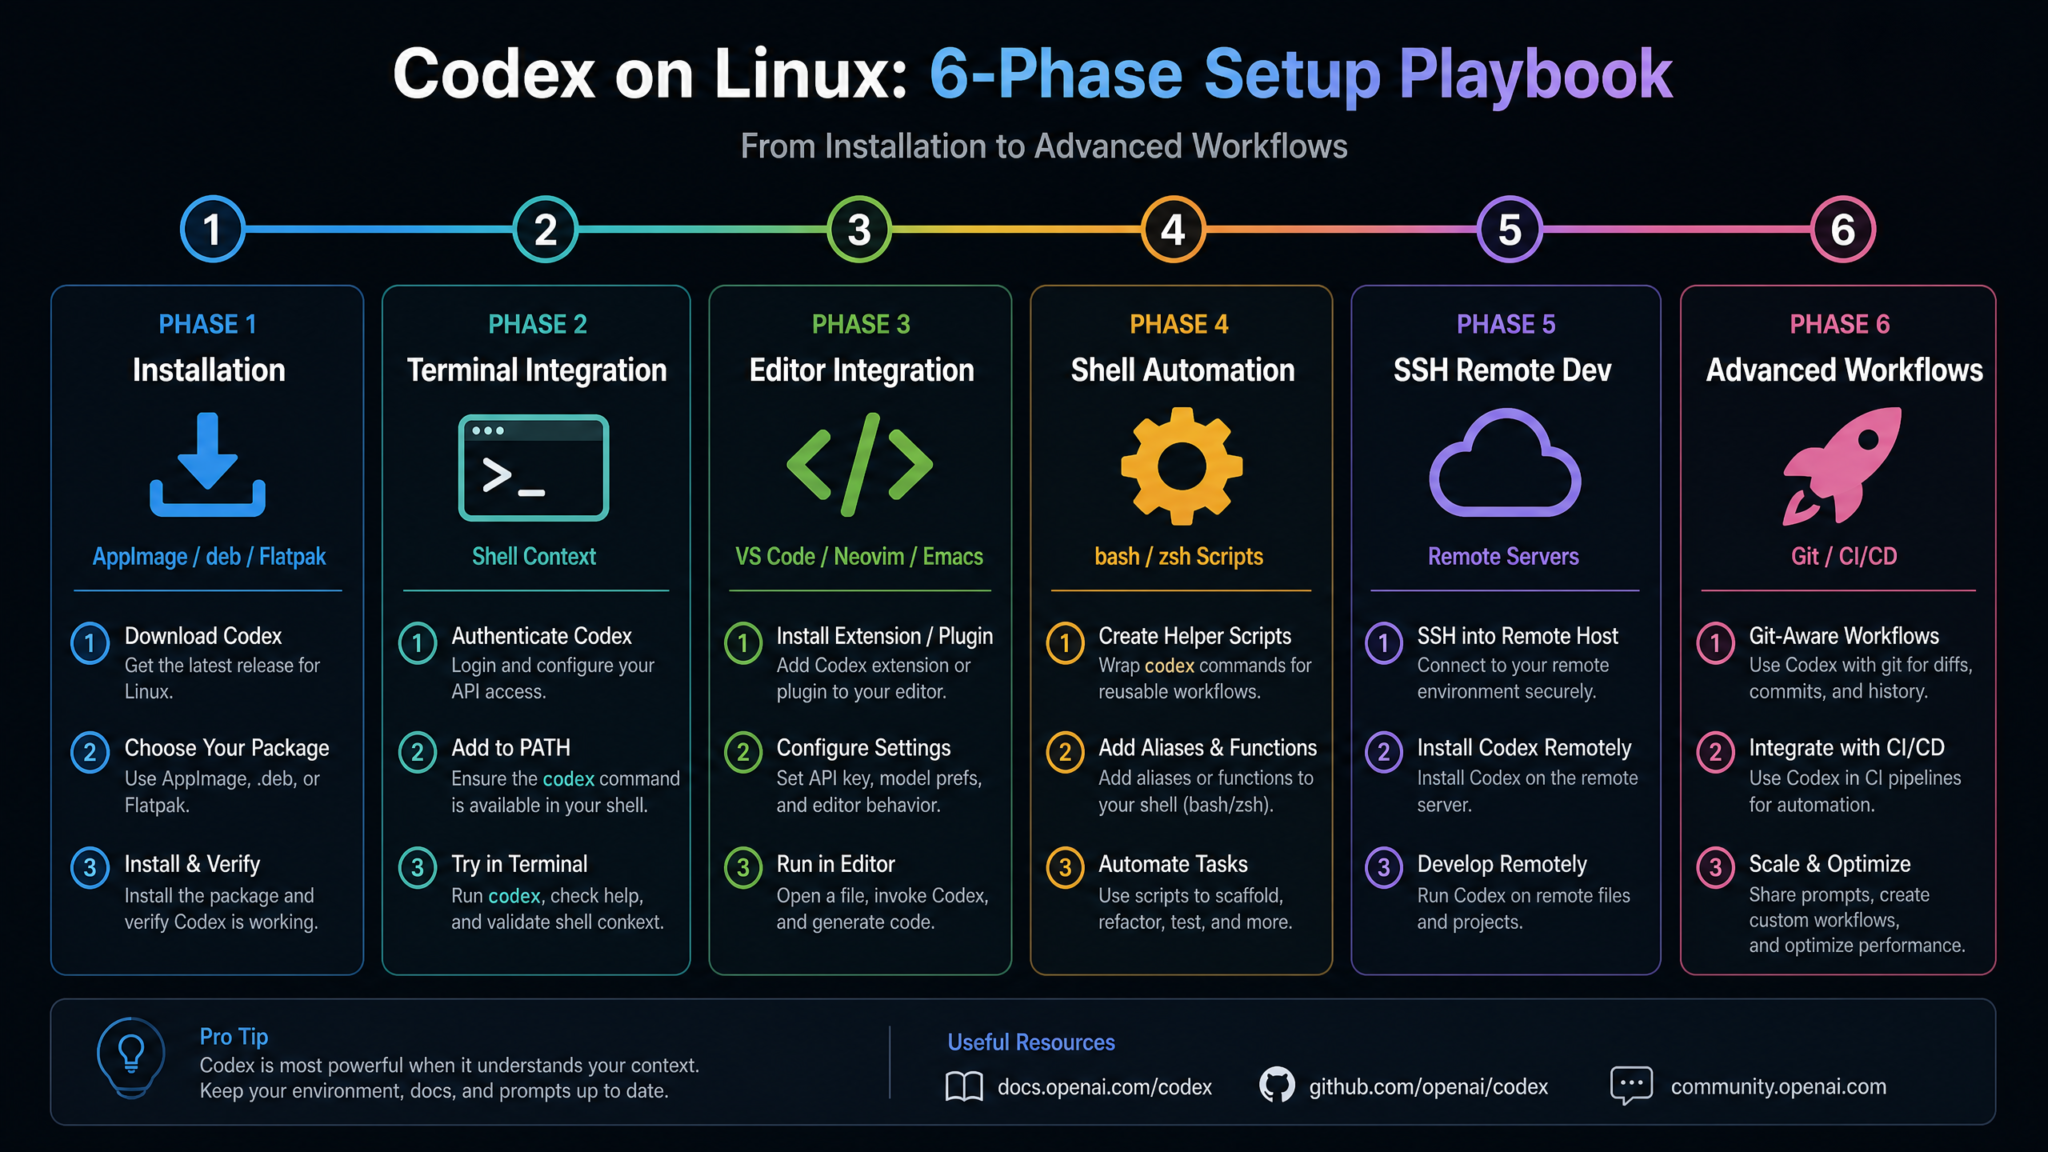
Phase 3: Editor Integration — VS Code, Neovim, and Emacs
VS Code on Linux
VS Code remains the most popular graphical editor among Linux developers despite fierce competition from terminal editors. The integration story with Codex on Linux is straightforward but requires some setup to get contextual awareness working properly.
Install the Continue extension from the VS Code Marketplace — this open-source AI coding assistant supports OpenAI's API and can be configured to use the Codex model. Configure it via ~/.continue/config.json:
{
  "models": [
    {
      "title": "Codex",
      "provider": "openai",
      "model": "codex-1",
      "apiKey": "$OPENAI_API_KEY",
      "contextLength": 32768
    }
  ],
  "customCommands": [
    {
      "name": "explain-selection",
      "prompt": "Explain this code in detail, focusing on any non-obvious logic",
      "description": "Explain selected code"
    },
    {
      "name": "optimize",
      "prompt": "Optimize this code for performance and readability without changing its external behavior",
      "description": "Optimize selected code"
    }
  ],
  "slashCommands": [
    { "name": "share", "description": "Export conversation to clipboard" },
    { "name": "commit", "description": "Generate a conventional commit message" }
  ]
}
For the integrated terminal inside VS Code, add this to your settings.json to ensure the shell inherits your Codex environment variables:
{
  "terminal.integrated.env.linux": {
    "OPENAI_API_KEY": "${env:OPENAI_API_KEY}",
    "CODEX_CONTEXT_DIR": "${workspaceFolder}/.codex"
  },
  "terminal.integrated.defaultProfile.linux": "zsh",
  "terminal.integrated.shellIntegration.enabled": true
}
Neovim Integration
Neovim's Lua-based plugin ecosystem offers the most powerful Codex integration available for any editor on Linux. The gen.nvim plugin and the codecompanion.nvim plugin both support OpenAI's API. For a terminal-first workflow, codecompanion.nvim is the stronger choice:
-- In your lazy.nvim or packer.nvim config (~/.config/nvim/lua/plugins/ai.lua)
return {
  "olimorris/codecompanion.nvim",
  dependencies = {
    "nvim-lua/plenary.nvim",
    "nvim-treesitter/nvim-treesitter",
  },
  config = function()
    require("codecompanion").setup({
      adapters = {
        openai = function()
          return require("codecompanion.adapters").extend("openai", {
            env = {
              api_key = "OPENAI_API_KEY",
            },
            schema = {
              model = {
                default = "codex-1",
              },
              max_tokens = {
                default = 8192,
              },
            },
          })
        end,
      },
      strategies = {
        chat = { adapter = "openai" },
        inline = { adapter = "openai" },
        agent = { adapter = "openai" },
      },
      -- Key mappings
      mappings = {
        chat = {
          toggle = "<leader>cc",
        },
        inline = {
          accept_change = "<leader>ca",
          reject_change = "<leader>cr",
        },
      },
    })
  end,
}
Add keybindings to your init.lua for rapid context-sending:
-- Visual mode: send selection to Codex chat
vim.keymap.set("v", "<leader>cx", ":CodeCompanion<CR>", { desc = "Send selection to Codex" })
-- Normal mode: explain current function
vim.keymap.set("n", "<leader>ce", ":CodeCompanion /explain<CR>", { desc = "Explain current context" })
-- Generate unit tests for current file
vim.keymap.set("n", "<leader>ct", ":CodeCompanion /tests<CR>", { desc = "Generate tests" })
Emacs Integration
Emacs users can integrate Codex through the gptel package, which provides a universal LLM interface for Emacs. Add this to your Emacs configuration:
;; In ~/.emacs.d/init.el or ~/.config/emacs/init.el
(use-package gptel
  :config
  (setq gptel-model "codex-1"
        gptel-backend (gptel-make-openai "OpenAI"
                        :key (getenv "OPENAI_API_KEY")
                        :models '("codex-1" "gpt-4o")))
  ;; Keybindings
  (global-set-key (kbd "C-c g s") 'gptel-send)
  (global-set-key (kbd "C-c g m") 'gptel-menu)
  (global-set-key (kbd "C-c g r") 'gptel-rewrite-and-replace))

;; Shell command integration: send eshell output to Codex
(defun codex-analyze-region (beg end)
  "Send the selected region to Codex for analysis."
  (interactive "r")
  (let ((text (buffer-substring-no-properties beg end)))
    (gptel-request text
      :callback (lambda (response _)
                  (with-current-buffer (get-buffer-create "*Codex Output*")
                    (insert response)
(display-buffer (current-buffer)))))))Phase 4: Shell Workflow Automation — Scripts, Pipelines, and Containers
Bash and Zsh Script Generation Patterns
The highest-leverage use of Codex in a Linux terminal workflow is not answering one-off questions — it is generating complete, production-quality shell scripts from natural language descriptions. The key is learning to prompt with sufficient context for the script to be immediately usable without editing.
A high-quality script generation prompt follows this pattern:
codex "Write a bash script that:
- Accepts a domain name as its first argument
- Checks if an SSL certificate exists for that domain in /etc/letsencrypt/live/
- If the cert expires within 14 days, runs certbot renew for that domain
- Logs all actions with timestamps to /var/log/cert-check.log
- Exits with code 0 on success, 1 on any failure
- Is safe to run as a cron job (no interactive prompts)
Target system: Ubuntu 24.04, certbot installed via snap"
Codex will generate a complete, annotated script. You then pipe it through review before executing:
# Generate and save to file for review
codex "..." > /tmp/cert-check.sh
# Review it
bat /tmp/cert-check.sh   # or cat if bat is not installed
# Make executable after review
chmod +x /tmp/cert-check.sh && sudo mv /tmp/cert-check.sh /usr/local/bin/cert-check
Building Complex Pipeline Chains
Codex excels at constructing multi-stage Unix pipelines that would otherwise require significant mental overhead to compose correctly. Use the CLI's pipe-friendly mode:
# Ask Codex to build a log analysis pipeline
codex --format shell "Build a one-liner pipeline that:
reads /var/log/nginx/access.log,
filters for 5xx status codes from the last hour,
extracts unique IP addresses,
looks up each IP in a local GeoIP database using geoiplookup,
counts by country,
and outputs a sorted frequency table"

# The output might be something like:
awk -v d="$(date -d '1 hour ago' '+%d/%b/%Y:%H')" \
  '$4 ~ d && $9 ~ /^5/' /var/log/nginx/access.log \
  | awk '{print $1}' | sort -u \
  | while read ip; do geoiplookup "$ip" | awk -F: '{print $2}'; done \
  | sort | uniq -c | sort -rn
Docker and Container Management Workflows
Container management generates enormous cognitive load — multi-service Compose files, Dockerfile optimization, network debugging, volume management. Codex reduces this friction dramatically when you feed it your existing configuration as context:
# Analyze and optimize an existing Dockerfile
cat Dockerfile | codex "Review this Dockerfile for:
1. Layer caching efficiency
2. Security issues (running as root, exposed secrets, unnecessary packages)
3. Image size reduction opportunities
4. Build reproducibility
Provide the optimized Dockerfile with inline comments explaining each change"

# Generate a complete docker-compose.yml from a description
codex "Generate a docker-compose.yml for a web application stack:
- Node.js 20 API service on port 3000 (source at ./api)
- React frontend served by nginx on port 80 (source at ./frontend, nginx config at ./nginx/)
- PostgreSQL 15 with data persisted to a named volume
- Redis 7 for session storage
- All services on a private bridge network named 'app-network'
- API depends_on postgres and redis with health check conditions
- Include .env variable substitution for database credentials"
For debugging running containers, combine Codex with Docker's inspection outputs:
# Debug network connectivity issues
docker network inspect app-network | \
  codex "This Docker network inspection output shows connectivity issues \
  between my api container and postgres container. Diagnose the problem \
  and provide the fix."

# Analyze container resource usage
docker stats --no-stream --format json | \
  codex "These container stats show one container consuming excessive memory. \
  Identify it and suggest resource limit configurations."
System Administration Task Automation
Codex significantly reduces the reference-lookup overhead that characterizes sysadmin work. Use it as an inline reference for unfamiliar tools while keeping your hands on the keyboard:
# systemd service creation
codex "Write a systemd unit file for a Node.js application:
- Binary: /usr/local/bin/myapp
- Run as user: www-data
- Restart on failure with 5s delay, max 3 retries
- Log to journald
- Requires network.target
- Environment file at /etc/myapp/env
- Soft memory limit of 512MB"

# iptables/nftables rule generation
codex "Write nftables rules that:
- Allow established and related connections
- Allow SSH from 10.0.0.0/8 only
- Allow HTTP and HTTPS from anywhere
- Allow outbound DNS and NTP
- Block everything else inbound
- Log blocked connections with rate limiting"Phase 5: SSH and Remote Development
Using Codex with Remote Servers
Remote development introduces a fundamental architectural question: do you run Codex locally and provide remote context, or do you install the Codex CLI on the remote server? The answer depends on your latency requirements and data sensitivity constraints.
Local Codex + Remote Context is the recommended approach for most workflows. You query Codex from your local machine, but feed it context captured from remote sessions:
Access 40,000+ AI Prompts for ChatGPT, Claude & Codex — Free!
Subscribe to get instant access to our complete Notion Prompt Library — the largest curated collection of prompts for ChatGPT, Claude, OpenAI Codex, and other leading AI models. Optimized for real-world workflows across coding, research, content creation, and business.
# SSH wrapper that captures remote context for Codex
ssh-cx() {
  local host="$1"
  shift
  local remote_context=$(ssh "$host" bash << 'REMOTE'
    echo "=== System Info ==="
    uname -a
    echo "=== Running Services ==="
    systemctl list-units --state=running --no-legend 2>/dev/null | head -20
    echo "=== Recent Errors ==="
    journalctl -p err --since "1 hour ago" --no-pager 2>/dev/null | tail -30
    echo "=== Disk Usage ==="
    df -h
    echo "=== Memory ==="
    free -h
REMOTE
  )
  echo "$remote_context" | codex "$@"
}

# Usage:
ssh-cx prod-server-01 "Why is disk usage high and how should I clean it up?"
SSH Tunneling for Codex Desktop App on Headless Servers
When working on headless remote servers, you may want to expose local development services to Codex's context without full X11 forwarding. Set up SSH tunnels to bridge remote ports:
# ~/.ssh/config — tunneling configuration for development servers
Host devserver
  HostName 203.0.113.45
  User developer
  IdentityFile ~/.ssh/id_ed25519
  # Forward remote dev server port locally
  LocalForward 13000 localhost:3000
  # Forward remote database port for local inspection
  LocalForward 15432 localhost:5432
  # Enable connection multiplexing for speed
  ControlMaster auto
  ControlPath ~/.ssh/cm-%r@%h:%p
  ControlPersist 10m
  # Keep connection alive
  ServerAliveInterval 60
  ServerAliveCountMax 3
# Connect and launch Codex with awareness of tunneled services
ssh devserver &
sleep 2
# Now Codex can see your remote app running locally via the tunnel
cx "The Node.js app tunneled from my dev server is returning 502 errors \
on localhost:13000. Check the service health and diagnose the issue." \
--context "App running on remote server devserver, accessed via SSH tunnel on port 13000"Cloud Development Environments
GitHub Codespaces, Gitpod, and similar cloud IDEs run on remote Linux VMs. Integrating Codex CLI into these environments requires installing it in the cloud container and configuring your API key securely:
# In your .devcontainer/devcontainer.json
{
  "postCreateCommand": "npm install -g @openai/codex && codex --version",
  "containerEnv": {
    "OPENAI_API_KEY": "${localEnv:OPENAI_API_KEY}"
  },
  "customizations": {
    "vscode": {
      "extensions": [
        "continue.continue"
      ]
    }
  }
}

# In your Gitpod .gitpod.yml
tasks:
  - init: |
      npm install -g @openai/codex
      echo 'export OPENAI_API_KEY="'$OPENAI_API_KEY'"' >> ~/.bashrc
      source ~/.bashrc
    command: |
      echo "Codex CLI ready. API key configured: $(codex --version)"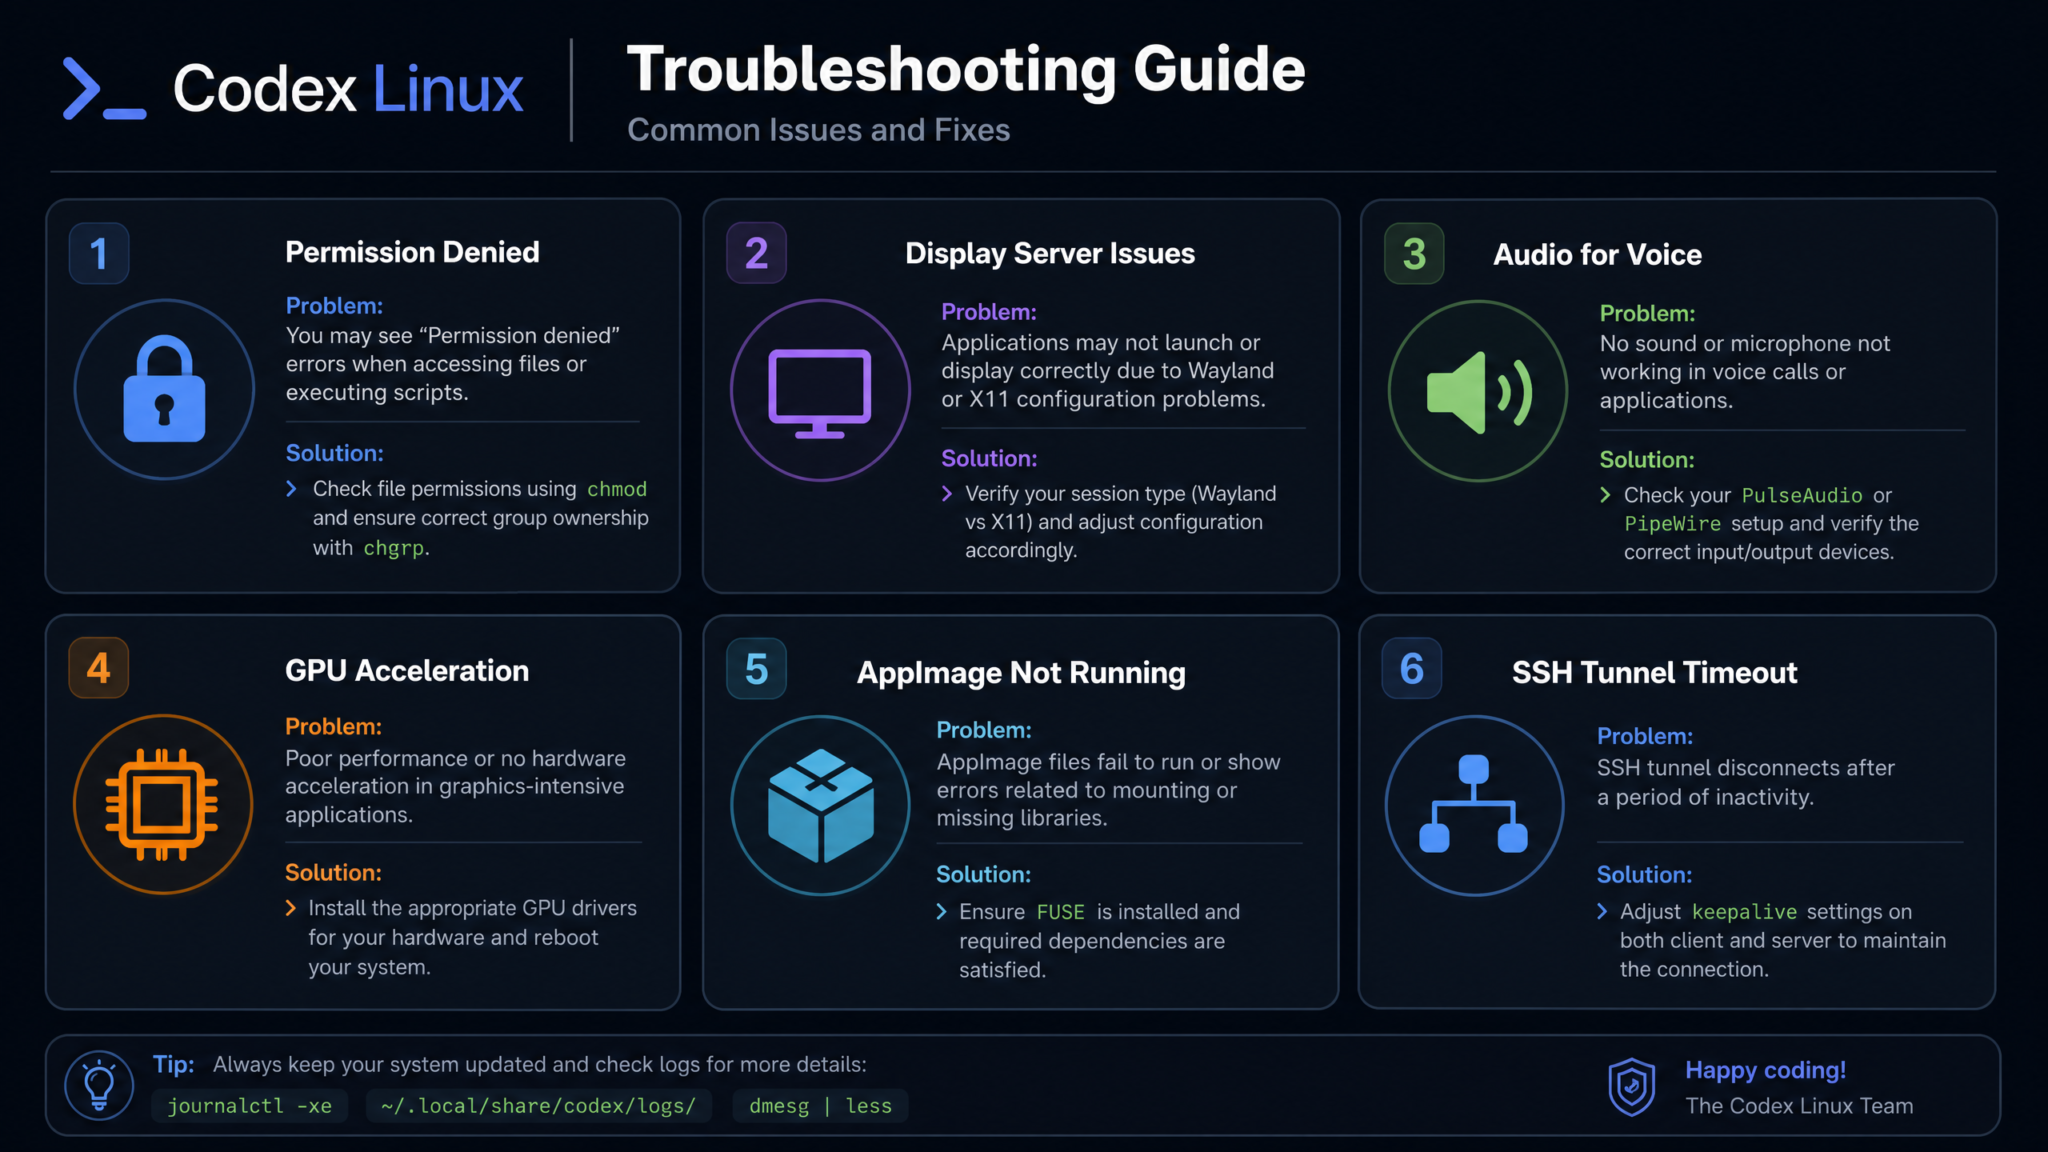
Phase 6: Advanced Workflows — Git, CI/CD, Dotfiles, and Multi-Repo Navigation
Git Workflow Integration
Git is where Codex delivers some of its most consistent value in daily development work. The three highest-impact integration points are commit message generation, conflict resolution assistance, and repository archaeology (understanding unfamiliar codebases through AI-assisted exploration).
Commit Message Generation
# Add to ~/.gitconfig
[alias]
  cx-commit = "!f() { \
    diff=$(git diff --cached); \
    if [ -z \"$diff\" ]; then echo 'No staged changes'; return 1; fi; \
    msg=$(echo \"$diff\" | codex \
      'Generate a conventional commit message for this diff. \
      Format: type(scope): description. \
      Types: feat, fix, docs, style, refactor, perf, test, chore. \
      Keep description under 72 chars. Add body if changes are complex.'); \
    echo \"Suggested commit message:\n$msg\"; \
    read -p 'Use this message? [Y/n/e(dit)]: ' choice; \
    case $choice in \
      [nN]) echo 'Commit cancelled';; \
      [eE]) git commit -e -m \"$msg\";; \
      *) git commit -m \"$msg\";; \
    esac; \
  }; f"

  cx-review = "!git diff HEAD~1 | codex 'Review this commit for bugs, style issues, and missing edge cases'"
  cx-explain = "!git log --oneline -20 | codex 'Explain what this project has been working on recently based on these commits'"
Conflict Resolution Assistance
# Shell function to send conflicted files to Codex
git-resolve() {
  local conflicted_files=$(git diff --name-only --diff-filter=U)
  for file in $conflicted_files; do
    echo "Analyzing conflict in: $file"
    cat "$file" | codex \
      "This file has merge conflicts marked with <<<<<<, =======, and >>>>>>>. \
      Analyze both versions and explain: \
      1. What each change is trying to accomplish \
      2. Whether both changes can coexist \
      3. Your recommended resolution with the merged code \
      File: $file"
  done
}
CI/CD Pipeline Assistance
Generating and debugging CI/CD pipeline configurations is one of the most tedious tasks in modern development. Codex handles GitHub Actions, GitLab CI, Jenkins, and CircleCI syntax fluently when given sufficient context about your project.
# Generate a complete GitHub Actions workflow
codex "Generate a GitHub Actions workflow file for a Node.js TypeScript project that:
- Triggers on push to main and all pull requests
- Uses a matrix strategy to test on Node 18, 20, and 22
- Caches node_modules using actions/cache with package-lock.json as cache key
- Runs: install, type-check (tsc --noEmit), lint (eslint), test (jest --coverage)
- On push to main only: builds Docker image, pushes to GitHub Container Registry (ghcr.io)
- Uses GITHUB_TOKEN for GHCR authentication (no additional secrets needed)
- Sets minimum code coverage threshold of 80%"

# Debug a failing CI run
cat .github/workflows/ci.yml | codex "This GitHub Actions workflow is failing with the error: \
'Error: Process completed with exit code 1' on the 'Run tests' step. \
The logs show Jest cannot find module './utils/database'. \
Diagnose the issue and provide the fix."
Multi-Repo Navigation with Codex
Monorepo and multi-repo architectures create navigation complexity that Codex can significantly reduce. Build a repository index that Codex can reference:
# Create a multi-repo context generator
gen-repo-map() {
  local output_file="${HOME}/.codex/repo-map.md"
  mkdir -p ~/.codex

  echo "# Repository Map - Generated $(date)" > "$output_file"
  echo "" >> "$output_file"

  for repo in ~/projects/*/; do
    if [[ -d "$repo/.git" ]]; then
      echo "## $(basename $repo)" >> "$output_file"
      echo "- **Path**: $repo" >> "$output_file"
      echo "- **Branch**: $(git -C $repo branch --show-current)" >> "$output_file"
      echo "- **Last commit**: $(git -C $repo log -1 --format='%s (%ar)')" >> "$output_file"

      # Detect project type
      if [[ -f "$repo/package.json" ]]; then
        echo "- **Type**: Node.js - $(jq -r .name $repo/package.json)" >> "$output_file"
      elif [[ -f "$repo/Cargo.toml" ]]; then
        echo "- **Type**: Rust" >> "$output_file"
      elif [[ -f "$repo/go.mod" ]]; then
        echo "- **Type**: Go" >> "$output_file"
      elif [[ -f "$repo/requirements.txt" || -f "$repo/pyproject.toml" ]]; then
        echo "- **Type**: Python" >> "$output_file"
      fi
      echo "" >> "$output_file"
    fi
  done

  echo "Repo map written to $output_file"
}

# Use with Codex
cx-repos() {
  cat ~/.codex/repo-map.md | codex "$@"
}

# Example usage:
cx-repos "Which of my repositories hasn't been updated in over a month and might need dependency updates?"
Dotfiles Management with AI Assistance
Dotfiles represent years of accumulated configuration knowledge. Codex can help you understand, audit, optimize, and extend your dotfiles in ways that would otherwise require hours of documentation reading.
# Dotfiles repository structure that works well with Codex
~/dotfiles/
├── .codex/
│   └── context.md          # Describe your system and preferences
├── bash/
│   ├── .bashrc
│   └── .bash_profile
├── zsh/
│   ├── .zshrc
│   └── .zsh_plugins.txt
├── vim/
│   └── .vimrc
├── nvim/
│   └── init.lua
├── tmux/
│   └── .tmux.conf
├── git/
│   └── .gitconfig
└── install.sh
# AI-assisted dotfiles audit
cat ~/.zshrc | codex "Audit this zsh configuration for:
1. Performance issues (slow startup, inefficient path construction)
2. Deprecated syntax
3. Missing useful plugins or functions for a full-stack developer
4. Security concerns (exposed secrets, insecure PATH entries)
5. Compatibility issues across macOS and Linux
Provide specific improvements with explanations"
# Generate new aliases based on your most-used commands
history | awk '{print $2}' | sort | uniq -c | sort -rn | head -30 | \
codex "Based on my 30 most-used commands, suggest useful shell aliases and functions \
that would save keystrokes. Format as ready-to-paste shell configuration."Troubleshooting Common Linux-Specific Issues
Permission Issues
The most common Linux-specific problem with the ChatGPT desktop app involves filesystem permissions, particularly when the app needs to read terminal socket files or write to protected configuration directories.
| Issue | Symptom | Fix |
|---|---|---|
| AppImage execution blocked | Permission denied on launch |
chmod +x ChatGPT.AppImage; check if noexec mount flag is set on the partition |
| Config directory inaccessible | Settings not saved between launches | mkdir -p ~/.config/ChatGPT && chown $USER:$USER ~/.config/ChatGPT |
| Codex CLI cannot read project files | Context loading fails silently | Check that contextPaths in config.json use absolute paths, not ~ expansion |
| Flatpak sandbox blocks socket access | Terminal context features unavailable | flatpak override --user --filesystem=home com.openai.ChatGPT |
| SELinux blocking on Fedora/RHEL | AVC denials in audit.log | Create a custom SELinux policy module or run chcon -t bin_t ChatGPT.AppImage |
Display Server Issues (X11 vs Wayland)
The ChatGPT desktop app is built on Electron, which has historically had friction with Wayland. On modern distributions like Fedora 40+, Ubuntu 24.04+, and Arch Linux with Wayland as default, you may encounter blank windows, scaling issues, or crash-on-launch behavior.
# Fix for Wayland: force Electron to use XWayland
# Create a wrapper script or set electron flags
cat > ~/.local/bin/chatgpt-wayland << 'EOF'
#!/usr/bin/env bash
# Force XWayland compatibility mode
export ELECTRON_OZONE_PLATFORM_HINT=x11
# Or try native Wayland (may work better on newer Electron versions)
# export ELECTRON_OZONE_PLATFORM_HINT=wayland
exec ~/Applications/ChatGPT.AppImage --ozone-platform=x11 "$@"
EOF
chmod +x ~/.local/bin/chatgpt-wayland

# For .deb installation, create a desktop entry override
mkdir -p ~/.local/share/applications
cat > ~/.local/share/applications/chatgpt.desktop << 'EOF'
[Desktop Entry]
Name=ChatGPT
Exec=/usr/bin/chatgpt-desktop --ozone-platform=x11 %U
Type=Application
Categories=Development;
EOF

# HiDPI scaling fix for 4K displays
export ELECTRON_FORCE_DEVICE_SCALE_FACTOR=1.5
# Or auto-detect from GDK
export ELECTRON_FORCE_DEVICE_SCALE_FACTOR=$(gsettings get org.gnome.desktop.interface scaling-factor 2>/dev/null || echo 1)
If you are running a pure Wayland compositor like Sway or Hyprland without XWayland available, install XWayland explicitly:
# Arch Linux
sudo pacman -S xorg-xwayland

# Fedora
sudo dnf install xorg-x11-server-Xwayland

# Ubuntu
sudo apt install xwayland
Audio Issues for Voice Features
The voice input feature in ChatGPT desktop requires PulseAudio or PipeWire access. Linux audio on Electron apps is a known pain point, particularly on distributions that have migrated fully to PipeWire.
# Check your audio server
pactl info | grep "Server Name"
# Should show PulseAudio or PipeWire

# If PipeWire is running but app shows no microphone access:
# Install PulseAudio compatibility layer for PipeWire
# Arch:
sudo pacman -S pipewire-pulse
# Ubuntu 22.04+:
sudo apt install pipewire-audio-client-libraries

# Verify the app has access to audio devices
# For AppImage (no sandbox), check ALSA/PA permissions:
groups $USER
# You should be in the 'audio' group
sudo usermod -a -G audio $USER
# Log out and back in for group change to take effect

# For Flatpak, grant audio permissions:
flatpak override --user --device=all com.openai.ChatGPT
# Or specifically:
flatpak override --user --socket=pulseaudio com.openai.ChatGPT

# Test microphone access from terminal
arecord -l  # list recording devices
arecord -d 3 /tmp/test.wav && aplay /tmp/test.wav
Network and Proxy Issues
# Corporate proxy configuration for Codex CLI
export HTTPS_PROXY=https://proxy.corporate.local:8080
export NO_PROXY=localhost,127.0.0.1,10.0.0.0/8

# For systems with custom CA certificates (common in enterprise environments)
export NODE_EXTRA_CA_CERTS=/etc/ssl/certs/corporate-ca.pem

# If using the desktop app behind a proxy, set system proxy or:
cat > ~/.config/ChatGPT/electron-flags.conf << 'EOF'
--proxy-server=https://proxy.corporate.local:8080
--proxy-bypass-list=localhost;127.0.0.1
EOF
Setting Up OpenAI API Keys Securely on Linux Development Machines
Performance Optimization by Hardware Profile
Low-Resource Systems (4GB RAM, Older CPUs)
On systems with limited memory, the ChatGPT desktop app's Electron overhead (~300–500MB baseline) can be prohibitive. The Codex CLI is the right tool for these systems — it uses no graphical resources and can be configured to minimize memory footprint:
# Minimize Codex CLI memory usage
# Use shorter context windows
cat > ~/.config/codex/config.json << 'EOF'
{
  "model": "codex-1",
  "maxTokens": 2048,
  "contextPaths": [],
  "streamOutput": true,
  "timeout": 60000
}
EOF

# Limit Node.js memory for the Codex CLI process
echo 'alias codex="node --max-old-space-size=256 $(which codex)"' >> ~/.bashrc

# Use a lightweight terminal multiplexer
# tmux uses ~5MB vs screen's ~2MB; both are viable
# Avoid running desktop app and CLI simultaneously on <4GB systems
Mid-Range Systems (8–16GB RAM, Modern CPUs)
The sweet spot for full-featured Codex integration. You can run the desktop app for complex multi-turn conversations while keeping the CLI active in your terminal sessions simultaneously.
# Optimize desktop app startup time
# Pre-load shared libraries used by Electron
echo '/usr/lib/x86_64-linux-gnu/libXss.so.1' | sudo tee /etc/ld.so.preload
sudo ldconfig

# Use systemd user service to keep Codex CLI warm
cat > ~/.config/systemd/user/codex-daemon.service << 'EOF'
[Unit]
Description=Codex CLI Daemon
After=network-online.target

[Service]
Type=simple
ExecStart=/usr/local/bin/codex --daemon
Restart=on-failure
RestartSec=5s
Environment=OPENAI_API_KEY=%h/.config/codex/api_key

[Install]
WantedBy=default.target
EOF
systemctl --user enable codex-daemon
systemctl --user start codex-daemon
High-Performance Workstations (32GB+ RAM, Multi-Core)
On high-end Linux workstations, the bottleneck is network latency to the OpenAI API, not local compute. Optimize for response throughput and parallel context processing:
# Enable parallel context loading for large repositories
cat > ~/.config/codex/config.json << 'EOF'
{
  "model": "codex-1",
  "maxTokens": 32768,
  "contextPaths": [
    "~/projects/",
    "~/dotfiles/"
  ],
  "parallelContextLoad": true,
  "streamOutput": true,
  "cacheResponses": true,
  "cacheDir": "/tmp/codex-cache",
  "cacheTTL": 3600
}
EOF

# Use a RAM disk for the response cache
sudo mkdir -p /tmp/codex-cache
sudo mount -t tmpfs -o size=512m tmpfs /tmp/codex-cache
# Make permanent in /etc/fstab:
echo 'tmpfs /tmp/codex-cache tmpfs rw,size=512m 0 0' | sudo tee -a /etc/fstab
Laptop/Battery-Constrained Systems
On laptops running on battery, Electron's background rendering and network polling can drain power significantly. Implement power-aware Codex usage:
# Power-aware Codex wrapper that closes the desktop app after each session
codex-battery() {
  local power_source=$(cat /sys/class/power_supply/AC/online 2>/dev/null || echo "1")

  if [[ "$power_source" == "0" ]]; then
    # On battery: use CLI only, skip desktop app
    echo "[Battery mode: using CLI only]"
    codex "$@"
  else
    # On AC power: full featured mode
    chatgpt &
    codex "$@"
  fi
}

# Throttle background polling on battery
# Add to your power management scripts (e.g., triggered by upower events):
on_battery() {
  # Suspend desktop app updates
  pkill -STOP ChatGPT 2>/dev/null
  echo "Codex desktop app suspended on battery"
}

on_ac() {
  pkill -CONT ChatGPT 2>/dev/null
  echo "Codex desktop app resumed on AC power"
}
ARM and Non-x86 Systems (Raspberry Pi, Apple Silicon Emulation, AWS Graviton)
# Check for ARM-specific AppImage support
uname -m  # Should show aarch64 for 64-bit ARM

# If no ARM AppImage is available, use only the CLI tool
npm install -g @openai/codex  # Pure Node.js, runs on any architecture

# For Raspberry Pi 4/5 (aarch64, 4-8GB):
# Use Node 20 LTS from NodeSource
curl -fsSL https://deb.nodesource.com/setup_20.x | sudo -E bash -
sudo apt install -y nodejs
npm install -g @openai/codex

# Optimize for slower network on remote/edge devices
cat > ~/.config/codex/config.json << 'EOF'
{
  "model": "codex-1",
  "maxTokens": 1024,
  "timeout": 120000,
  "retries": 3,
  "streamOutput": true
}
EOF
NixOS and Immutable Distribution Considerations
# NixOS: add Codex CLI to your system configuration
# In /etc/nixos/configuration.nix or home-manager config:
{ pkgs, ... }: {
  environment.systemPackages = with pkgs; [
    nodejs_20
  ];

  # Install Codex CLI in user environment
  home.packages = [
    (pkgs.buildNpmPackage rec {
      pname = "codex-cli";
      version = "latest";
      src = pkgs.fetchFromGitHub {
        owner = "openai";
        repo = "codex";
        # Use current commit hash from github.com/openai/codex
        rev = "main";
        hash = "";
      };
      npmDepsHash = "";
    })
  ];
}
Terminal-First AI Development Workflows for Linux Power Users
Putting It All Together: The Terminal-First Codex Workflow in Practice
A mature Codex integration on Linux does not feel like using an external tool — it feels like an extension of your shell. Here is what a typical advanced workflow session looks like when all phases are integrated:
- Open tmux with your project layout (editor pane, server pane, git pane, Codex context pane)
- Project context auto-loads from
.codex/context.mdin your repository root - Shell history and environment variables are automatically injected into each Codex query via your
cx()wrapper function - Editor integration (Neovim or VS Code) allows sending selections directly to Codex without switching windows
- Git workflow generates commit messages, reviews PRs, and resolves merge conflicts through shell aliases
- CI/CD pipeline failures get routed through a webhook-triggered script that feeds logs to Codex for automated diagnosis
- System alerts from monitoring tools trigger Codex analysis through pipe integration
The power of this approach is its composability. Every piece is a standard Unix tool that speaks text. Codex is not a walled garden requiring a proprietary IDE or cloud dashboard — it is a text-in, text-out intelligence layer that slots into any workflow that already operates on text streams. That is why it is architecturally perfect for Linux terminal-first development.
The investment in Phase 1 and Phase 2 — getting installation right and building context-aware shell functions — pays compounding returns across every subsequent phase. A developer who spends two hours properly wiring Codex into their Linux terminal environment will recover that time within the first week of accelerated scripting, debugging, and documentation work.
Keep your .codex/context.md files updated as your projects evolve. Commit your Codex configuration to your dotfiles repository so the setup is reproducible across machines. And use the approvalMode: "suggest" setting until you have enough familiarity with Codex's behavior in your specific environment to trust auto-execution in sandboxed contexts.
The Linux terminal is already the most powerful development environment in existence. Codex does not replace that power — it amplifies it.
