How to Use Claude Opus 4.7 for Design Prototyping: Converting Figma to React Components

Setting Up Claude Opus 4.7 for Design Prototyping: Leveraging Upgraded Vision Capabilities to Convert Figma Designs into Functional React Components
Introduction
Overview of Claude Opus 4.7
Claude Opus is a cutting-edge AI platform that seamlessly integrates advanced natural language processing with state-of-the-art computer vision capabilities. Designed to accelerate workflows in software development, content generation, and design automation, Claude Opus has swiftly become a cornerstone technology for developers and designers alike.
The release of Claude Opus 4.7 represents a significant milestone, featuring a major upgrade in its vision model with an impressive 3.75 megapixel resolution capacity. This upgrade empowers the system to analyze design assets with greater fidelity and precision, enabling more reliable recognition of UI elements, layouts, and intricate component details. With this enhancement, designers and developers can automate the conversion of visual prototypes into production-ready code much more effectively.
Why Use Claude Opus 4.7 for Design Prototyping?
Prototyping is an iterative and often resource-intensive process where design ideas must quickly transition into interactive user interfaces. Claude Opus 4.7 addresses several challenges in the traditional design-to-code workflow:
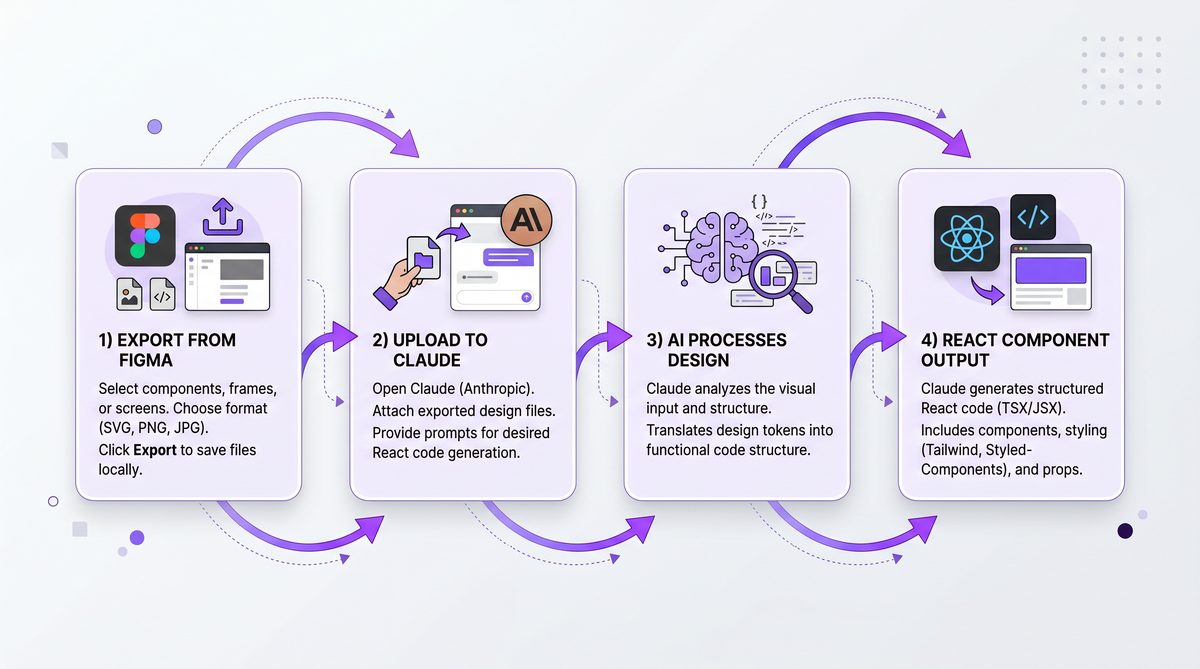
- Automated Design-to-Code Transformation: By leveraging advanced computer vision, the platform can parse static design images—such as Figma exports or screenshots—and generate corresponding UI code, greatly reducing manual coding efforts.
- Rapid Iteration and Prototyping: Developers can quickly test design concepts as live React components, facilitating real-time feedback cycles and accelerating product development timelines.
- Scalable and Precise UI Extraction: Improved recognition accuracy results in higher-quality component extractions, even from complex, layered designs, minimizing the need for manual cleanup.
These capabilities allow teams to streamline collaboration between designers and developers and optimize the entire product development pipeline.
What You Will Learn in This Tutorial
This comprehensive guide provides a detailed walkthrough of how to set up and utilize Claude Opus 4.7 for design prototyping by converting Figma designs into functional React components. Specifically, you will learn:
- How to install and configure Claude Opus 4.7 along with necessary dependencies.
- Best practices for exporting and preparing Figma designs and screenshots for AI analysis.
- How to leverage Claude Opus 4.7’s upgraded vision capabilities to extract UI elements and design structure.
- Step-by-step procedures for generating clean, reusable React components from the AI’s vision outputs.
- Key best practices, optimization strategies, and troubleshooting techniques for maximizing output quality.
By the end of this tutorial, you will be equipped with the technical know-how to embed Claude Opus 4.7 into your design-to-code workflow and jumpstart rapid prototype development using AI-powered vision.
1. Understanding Claude Opus 4.7 and Its Vision Capabilities
1.1 Overview of Claude Opus AI Platform
Claude Opus is a versatile AI platform that combines large language models (LLMs) with powerful computer vision to automate complex cognitive tasks. Emerging from Anthropic’s R&D initiatives, it exemplifies the next frontier of multimodal AI systems. The platform’s capabilities span natural language understanding, contextual reasoning, image analysis, and synthesis, making it ideal for multidisciplinary workflows that include text, image, and code generation.
In software development, designers and engineers repeatedly face the challenge of translating visual designs into consistent UI code. Claude Opus bridges this gap through its vision-to-code pipeline, enabling AI-driven interpretation of design images and production of front-end-ready components. This reduces human error, accelerates iteration cycles, and enhances collaboration across roles.
1.2 Key Upgrades in Version 4.7
The 4.7 release introduces several significant improvements that make the system especially potent for design prototyping tasks:
- Enhanced Vision Model Resolution: Upgraded to 3.75 megapixels (approximately 2100×1800 pixels), the vision model can process high-resolution images preserving intricate UI details that lower resolutions might miss. This translates to better recognition of typography, iconography, spacing, and nuanced visual cues.
- Improved UI Recognition Accuracy: Thanks to refined training datasets and architectural enhancements, Claude Opus 4.7 delivers more accurate classification and bounding of UI elements such as buttons, toggles, input fields, menus, and other common interactive components.
- Accelerated Image Processing: Faster image encoding and inference pipelines reduce turnaround times, allowing users to analyze more screens and components in less time without sacrificing quality.
These upgrades collectively empower the AI to translate complex design assets into modular, functional React elements with higher fidelity.
1.3 How Vision Capabilities Transform Design Prototyping
Before the introduction of robust vision capabilities, design-to-code automation was limited mainly to vector-based exports or manually annotated designs. Claude Opus 4.7’s vision model changes the game by ingesting static image inputs and inferring UI structure and semantics with a high degree of contextual understanding. This process involves:
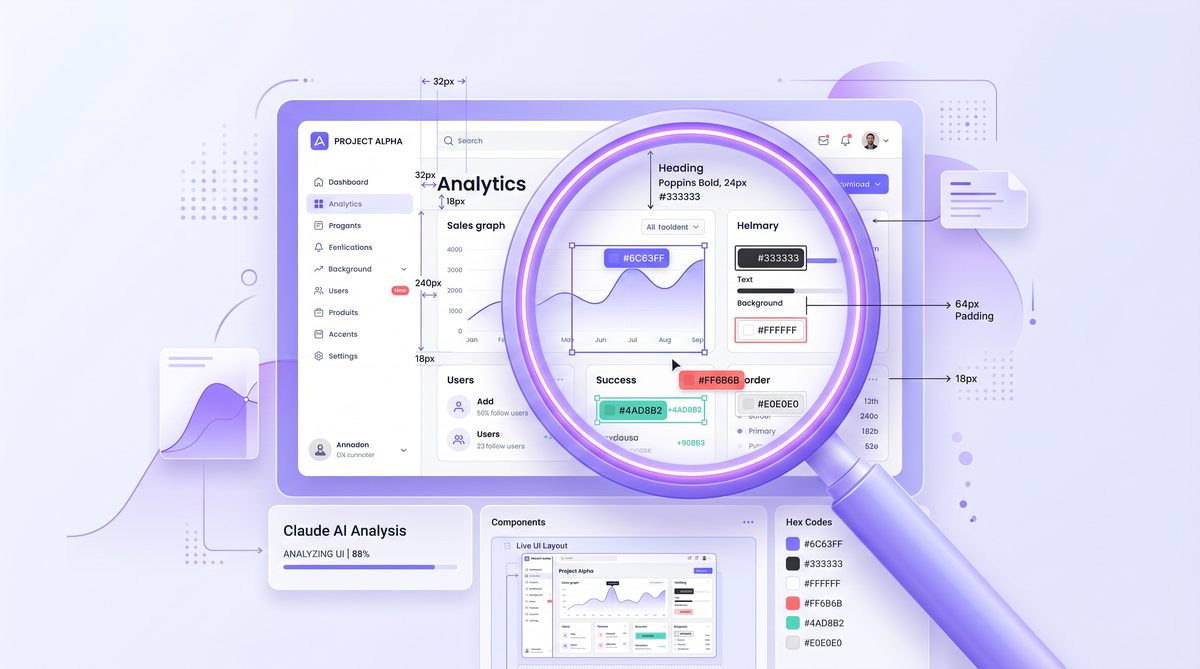
- Element Detection: The vision system identifies discrete UI elements such as buttons, text fields, dropdowns, labels, icons, and containers within a design screenshot or image.
- Layout Parsing: It reconstructs layout hierarchies and spatial relationships, understanding how components nest and align within screens.
- Style Extraction: Colors, typography, shadows, borders, spacing, and other style attributes are extracted to ensure the generated components visually match the original design.
- Interaction Mapping: Where applicable, static components are mapped to their prospective behaviors (e.g., click events on buttons) or markers for interaction logic.
This workflow dramatically reduces manual front-end development and brings us closer to instantaneous design-to-prototype conversions, fostering rapid product iteration and agile development cycles.
However, while the vision model excels in many respects, some limitations persist. Designs with heavy overlapping layers, ambiguous iconography, or highly customized styles may require manual corrections post-conversion. Understanding these boundaries upfront will help you optimize your preprocessing and post-processing efforts effectively.
2. Preparing Your Environment for Claude Opus 4.7
2.1 System Requirements and Dependencies
To ensure smooth installation and operation of Claude Opus 4.7, it is critical to meet the hardware and software prerequisites:
| Category | Minimum Requirements | Recommended |
|---|---|---|
| Operating System | Windows 10 / macOS 10.14+ / Ubuntu 18.04+ | Ubuntu 20.04 LTS or latest macOS Big Sur+ |
| Processor | Intel i5 equivalent | Intel i7 / AMD Ryzen 7 or better |
| RAM | 8 GB | 16+ GB |
| GPU (Optional) | Not mandatory but beneficial | NVIDIA RTX 2060 or higher (for accelerated image processing) |
| Python Version | Python 3.8+ | Python 3.10+ |
| Node.js Version | Node.js 14+ | Node.js 16+ |
Beyond system specs, ensure essential libraries and SDKs are installed:
pip: for Python package managementnpmoryarn: for JavaScript package managementrequests,numpy,Pillow: image processing dependenciesclaude-opus-sdk(official SDK for API integration)Reactand associated dependencies for front-end development (Case Study: How Bun Uses ‘Robobun’ AI to Automate Regression Testing with Claude Code)
2.2 Installing Claude Opus 4.7
Follow these steps to download and install Claude Opus 4.7:
- Download the SDK and CLI Tools: Obtain the latest release from the official GitHub repository or the official Anthropic portal:
- Install Python SDK: Execute in your terminal:
pip install claude-opus-sdk==4.7.0 - Install CLI Tool: Alternatively, for CLI interaction:
npm install -g [email protected] - Verify Installation: Check the installed version:
claude-opus --versionExpected output:
claude-opus-cli 4.7.0
If you encounter permission errors on Linux or macOS, prepend sudo to the install commands or use virtual environments.
2.3 Setting Up API Access and Authentication
Access to Claude Opus services requires authentication through an API key. Follow these steps:
- Register an Account: Create an account at the official Anthropic developer portal if you haven’t already.
- Generate API Key: Navigate to the API settings page and generate a new secure key.
- Configure Environment Variables: It’s recommended to store your API key in environment variables to safeguard it. For Linux/macOS, add to
~/.bashrcor~/.zshrc:export CLAUDE_OPUS_API_KEY="your_api_key_here"For Windows PowerShell:
setx CLAUDE_OPUS_API_KEY "your_api_key_here" - Configure SDK or CLI: The SDK automatically picks up the environment variable; alternatively, you can specify explicitly in configuration files or API clients.
- Test Connectivity: Run a test request to verify:
claude-opus pingExpected response:
API Connection Successful
2.4 Integrating with Your IDE
A productive development environment significantly accelerates your workflow. Here are recommendations:
- Editors: Visual Studio Code (VSCode) and JetBrains WebStorm are both excellent choices.
- Plug-ins and Extensions:
- Install the Claude Opus SDK Extension (available in VSCode Marketplace) to enable autocomplete, inline code suggestions, and API request templates.
- Enable ESLint and Prettier for code style enforcement and formatting.
- Setting Up Autocomplete: Configure your editor to recognize the Claude Opus SDK namespace by updating
jsconfig.jsonortsconfig.json, facilitating seamless API method completions. - Debugging Support: Use built-in debuggers to step through your React component generation scripts.
With your environment fully prepared, you are now ready to begin working with design assets for AI-based UI extraction.
3. Preparing Figma Designs and Screenshots for Claude Opus Analysis
3.1 Exporting Figma Designs Correctly
Figma is a leading design tool used to create UI/UX prototypes. Exporting designs with the proper settings is critical for Claude Opus’ vision model to successfully analyze and parse visual information. Here are the key considerations:
- Supported File Formats:
PNGandJPEGare widely supported. PNG is preferred for lossless compression and preserving transparency.SVGfiles can be used but may present challenges for vision recognition if the SVG contains complex embedded vectors that don’t render pixel-perfect.
- Resolution and Quality: Export at high resolutions (preferably matching or exceeding 1920×1080). Higher-resolution images ensure the 3.75 megapixel threshold is utilized effectively.
- Isolate Components: When possible, export individual UI components or smaller screen sections instead of entire pages. This isolation reduces noise and improves element recognition accuracy.
- Compression Settings: Avoid aggressive compression or quality reduction that could distort edges or typography.
- Figma Export Settings Step-by-Step:
- Select layer(s) or frame to export.
- Open the right-hand properties panel.
- Define export format as PNG or JPEG.
- Set scale factor to 2x or 3x for high-res output.
- Click “Export” and save files accordingly.
3.2 Capturing Screenshots for Prototyping
In addition to exported files, capturing live screenshots of designs or prototype views can be valuable:
- Focus and Clarity: Ensure screenshots focus on the UI sections of interest without extraneous desktop elements.
- Screenshots Tools:
- macOS: Use
Cmd + Shift + 4for selective capture. - Windows: Use Snipping Tool or
Win + Shift + S. - Third-party: Tools like ShareX or Greenshot provide advanced capturing options.
- macOS: Use
- Avoid Common Pitfalls:
- Minimize window shadows and drop shadows that interfere with edge detection.
- Remove cursor from the screenshot; it can be mistakenly interpreted as a UI element.
- Disable annotations, grid overlays, or developer tool panels.
3.3 Organizing Assets for Batch Processing
For projects involving multiple screens or components, organizing visual assets systematically is vital:
- Naming Conventions: Use consistent naming to reflect contents and order, such as
login-screen-v1.png,[email protected], orprofile-overview-desktop.jpeg. - Folder Structure: Separate assets by project, screen types, or interaction states for easier reference. For example:
/assets/figma_exports//assets/screenshots//assets/icons/
- Metadata and Annotations: Although Claude Opus mainly relies on visual data, maintaining a JSON or CSV file documenting asset context, design version, and notes can assist downstream tooling.
- Batch Upload Optimization: Group files logically to reduce API request overhead and improve throughput during vision processing.
Proper preparation of your design visuals ensures the AI system receives the highest quality inputs, which directly impacts the fidelity and usability of the generated React components.
4. Utilizing Claude Opus 4.7 Vision for UI Extraction
4.1 Uploading and Feeding Images into Claude Opus
Claude Opus provides multiple ways to supply visual inputs for analysis through its API and CLI tools:
- API Image Input: Use the official Python SDK or REST API to send images as multipart form-data or base64 encoded payloads. Example using Python SDK:
from claude_opus_sdk import ClaudeOpusClient client = ClaudeOpusClient() with open('login-screen.png', 'rb') as image_file: response = client.vision.analyze_image(image_file.read()) print(response) - CLI Dashboard or Upload: The CLI tool supports image uploads via command line:
claude-opus vision analyze --image ./screenshots/login-screen.pngAlternatively, the web dashboard interface offers drag-and-drop upload functionality.
- Batch Processing: For multiple images, scripts can iterate over directories, invoking API calls programmatically, respecting rate limits.
4.2 Running Vision Analysis on Figma Screenshots
Once images are uploaded, initiate vision analysis with these steps:
- Invoke Analysis Endpoint: Select relevant parameters such as UI recognition context, element detection, and output verbosity.
- Monitor Processing: Real-time tracking is possible via CLI logs or dashboard progress bars.
- Review Output Format: Typically, the system returns a hierarchical JSON object describing the UI component tree. Example snippet:
{ "components": [ { "type": "button", "position": { "x": 50, "y": 120 }, "size": { "width": 140, "height": 40 }, "styles": { "backgroundColor": "#007bff", "borderRadius": "4px", "fontSize": "14px" }, "text": "Log In" }, ... ] } - Handling Multi-Screen Inputs: When providing images containing multiple screens or dynamic states, segment outputs by screen or component ID if metadata is supplied.
4.3 Interpreting Vision Outputs for Coding
The structured vision outputs can be mapped to UI primitives in React or other frameworks. Key points:
- Element Mapping: Buttons map to
<button>, text fields to<input />or<textarea>, icons to<img>or SVG components, and containers to<div>or layout components. - Style Extraction: Use style attributes to generate inline styles, CSS modules, or styled-components definitions. Colors, fonts, spacings, and borders can be programmatically extracted.
- Layout Considerations: Positioning info can inform flexbox or grid layout strategies, although absolute pixel positioning is typically converted to relative layouts for responsiveness.
- Debugging: Review the output JSON in raw and visualized form. Confirm all critical components are detected, and investigate mismatches via image annotations or feedback loops.
Successful interpretation of the vision outputs lays the foundation for automated code generation and seamless developer integration.
Advanced Prompt Engineering Frameworks for 2026: RTF, CREATE, Chain-of-Thought, ReAct, and DSPy
5. Generating Functional React Components from Vision Outputs
5.1 Setting Up Your React Project
Create a modern React environment tailored for integrating AI-generated components:
- Recommended Starter Kits:
- Create React App (CRA) – Simple and widely used for quick prototypes.
- Vite – Fast bundler and dev environment with hot module replacement.
- Next.js – For more complex applications with server-side rendering support.
- Install Dependencies: Alongside React, consider installing:
styled-componentsoremotionfor CSS-in-JS stylingprop-typesfor runtime props validation- TypeScript for type safety (optional but recommended)
5.2 Converting Claude Opus Output to JSX
Parsing and transforming the JSON vision output into JSX components can be achieved via utility scripts:
- Parsing the Payload: Use JSON parsers to read the AI output and generate internal representations.
- Component Generators: Write functions that map each detected element type into corresponding React elements. For example:
function generateButtonJSX(component) { return ( <button key={component.id} style= > {component.text} </button> ); } - Handling Containers and Layouts: Recursively generate JSX trees reflecting component nesting and positioning.
- SDKs and Tools: If available, use the official Claude Opus SDK conversion utilities to speed up the process.
A sample JSX snippet for a text input element might look like:
<input
  type="text"
  defaultText={component.defaultText || ''}
  style=
  onChange={handleInputChange}
/>
5.3 Styling Components Consistently
Styling is vital to maintaining the visual parity between the original design and the generated UI. Approaches include:
- Extracted CSS-in-JS: Convert style attributes into
styled-componentsdefinitions or inline style objects. - Responsive Design: Translate fixed pixel values into relative units (%, em, rem) or apply media queries to support multiple screen sizes.
- Theming: Use design tokens derived from color palettes and fonts to maintain consistency across components.
- Utility Classes: Alternatively, generate Tailwind CSS utility classes based on extracted style properties.
5.4 Incorporating Interactivity and State
Static components become truly functional when augmented with interactivity and state management:
- Event Handlers: Add basic events such as
onClickfor buttons,onChangefor inputs, andonFocuswhere appropriate. - State Management: Utilize React’s
useStateto handle controlled components, for example, form inputs with immediate state reflection. - Advanced Interaction: Enable toggles, expandable menus, or conditional rendering based on user inputs and navigation.
Example:
const [inputValue, setInputValue] = React.useState('');

const handleInputChange = (e) => {
  setInputValue(e.target.value);
};

<input value={inputValue} onChange={handleInputChange} />
5.5 Building a Reusable Component Library
To ensure scalability and maintainability, modularize your components by following industry best practices:
- Folder Structure:
src/ components/ Button/ Button.jsx Button.styles.js Button.test.js Input/ Input.jsx Input.styles.js Input.test.js - Naming Conventions: Use PascalCase for components and lower camelCase for props to maintain consistency.
- Documentation: Include JSDoc comments and README files to document component interfaces and usage.
- Testing: Write unit and integration tests to ensure components behave predictably across updates.
By encapsulating design elements as reusable React components, you tremendously enhance development efficiency and foster design system alignment.
Claude for Small Business: Complete Guide to 15 Agentic Workflows
6. Best Practices, Optimization Tips, and Troubleshooting
6.1 Ensuring Accuracy in Vision Recognition
Maximizing accuracy from Claude Opus 4.7 depends on both input quality and smart usage:
- Clean Design Inputs: Avoid clutter, overlapping UI elements, or excessive shadows that can confuse the vision model.
- Consistent Design Patterns: Use standard UI elements familiar to the model, such as conventional button shapes or text inputs.
- Design Constraints: Lock layout grids and alignments in Figma to provide structural consistency, enhancing element detection.
- Preprocessing: Crop or mask irrelevant areas from images before analysis.
6.2 Optimizing React Code Output
Automatically generated code may require optimization to meet production standards:
- Remove Redundancies: Delete unnecessary wrappers, duplicate styles, or inline overrides that conflict with theme files.
- Code Formatting: Automate with tools like
PrettierandESLintfor consistent style and error detection. - Performance: Replace fixed pixel values with responsive units to improve adaptability.
- Component Granularity: Consolidate overly fragmented components where appropriate to balance readability and reusability.
6.3 Common Issues and How to Fix Them
| Issue | Possible Cause | Resolution |
|---|---|---|
| Missing UI Components | Overlapping layers or low-contrast elements | Preprocess images to separate layers, enhancing contrast, or manually add missing elements post conversion |
| Styling Mismatches | Incorrect extraction of colors or fonts | Adjust export quality or supplement with manual CSS overrides |
| Layout Shifts in React App | Use of absolute positioning in design | Refactor code to flexbox/grid; convert fixed sizes to responsive units |
| API Connection Errors | Incorrect API key or network issues | Verify environment variables, test network, and retry with valid credentials |
6.4 Leveraging Feedback Loops for Improvement
Iterative improvement of design-to-code fidelity involves feedback mechanisms:
- Manual Adjustments: Post-process outputs by tweaking JSX or styles, then feed corrections back as annotations or metadata to refine future parsing.
- Fine-tuning Models: While Claude Opus primarily operates as a managed service, certain configurations or enterprise options may allow dataset adjustment to suit specific design languages.
- Collaboration: Engage design and development teams to provide contextual inputs, ensuring the AI-generated components match evolving requirements.
Conclusion
In this extensive tutorial, we covered the end-to-end process of setting up Claude Opus 4.7 for design prototyping and leveraging its upgraded vision capabilities to transform Figma designs and screenshots into functional React components.
Starting with an understanding of the platform’s groundbreaking 3.75 megapixel vision model enhancements, we walked through setting up both local and cloud environments, followed by best practices for exporting and preparing design assets for optimal AI recognition. We then delved into executing vision analysis, interpreting outputs, and systematically converting these into clean, interactive React components, complete with consistent styling and state management.
Finally, we discussed best practices to maximize accuracy, optimize generated code, troubleshoot common issues, and implement feedback loops for continuous improvement. Armed with this knowledge, developers, and designers can significantly accelerate their prototyping workflows, reduce manual errors, and foster tighter collaboration between visual and code teams.
We encourage readers to experiment with Claude Opus 4.7 in real projects, iterate on the outputs, and contribute to advancing the AI-assisted design-to-code paradigm. The future of UI development is increasingly AI-augmented, and mastering these tools today offers a competitive edge tomorrow.
Access 40,000+ AI Prompts for ChatGPT, Claude & Codex — Free!
Subscribe to get instant access to our complete Notion Prompt Library — the largest curated collection of prompts for ChatGPT, Claude, OpenAI Codex, and other leading AI models. Optimized for real-world workflows across coding, research, content creation, and business.
Useful Links
- Claude Opus Official Homepage
- Figma Developer API Documentation
- React Official Documentation
- styled-components Documentation
- ESLint – Pluggable JavaScript Linter
- Prettier – Code Formatter
- Vite – Next Generation Frontend Tooling
- MDN Web Docs – Canvas API for Image Processing
- Claude Opus GitHub SDK Repository